入门
如果您尚未设置项目,请转到快速开始指南启动并运行。 您还可以查看我们的API参考有关我们的SDK的更多详细信息。
Parse平台为您的移动应用程序提供完整的后端解决方案。 我们的目标是完全消除编写服务器代码或维护服务器的需要。
我们的JavaScript SDK最初基于流行的Backbone.js框架,但它提供了灵活的API,允许它与您喜欢的JS库配对。 我们的目标是最小化配置,让您快速开始在Parse上构建JavaScript和HTML5应用程序。
我们的SDK支持Firefox 23+,Chrome 17+,Safari 5+和IE 10.只有使用HTTPS托管的应用程序才支持IE 9。
要用Javascript初始化你自己的Parse-Server,你应该用这个替换你当前的初始化代码
Parse.initialize("YOUR_APP_ID");
Parse.serverURL = 'http://YOUR_PARSE_SERVER:1337/parse'
对象
Parse.Object
在Parse中存储数据是围绕Parse.Object构建的。 每个Parse.Object包含JSON兼容数据的键值对。 此数据是无模式的,这意味着您不需要提前在每个Parse.Object上存在什么键。 你只需设置你想要的键值对,我们的后端会存储它。
例如,假设您要跟踪游戏的高分。 单个Parse.Object可以包含:
score: 1337, playerName: "Sean Plott", cheatMode: false
键必须是字母数字字符串。 值可以是字符串,数字,布尔值,甚至数组和字典 - 任何可以JSON编码的东西。
每个Parse.Object是一个具有类名的特定子类的实例,您可以使用它来区分不同类型的数据。 例如,我们可以将高分对象称为GameScore。 我们建议你NameYourClassesLikeThis和nameYourKeysLikeThis,只是为了保持你的代码看起来漂亮。
要创建一个新的子类,使用Parse.Object.extend方法。 任何Parse.Query将返回任何具有相同类名的Parse.Object的新类的实例。 如果你熟悉Backbone.Model,那么你已经知道如何使用Parse.Object。 它的设计是以相同的方式创建和修改。
// Simple syntax to create a new subclass of Parse.Object.
var GameScore = Parse.Object.extend("GameScore");

// Create a new instance of that class.
var gameScore = new GameScore();

// Alternatively, you can use the typical Backbone syntax.
var Achievement = Parse.Object.extend({
  className: "Achievement"
});
您可以向Parse.Object的子类添加其他方法和属性。
// A complex subclass of Parse.Object
var Monster = Parse.Object.extend("Monster", {
  // Instance methods
  hasSuperHumanStrength: function () {
    return this.get("strength") > 18;
  },
  // Instance properties go in an initialize method
  initialize: function (attrs, options) {
    this.sound = "Rawr"
  }
}, {
  // Class methods
  spawn: function(strength) {
    var monster = new Monster();
    monster.set("strength", strength);
    return monster;
  }
});

var monster = Monster.spawn(200);
alert(monster.get('strength'));  // Displays 200.
alert(monster.sound); // Displays Rawr.
要创建任何Parse Object类的单个实例,您还可以直接使用Parse.Object构造函数。 new Parse.Objec(className)将创建一个具有该类名的单个Parse对象。
如果你已经在你的代码库中使用ES6,好消息! 从1.6.0开始,JavaScript SDK与ES6类兼容。 你可以用extend关键字来继承Parse.Object:
class Monster extends Parse.Object {
  constructor() {
    // Pass the ClassName to the Parse.Object constructor
    super('Monster');
    // All other initialization
    this.sound = 'Rawr';
  }

  hasSuperHumanStrength() {
    return this.get('strength') > 18;
  }

  static spawn(strength) {
    var monster = new Monster();
    monster.set('strength', strength);
    return monster;
  }
}
但是,当使用extend时,SDK不会自动知道你的子类。 如果你想要从查询返回的对象使用你的子类Parse.Object,你将需要注册子类,类似于我们在其他平台上做的。
// After specifying the Monster subclass...
Parse.Object.registerSubclass('Monster', Monster);
保存对象
假设你想把上面描述的GameScore保存到Parse Cloud中。 该接口类似于一个Backbone.Model,包括save方法:
var GameScore = Parse.Object.extend("GameScore");
var gameScore = new GameScore();

gameScore.set("score", 1337);
gameScore.set("playerName", "Sean Plott");
gameScore.set("cheatMode", false);

gameScore.save(null, {
  success: function(gameScore) {
    // Execute any logic that should take place after the object is saved.
    alert('New object created with objectId: ' + gameScore.id);
  },
  error: function(gameScore, error) {
    // Execute any logic that should take place if the save fails.
    // error is a Parse.Error with an error code and message.
    alert('Failed to create new object, with error code: ' + error.message);
  }
});
在这段代码运行后,你可能会想知道是否真的发生了。 为了确保数据已保存,您可以在Parse的应用程序中查看数据浏览器。 你应该看到这样的:
objectId: "xWMyZ4YEGZ", score: 1337, playerName: "Sean Plott", cheatMode: false,
createdAt:"2011-06-10T18:33:42Z", updatedAt:"2011-06-10T18:33:42Z"
这里有两件事要注意。 在运行此代码之前,您不必配置或设置一个名为GameScore的新类。 你的Parse应用程序懒洋洋地为你创建这个类,当它第一次遇到它。
还有一些字段,您不需要指定为方便提供。 objectId是每个保存对象的唯一标识符。 createdAt和updatedAt表示每个对象在云中创建和最后修改的时间。 这些字段中的每一个都由Parse填充,因此在保存操作完成之前,它们不存在于Parse.Object中。
如果你喜欢,你可以直接在调用中设置属性save。
var GameScore = Parse.Object.extend("GameScore");
var gameScore = new GameScore();

gameScore.save({
  score: 1337,
  playerName: "Sean Plott",
  cheatMode: false
}, {
  success: function(gameScore) {
    // The object was saved successfully.
  },
  error: function(gameScore, error) {
    // The save failed.
    // error is a Parse.Error with an error code and message.
  }
});
获取对象
将数据保存到云是很有趣,但它再更有趣的数据。 如果你有objectId,你可以使用Parse.Query检索整个Parse.Object:
var GameScore = Parse.Object.extend("GameScore");
var query = new Parse.Query(GameScore);
query.get("xWMyZ4YEGZ", {
  success: function(gameScore) {
    // The object was retrieved successfully.
  },
  error: function(object, error) {
    // The object was not retrieved successfully.
    // error is a Parse.Error with an error code and message.
  }
});
要从Parse.Object获取值,使用get方法。
var score = gameScore.get("score");
var playerName = gameScore.get("playerName");
var cheatMode = gameScore.get("cheatMode");
三个特殊的保留值作为属性提供,不能使用get方法检索,也不能使用set方法修改:
var objectId = gameScore.id;
var updatedAt = gameScore.updatedAt;
var createdAt = gameScore.createdAt;
如果你需要刷新一个已经拥有最新数据的对象
在Parse Cloud中,您可以调用fetch方法,如下所示:
myObject.fetch({
  success: function(myObject) {
    // The object was refreshed successfully.
  },
  error: function(myObject, error) {
    // The object was not refreshed successfully.
    // error is a Parse.Error with an error code and message.
  }
});
更新对象
更新对象很简单。 只需在其上设置一些新数据,并调用保存方法。 例如:
// Create the object.
var GameScore = Parse.Object.extend("GameScore");
var gameScore = new GameScore();

gameScore.set("score", 1337);
gameScore.set("playerName", "Sean Plott");
gameScore.set("cheatMode", false);
gameScore.set("skills", ["pwnage", "flying"]);

gameScore.save(null, {
  success: function(gameScore) {
    // Now let's update it with some new data. In this case, only cheatMode and score
    // will get sent to the cloud. playerName hasn't changed.
    gameScore.set("cheatMode", true);
    gameScore.set("score", 1338);
    gameScore.save();
  }
});
解析自动计算出哪些数据已更改,因此只有”垃圾”字段将发送到解析云。 你不需要担心压缩你不想更新的数据。
计数器
上面的例子包含一个常见的用例。 score字段是一个计数器,我们需要持续更新玩家的最新得分。 使用上面的方法工作,但它是繁琐的,如果有多个客户端尝试更新相同的计数器,可能会导致问题。
为了帮助存储计数器类型数据,Parse提供了原子地增加(或减少)任何数字字段的方法。 因此,相同的更新可以重写为:
gameScore.increment("score");
gameScore.save();
你也可以通过传递第二个参数到increment来增加任何数量。 当未指定数量时,默认使用1。
数组
为了帮助存储数组数据,有三个操作可用于原子地改变与给定键相关联的数组:
add将给定的对象附加到数组字段的末尾。addUnique只有在给定对象尚未包含在数组字段中时才添加该对象。 不保证插入件的位置。remove从数组字段中删除给定对象的所有实例。
例如,我们可以添加项目到类似set的”技能”字段,如:
gameScore.addUnique("skills", "flying");
gameScore.addUnique("skills", "kungfu");
gameScore.save();
注意,当前不可能在同一保存中从数组中原子地添加和删除项目。 你必须在每种不同类型的数组操作之间调用save。
销毁对象
从云中删除对象:
myObject.destroy({
  success: function(myObject) {
    // The object was deleted from the Parse Cloud.
  },
  error: function(myObject, error) {
    // The delete failed.
    // error is a Parse.Error with an error code and message.
  }
});
您可以使用unset方法从对象中删除单个字段:
// After this, the playerName field will be empty
myObject.unset("playerName");

// Saves the field deletion to the Parse Cloud.
// If the object's field is an array, call save() after every unset() operation.
myObject.save();
请注意,不建议使用object.set(null)从对象中删除字段,这将导致意外的功能。
关系数据
对象可以具有与其他对象的关系。 例如,在博客应用程序中,Post对象可能有许多Comment对象。 Parse支持所有类型的关系,包括一对一,一对多和多对多。
一对一和一对多关系
一对一和一对多关系通过将Parse.Object保存为另一个对象中的值来建模。 例如,博客应用中的每个Comment可能对应一个Post。
要创建一个带有Comment的Post,你可以这样写:
// Declare the types.
var Post = Parse.Object.extend("Post");
var Comment = Parse.Object.extend("Comment");

// Create the post
var myPost = new Post();
myPost.set("title", "I'm Hungry");
myPost.set("content", "Where should we go for lunch?");

// Create the comment
var myComment = new Comment();
myComment.set("content", "Let's do Sushirrito.");

// Add the post as a value in the comment
myComment.set("parent", myPost);

// This will save both myPost and myComment
myComment.save();
在内部,Parse框架将在一个地方存储引用对象,以保持一致性。 你也可以使用它们的objectId来链接对象,像这样:
var post = new Post();
post.id = "1zEcyElZ80";

myComment.set("parent", post);
默认情况下,当提取对象时,不会提取相关的Parse.Object。 在获取这些对象的值之前,无法检索这些值:
var post = fetchedComment.get("parent");
post.fetch({
  success: function(post) {
    var title = post.get("title");
  }
});
多对多关系
多对多关系使用Parse.Relation建模。 这类似于在一个键中存储一个Parse.Objects数组,除了你不需要同时获取关系中的所有对象。 此外,这允许Parse.Relation扩展到比Parse.Object方法的数组更多的对象。 例如,一个User可能有很多Posts,她可能会喜欢。 在这种情况下,你可以存储User喜欢使用关系的Posts的集合。 为了在User的likes列表中添加一个Post,你可以这样做:
var user = Parse.User.current();
var relation = user.relation("likes");
relation.add(post);
user.save();
你可以从Parse.Relation中删除一个帖子:
relation.remove(post);
user.save();
在调用save之前,你可以多次调用add和remove
relation.remove(post1);
relation.remove(post2);
user.save();
你也可以把一个Parse.Object数组传递给add和remove:
relation.add([post1, post2, post3]);
user.save();
默认情况下,不会下载此关系中的对象列表。 您可以通过使用query返回的Parse.Query获取用户喜欢的帖子的列表。 代码如下所示:
relation.query().find({
  success: function(list) {
    // list contains the posts that the current user likes.
  }
});
如果你只想要一个子集的帖子,你可以添加额外的约束到Parse.Query通过查询返回如下:
var query = relation.query();
query.equalTo("title", "I'm Hungry");
query.find({
  success:function(list) {
    // list contains post liked by the current user which have the title "I'm Hungry".
  }
});
有关Parse.Query的更多细节,请查看本指南的查询部分。 Parse.Relation的行为类似于Parse.Object的数组,用于查询目的,所以任何查询你可以做一个对象数组,你可以做一个Parse.Relation。
数据类型
到目前为止,我们使用类型为String,Number和Parse.Object的值。 Parse还支持Dates和null。 你可以嵌套JSON对象和JSON数组来存储更多的结构化数据在一个Parse.Object中。 总的来说,对象中的每个字段都允许使用以下类型:
- String =>
String - Number =>
Number - Bool =>
bool - Array =>
JSON Array - Object =>
JSON Object - Date =>
Date - File =>
Parse.File - Pointer => other
Parse.Object - Relation =>
Parse.Relation - Null =>
null
一些例子:
var number = 42;
var bool = false;
var string = "the number is " + number;
var date = new Date();
var array = [string, number];
var object = { number: number, string: string };
var pointer = MyClassName.createWithoutData(objectId);

var BigObject = Parse.Object.extend("BigObject");
var bigObject = new BigObject();
bigObject.set("myNumber", number);
bigObject.set("myBool", bool);
bigObject.set("myString", string);
bigObject.set("myDate", date);
bigObject.set("myArray", array);
bigObject.set("myObject", object);
bigObject.set("anyKey", null); // this value can only be saved to an existing key
bigObject.set("myPointerKey", pointer); // shows up as Pointer <MyClassName> in the Data Browser
bigObject.save();
我们不建议在Parse.Object上存储大型二进制数据,如图像或文档。 Parse.Objects的大小不应超过128字节。 我们建议您使用Parse.Files来存储图像,文档和其他类型的文件。 您可以通过实例化一个Parse.File对象并将其设置在字段上来实现。 有关详细信息,请参阅文件。
有关Parse如何处理数据的更多信息,请查看我们关于数据的文档。
查询
我们已经看到一个Parse.Query与get可以从Parse中检索一个Parse.Object。
还有很多其他方法来使用Parse.Query检索数据 - 你可以一次检索多个对象,在你想要检索的对象上放置条件,等等。
基本查询
在许多情况下,get不够强大,无法指定要检索的对象。 Parse.Query提供了不同的方法来检索对象列表,而不仅仅是一个对象。
一般的模式是创建一个Parse.Query,放置条件,然后使用find检索一个Array匹配Parse.Objects。 例如,要检索具有特定playerName的分数,请使用equalTo方法来约束键的值。
var GameScore = Parse.Object.extend("GameScore");
var query = new Parse.Query(GameScore);
query.equalTo("playerName", "Dan Stemkoski");
query.find({
  success: function(results) {
    alert("Successfully retrieved " + results.length + " scores.");
    // Do something with the returned Parse.Object values
    for (var i = 0; i < results.length; i++) {
      var object = results[i];
      alert(object.id + ' - ' + object.get('playerName'));
    }
  },
  error: function(error) {
    alert("Error: " + error.code + " " + error.message);
  }
});
查询约束
有几种方法可以对Parse.Query找到的对象设置约束。 您可以使用notEqualTo过滤掉带有特定键值对的对象:
query.notEqualTo("playerName", "Michael Yabuti");
您可以给出多个约束,并且只有在对象匹配所有约束时,对象才会在结果中。 换句话说,它就像一个约束的AND。
query.notEqualTo("playerName", "Michael Yabuti");
query.greaterThan("playerAge", 18);
你可以通过设置limit来限制结果的数量。 默认情况下,结果限制为100,但1到1000之间的任何值都是有效的限制:
query.limit(10); // limit to at most 10 results
如果你想要一个结果,一个更方便的替代方法可能是使用first而不是使用find。
var GameScore = Parse.Object.extend("GameScore");
var query = new Parse.Query(GameScore);
query.equalTo("playerEmail", "dstemkoski@example.com");
query.first({
  success: function(object) {
    // Successfully retrieved the object.
  },
  error: function(error) {
    alert("Error: " + error.code + " " + error.message);
  }
});
你可以通过设置skip来跳过第一个结果。 这对分页很有用:
query.skip(10); // skip the first 10 results
对于可排序类型(如数字和字符串),您可以控制返回结果的顺序:
// Sorts the results in ascending order by the score field
query.ascending("score");

// Sorts the results in descending order by the score field
query.descending("score");
对于可排序类型,您还可以在查询中使用比较:
// Restricts to wins < 50
query.lessThan("wins", 50);

// Restricts to wins <= 50
query.lessThanOrEqualTo("wins", 50);

// Restricts to wins > 50
query.greaterThan("wins", 50);

// Restricts to wins >= 50
query.greaterThanOrEqualTo("wins", 50);
如果要检索与值列表中的任何值匹配的对象,可以使用containedIn,提供可接受值的数组。
这通常用于用单个查询替换多个查询。 例如,如果您要检索特定列表中任何播放器所做的评分:
// Finds scores from any of Jonathan, Dario, or Shawn
query.containedIn("playerName",
                  ["Jonathan Walsh", "Dario Wunsch", "Shawn Simon"]);
如果要检索不匹配任何几个值的对象,可以使用notContainedIn,提供一个可接受值的数组。
例如,如果您要从列表中除了那些播放器之外的播放器检索分数:
// Finds scores from anyone who is neither Jonathan, Dario, nor Shawn
query.notContainedIn("playerName",
                     ["Jonathan Walsh", "Dario Wunsch", "Shawn Simon"]);
如果要检索具有特定键集的对象,可以使用exists。 相反,如果你想检索没有特定键集合的对象,你可以使用doesNotExist。
// Finds objects that have the score set
query.exists("score");

// Finds objects that don't have the score set
query.doesNotExist("score");
您可以使用matchesKeyInQuery方法获取对象,其中键与来自另一个查询的一组对象中的键的值匹配。 例如,如果您有一个包含运动队的类,并且您在用户类中存储了用户的家乡,则可以发出一个查询以查找其家乡球队有获胜记录的用户列表。 查询将如下所示:
var Team = Parse.Object.extend("Team");
var teamQuery = new Parse.Query(Team);
teamQuery.greaterThan("winPct", 0.5);
var userQuery = new Parse.Query(Parse.User);
userQuery.matchesKeyInQuery("hometown", "city", teamQuery);
userQuery.find({
  success: function(results) {
    // results has the list of users with a hometown team with a winning record
  }
});
相反,要获取对象,其中的键不匹配从另一个查询产生的一组对象中的键的值,请使用doesNotMatchKeyInQuery。
例如,要查找其家乡团队失去记录的用户:
var losingUserQuery = new Parse.Query(Parse.User);
losingUserQuery.doesNotMatchKeyInQuery("hometown", "city", teamQuery);
losingUserQuery.find({
  success: function(results) {
    // results has the list of users with a hometown team with a losing record
  }
});
您可以通过使用键列表调用select来限制返回的字段。
要检索只包含score'和playerName字段(以及特殊的内置字段,如objectId,createdAt和updatedAt)的文档:
<!-- You can restrict the fields returned by calling select with a list of keys. To retrieve documents that contain only the score and playerName fields (and also special built-in fields such as objectId, createdAt, and updatedAt`): –>
var GameScore = Parse.Object.extend("GameScore");
var query = new Parse.Query(GameScore);
query.select("score", "playerName");
query.find().then(function(results) {
  // each of results will only have the selected fields available.
});
剩余的字段可以稍后通过在返回的对象上调用fetch来获取:
query.first().then(function(result) {
  // only the selected fields of the object will now be available here.
  return result.fetch();
}).then(function(result) {
  // all fields of the object will now be available here.
});
数组值查询
对于数组类型的键,可以通过以下方式查找键的数组值包含2的对象:
// Find objects where the array in arrayKey contains 2.
query.equalTo("arrayKey", 2);
您还可以找到对象的键的数组值包含每个元素2,3和4的对象,其中包含以下内容:
// Find objects where the array in arrayKey contains all of the elements 2, 3, and 4.
query.containsAll("arrayKey", [2, 3, 4]);
对字符串值的查询
使用startsWith限制以特定字符串开头的字符串值。 类似于MySQL LIKE操作符,它是索引的,因此对于大型数据集是有效的:
// Finds barbecue sauces that start with "Big Daddy's".
var query = new Parse.Query(BarbecueSauce);
query.startsWith("name", "Big Daddy's");
上面的例子将匹配任何BarbecueSauce对象,其中name字符串键中的值以Big Daddy's开头。
例如,”Big Daddy’s”和”Big Daddy’s BBQ” 将匹配,但”big daddy’s”或”BBQ Sauce: Big Daddy’s”不会。
有正则表达式约束的查询非常昂贵,尤其是对于具有超过100,000个记录的类。 解析限制在任何给定时间在特定应用程序上可以运行多少此类操作。
关系查询
有几种方法可以为关系数据发出查询。 如果要检索字段与特定Parse.Object匹配的对象,您可以使用equalTo,就像其他数据类型一样。 例如,如果每个Comment在它的post字段中有一个Post对象,你可以获取一个特定的Post的注释:
// Assume Parse.Object myPost was previously created.
var query = new Parse.Query(Comment);
query.equalTo("post", myPost);
query.find({
  success: function(comments) {
    // comments now contains the comments for myPost
  }
});
如果要检索字段包含与另一个查询匹配的Parse.Object的对象,可以使用matchesQuery。 请注意,默认限制100和最大限制1000也适用于内部查询,因此对于大型数据集,您可能需要仔细构造查询以获取所需的行为。
为了找到包含图片的帖子的评论,您可以:
var Post = Parse.Object.extend("Post");
var Comment = Parse.Object.extend("Comment");
var innerQuery = new Parse.Query(Post);
innerQuery.exists("image");
var query = new Parse.Query(Comment);
query.matchesQuery("post", innerQuery);
query.find({
  success: function(comments) {
    // comments now contains the comments for posts with images.
  }
});
如果你想检索一个字段包含一个不匹配不同查询的Parse.Object的对象,你可以使用doesNotMatchQuery。
为了找到没有图片的帖子的评论,您可以:
var Post = Parse.Object.extend("Post");
var Comment = Parse.Object.extend("Comment");
var innerQuery = new Parse.Query(Post);
innerQuery.exists("image");
var query = new Parse.Query(Comment);
query.doesNotMatchQuery("post", innerQuery);
query.find({
  success: function(comments) {
    // comments now contains the comments for posts without images.
  }
});
你也可以通过objectId做关系查询:
var post = new Post();
post.id = "1zEcyElZ80";
query.equalTo("post", post);
在某些情况下,您希望在一个查询中返回多种类型的相关对象。 你可以使用include方法。
例如,假设您要检索最后十条评论,并且想要同时检索其相关帖子:
var query = new Parse.Query(Comment);

// Retrieve the most recent ones
query.descending("createdAt");

// Only retrieve the last ten
query.limit(10);

// Include the post data with each comment
query.include("post");

query.find({
  success: function(comments) {
    // Comments now contains the last ten comments, and the "post" field
    // has been populated. For example:
    for (var i = 0; i < comments.length; i++) {
      // This does not require a network access.
      var post = comments[i].get("post");
    }
  }
});
你也可以做多级包括使用点符号。 如果你想包含评论的帖子和帖子的作者,你可以做:
query.include(["post.author"]);
您可以通过多次调用include来发出包含多个字段的查询。
这个功能也可以与Parse.Query帮助函数,如first和get。
计数对象
警告:计数查询的速率限制为每分钟最多160个请求。 它们还可以为具有超过1,000个对象的类返回不准确的结果。 因此,最好构建应用程序,以避免这种计数操作(例如使用计数器)。
如果你只需要计算有多少个对象匹配一个查询,但你不需要检索所有匹配的对象,你可以使用count而不是find。
例如,计算特定玩家已经玩了多少游戏:
var GameScore = Parse.Object.extend("GameScore");
var query = new Parse.Query(GameScore);
query.equalTo("playerName", "Sean Plott");
query.count({
  success: function(count) {
    // The count request succeeded. Show the count
    alert("Sean has played " + count + " games");
  },
  error: function(error) {
    // The request failed
  }
});
复合查询
如果要查找与几个查询中的一个匹配的对象,可以使用Parse.Query.or方法来构造一个查询,该查询是传入的查询的OR。
例如,如果您想查找具有 很多的胜利或几场胜利,你可以做:
var lotsOfWins = new Parse.Query("Player");
lotsOfWins.greaterThan("wins", 150);

var fewWins = new Parse.Query("Player");
fewWins.lessThan("wins", 5);

var mainQuery = Parse.Query.or(lotsOfWins, fewWins);
mainQuery.find({
  success: function(results) {
     // results contains a list of players that either have won a lot of games or won only a few games.
  },
  error: function(error) {
    // There was an error.
  }
});
您可以向新创建的Parse.Query添加附加约束,作为AND运算符。
注意,我们不支持GeoPoint或非过滤约束(例如near',withinGeoBox,limit,skip,ascending/descending,include) 复合查询。
<!-- Note that we do not, however, support GeoPoint or non-filtering constraints (e.g. near, withinGeoBox, limit, skip, ascending/descending, include`) in the subqueries of the compound query. –>
实时查询
标准API
正如我们在LiveQuery协议中讨论的,我们维护一个WebSocket连接来与Parse LiveQuery服务器通信。
当使用服务器端时,我们使用ws包,在浏览器中我们使用window.WebSocket。
我们认为在大多数情况下,没有必要直接处理WebSocket连接。
因此,我们开发了一个简单的API,让您专注于自己的业务逻辑。
注意:只能在Parse Server中使用JS SDK〜1.8来支持Live Queries.
创建订阅
let query = new Parse.Query('Game');
let subscription = query.subscribe();
您获得的订阅实际上是一个事件发射器。 有关事件发射器的更多信息,请选中这里。
你将通过这个subscription获得LiveQuery事件。 第一次调用subscribe时,我们将尝试为您打开与LiveQuery服务器的WebSocket连接。
事件处理
我们定义了通过订阅对象获得的几种类型的事件:
打开事件
subscription.on('open', () => {
 console.log('subscription opened');
});
当调用query.subscribe()时,我们向LiveQuery服务器发送一个订阅请求。
当我们从LiveQuery服务器获得确认时,将会发出此事件。
当客户端丢失与LiveQuery服务器的WebSocket连接时,我们将尝试自动重新连接LiveQuery服务器。
如果我们重新连接LiveQuery服务器并成功重新订阅ParseQuery,您还将获得此事件。
创建事件
subscription.on('create', (object) => {
  console.log('object created');
});
当一个新的ParseObject被创建并且它满足你所订阅的ParseQuery时,你会得到这个事件。
object是创建的ParseObject。
更新事件
subscription.on('update', (object) => {
  console.log('object updated');
});
当一个现有的ParseObject满足你的订阅ParseQuery被更新时(ParseObject在更改之前和之后满足ParseQuery),你将得到这个事件。
object是被更新的ParseObject。 它的内容是ParseObject的最新值。
输入事件
subscription.on('enter', (object) => {
  console.log('object entered');
});
当一个现有的ParseObject的旧值不满足ParseQuery,但它的新值满足ParseQuery,你会得到这个事件。
object是ParseObject,它进入ParseQuery。 它的内容是ParseObject的最新值。
离开事件
subscription.on('leave', (object) => {
  console.log('object left');
});
当现有的ParseObject的旧值满足ParseQuery,但是它的新值不满足ParseQuery,你会得到这个事件。
object是ParseObject,留下ParseQuery。 它的内容是ParseObject的最新值。
删除事件
subscription.on('delete', (object) => {
  console.log('object deleted');
});
当一个现有的满足ParseQuery的ParseObject被删除时,你会得到这个事件。
object是ParseObject,它被删除。
关闭事件
subscription.on('close', () => {
  console.log('subscription closed');
});
当客户端丢失到LiveQuery服务器的WebSocket连接,并且我们不能再获得任何事件时,您将收到此事件。
取消订阅
subscription.unsubscribe();
如果你想停止接收来自ParseQuery的事件,你可以取消订阅subscription。 之后,你不会从subscription对象获得任何事件。
关闭
Parse.LiveQuery.close();
使用LiveQuery完成后,您可以调用Parse.LiveQuery.close()。 此函数将关闭与LiveQuery服务器的WebSocket连接,取消自动重新连接,并取消订阅基于它的所有订阅。 如果在此之后调用query.subscribe(),我们将创建一个到LiveQuery服务器的新WebSocket连接。
设置服务器地址
Parse.liveQueryServerURL = 'ws://XXXX'
大多数时候你不需要手动设置这个。 如果你设置了你的Parse.serverURL,我们将尝试提取主机名,并使用ws://hostname作为默认liveQueryServerURL。 然而,如果你想定义你自己的liveQueryServerURL或使用不同的协议,如wss,你应该自己设置它。
WebSocket状态
我们公开了三个事件来帮助您监视WebSocket连接的状态: ### 打开事件
Parse.LiveQuery.on('open', () => {
  console.log('socket connection established');
});
当我们建立到LiveQuery服务器的WebSocket连接时,您将收到此事件。
关闭事件
Parse.LiveQuery.on('close', () => {
  console.log('socket connection closed');
});
当我们失去与LiveQuery服务器的WebSocket连接时,您会收到此事件。
错误事件
Parse.LiveQuery.on('error', (error) => {
  console.log(error);
});
当发生某些网络错误或LiveQuery服务器错误时,您会收到此事件。
## 高级API
在我们的标准API中,我们为您管理一个全局WebSocket连接,这适用于大多数情况。
但是,在某些情况下,例如,当您有多个LiveQuery服务器并想要连接到所有这些服务器时,单个WebSocket连接是不够的。
我们为这些场景公开了LiveQueryClient。
LiveQueryClient
LiveQueryClient是标准WebSocket客户端的包装器。 我们添加了几个有用的方法来帮助您连接/断开与LiveQueryServer和订阅/取消订阅一个ParseQuery容易。
初始化
let Parse = require('parse/node');
let LiveQueryClient = Parse.LiveQueryClient;
let client = new LiveQueryClient({
  applicationId: '',
  serverURL: '',
  javascriptKey: '',
  masterKey: ''
});
applicationId是必选的,它是您的Parse应用程序的applicationIdliveQueryServerURL是必选的,它是您的LiveQuery服务器的URLjavascriptKeyandmasterKey是可选的,它们用于在尝试连接到LiveQuery服务器时验证LiveQueryClient。 如果你设置它们,他们应该匹配您的Parse应用程序。 您可以检查LiveQuery协议这里了解更多详情。
开启
client.open();
调用此命令后,LiveQueryClient将尝试向LiveQuery服务器发送连接请求。
订阅
let query = new Parse.Query('Game');
let subscription = client.subscribe(query, sessionToken);
queryis mandatory, it is theParseQueryyou want to subscribesessionTokenis optional, if you provide thesessionToken, when the LiveQuery server getsParseObject’s updates from parse server, it’ll try to check whether thesessionTokenfulfills theParseObject’s ACL. The LiveQuery server will only send updates to clients whose sessionToken is fit for theParseObject’s ACL. You can check the LiveQuery protocol here for more details. Thesubscriptionyou get is the samesubscriptionyou get from our Standard API. You can check our Standard API about how to use thesubscriptionto get events.
取消订阅
client.unsubscribe(subscription);
subscription是强制性的,它是您要取消订阅的订阅。 调用此命令后,将不会从预订对象获取任何事件。
关闭
client.close();
此函数将关闭与此LiveQueryClient的WebSocket连接,取消自动重新连接,并取消订阅基于它的所有订阅。
事件处理
我们公开了三个事件来帮助你监视LiveQueryClient的状态。
打开事件
client.on('open', () => {
  console.log('connection opened');
});
当我们建立到LiveQuery服务器的WebSocket连接时,您将收到此事件。
关闭事件
client.on('close', () => {
  console.log('connection closed');
});
当我们失去与LiveQuery服务器的WebSocket连接时,您会收到此事件。
错误事件
client.on('error', (error) => {
  console.log('connection error');
});
当发生某些网络错误或LiveQuery服务器错误时,您会收到此事件。
## 重新连接
由于整个LiveQuery功能依赖于到LiveQuery服务器的WebSocket连接,因此我们总是尝试维护一个打开的WebSocket连接。 因此,当我们发现我们失去了与LiveQuery服务器的连接时,我们将尝试自动重新连接。 我们在引擎盖下做指数回退。 但是,如果WebSocket连接由于Parse.LiveQuery.close()或client.close()关闭,我们将取消自动重新连接。
## SessionToken
当你订阅一个ParseQuery时,我们发送sessionToken给LiveQuery服务器。 对于标准API,我们默认使用当前用户的sessionToken。 对于高级API,您可以在订阅ParseQuery时使用任何sessionToken。 一个重要的事情要注意的是当你注销或你使用的sessionToken是无效的,你应该取消订阅订阅并再次订阅ParseQuery。 否则,您可能会面临安全问题,因为您将收到不应发送给您的事件。
用户
许多应用的核心部分,都有一个用户账号的概念,以便用户安全地访问他们都信息。
我们为此提供了一个Parse.User的用户管理类,它能自动完成用户账号管理中所需要的大部分功能。
使用此类,您可以在应用中添加用户账号管理功能。
Parse.User是Parse.Object的子类,并且具有所有相同的功能,比如灵活的架构、自动持久性和key-value设计接口。
Parse.Object中的所有方法也存在于Parse.User中。 区别是Parse.User有一些特殊的附加方法来管理用户帐户。
属性
Parse.User有几个值将它从Parse.Object中分离出来:
- username: 用户的用户名(必填)。
- password: 用户的密码(注册时需要)。
- email: 用户的电子邮件地址(可选)。
我们在这里将会详细介绍每一个用户方法的各种用例。
注册
你的程序会做的第一件事可能是要求用户进行注册。 以下代码是典型的注册用例:
var user = new Parse.User();
user.set("username", "my name");
user.set("password", "my pass");
user.set("email", "email@example.com");

// other fields can be set just like with Parse.Object
// 其他字段可以像Parse.Object一样进行设置
user.set("phone", "415-392-0202");

user.signUp(null, {
  success: function(user) {
    // Hooray! Let them use the app now.
    // 注册成功!让用户开始使用应用吧!
  },
  error: function(user, error) {
    // Show the error message somewhere and let the user try again.
    // 如果发生错误,在某处显示错误信息并让用户重新尝试注册
    alert("Error: " + error.code + " " + error.message);
  }
});
这个操作将会在你的Parse应用中异步创建一个新用户。
在此之前,它还会进行检查以确保用户名和邮件地址是唯一的。
此外,它在云服务器中使用了bcrypt进行密码的安全加密。
我们从不使用明文密码进行存储,也不会将明文密码发送到客户端。
注意,这里我们使用signUp而不是save方法。
新的Parse.User应该始终使用signUp方法创建。
用户在后边更新数据的话可以使用save方法来进行更新。
如果注册失败,您应该读取返回的错误信息对象。 最可能的情况是用户名或邮件地址已被注册过。 您应该向用户明确告知该情况,并要求他们尝试使用不同的用户名或邮件进行注册。
您可以使用电子邮件地址作为用户名。
只需要您的用户输入他们的邮件地址,但请把该地址填写到username属性中,这样Parse.User才会正常工作。
我们将在重置密码部分中讨论如何进行处理。
登录
当然,在您允许用户注册后,您需要让他们在以后进行登录。 要完成这个操作,你可以使用类方法logIn。
Parse.User.logIn("myname", "mypass", {
  success: function(user) {
    // Do stuff after successful login.
    // 登录成功后的回调函数
  },
  error: function(user, error) {
    // The login failed. Check error to see why.
    // 登录失败,可以进行失败信息展示
  }
});
验证邮箱
在应用程式的设定中启用电子邮件验证功能,可让应用程式为已确认电子邮件地址的使用者预留部分体验。 电子邮件验证将emailVerified键添加到Parse.User对象。 当一个Parse.User的email被设置或修改时,emailVerified被设置为false。 解析然后通过电子邮件发送给用户一个链接,该链接将emailVerified设置为true。
有三个emailVerified状态要考虑:
true- 用户通过点击链接Parse通过电子邮件确认他或她的电子邮件地址。Parse.Users在第一次创建用户帐户时永远不能有一个true值。false- 在上次刷新Parse.User对象时,用户没有确认他或她的电子邮件地址。 如果emailVerified是false,请考虑在Parse.User上调用fetch。- missing -
Parse.User是在电子邮件验证关闭或Parse.User没有email时创建的。
当前用户
如果用户每次打开您的应用程序时都必须登录,这将是麻烦的。 你可以通过使用缓存的当前Parse.User对象来避免这种情况。
每当您使用任何注册或登录方法时,用户都将缓存在localStorage中。 您可以将此缓存视为会话,并自动假定用户已登录:
<!– It would be bothersome if the user had to log in every time they open your app. You can avoid this by using the cached current Parse.User object.
Whenever you use any signup or login methods, the user is cached in localStorage. You can treat this cache as a session, and automatically assume the user is logged in: –>
var currentUser = Parse.User.current();
if (currentUser) {
    // do stuff with the user
} else {
    // show the signup or login page
}
您可以通过注销当前用户来清除:
Parse.User.logOut().then(() => {
  var currentUser = Parse.User.current();  // this will now be null
});
设置当前用户
如果您已经创建了自己的身份验证例程,或以其他方式登录到服务器端的用户,您现在可以将会话令牌传递给客户端并使用become方法。
此方法将确保会话令牌在设置当前用户之前有效。
Parse.User.become("session-token-here").then(function (user) {
  // The current user is now set to user.
}, function (error) {
  // The token could not be validated.
});
用户对象的安全性
Parse.User类在默认情况下是安全的。 Parse.User中存储的数据只能由该用户修改。 默认情况下,数据仍然可以由任何客户端读取。 因此,一些Parse.User对象被认证并且可以被修改,而其他是只读的。
具体来说,你不能调用任何save或delete方法,除非Parse.User是使用认证方法获得的,例如logIn或signUp。 这确保只有用户可以更改自己的数据。
以下说明此安全策略:
<!– The Parse.User class is secured by default. Data stored in a Parse.User can only be modified by that user. By default, the data can still be read by any client. Thus, some Parse.User objects are authenticated and can be modified, whereas others are read-only.
Specifically, you are not able to invoke any of the save or delete methods unless the Parse.User was obtained using an authenticated method, like logIn or signUp. This ensures that only the user can alter their own data.
The following illustrates this security policy: –>
var user = Parse.User.logIn("my_username", "my_password", {
  success: function(user) {
    user.set("username", "my_new_username");  // attempt to change username
    user.save(null, {
      success: function(user) {
        // This succeeds, since the user was authenticated on the device

        // Get the user from a non-authenticated method
        var query = new Parse.Query(Parse.User);
        query.get(user.objectId, {
          success: function(userAgain) {
            userAgain.set("username", "another_username");
            userAgain.save(null, {
              error: function(userAgain, error) {
                // This will error, since the Parse.User is not authenticated
              }
            });
          }
        });
      }
    });
  }
});
从Parse.User.current()获取的Parse.User将始终被认证。
如果你需要检查一个Parse.User是否被认证,你可以调用authenticated方法。 你不需要检查authenticated与通过认证方法获得的Parse.User对象。
<!– The Parse.User obtained from Parse.User.current() will always be authenticated.
If you need to check if a Parse.User is authenticated, you can invoke the authenticated method. You do not need to check authenticated with Parse.User objects that are obtained via an authenticated method. –>
其他对象的安全
应用于Parse.User的相同的安全模型可以应用于其他对象。 对于任何对象,您可以指定允许哪些用户读取对象,以及允许哪些用户修改对象。 为了支持这种类型的安全性,每个对象具有由Parse.ACL类实现的访问控制列表。
使用Parse.ACL的最简单的方法是指定对象只能由单个用户读取或写入。 这是通过使用Parse.User初始化Parse.ACL来实现的:new Parse.ACL(user)生成一个Parse.ACL,限制对该用户的访问。 与其他任何属性一样,对象的ACL将在保存对象时更新。 因此,要创建只能由当前用户访问的私人备注:
<!– The same security model that applies to the Parse.User can be applied to other objects. For any object, you can specify which users are allowed to read the object, and which users are allowed to modify an object. To support this type of security, each object has an access control list, implemented by the Parse.ACL class.
The simplest way to use a Parse.ACL is to specify that an object may only be read or written by a single user. This is done by initializing a Parse.ACL with a Parse.User: new Parse.ACL(user) generates a Parse.ACL that limits access to that user. An object’s ACL is updated when the object is saved, like any other property. Thus, to create a private note that can only be accessed by the current user: –>
var Note = Parse.Object.extend("Note");
var privateNote = new Note();
privateNote.set("content", "This note is private!");
privateNote.setACL(new Parse.ACL(Parse.User.current()));
privateNote.save();
然后,只有当前用户可以访问此注释,但该用户所登录的任何设备都可以访问此注释。此功能对于您希望在多个设备上启用对用户数据访问权限的应用程序(例如个人待办事项 列表。
也可以在每个用户的基础上授予权限。 您可以使用setReadAccess和setWriteAccess将权限单独添加到Parse.ACL。 例如,假设您有一封邮件将发送给一组几个用户,其中每个用户都有权读取和删除该邮件:
<!– This note will then only be accessible to the current user, although it will be accessible to any device where that user is signed in. This functionality is useful for applications where you want to enable access to user data across multiple devices, like a personal todo list.
Permissions can also be granted on a per-user basis. You can add permissions individually to a Parse.ACL using setReadAccess and setWriteAccess. For example, let’s say you have a message that will be sent to a group of several users, where each of them have the rights to read and delete that message:
–>
var Message = Parse.Object.extend("Message");
var groupMessage = new Message();
var groupACL = new Parse.ACL();

// userList is an array with the users we are sending this message to.
for (var i = 0; i < userList.length; i++) {
  groupACL.setReadAccess(userList[i], true);
  groupACL.setWriteAccess(userList[i], true);
}

groupMessage.setACL(groupACL);
groupMessage.save();
您也可以使用setPublicReadAccess和setPublicWriteAccess向所有用户授予权限。
这允许在留言板上发布评论的模式。 例如,要创建只能由其作者编辑但可由任何人阅读的帖子:
var publicPost = new Post();
var postACL = new Parse.ACL(Parse.User.current());
postACL.setPublicReadAccess(true);
publicPost.setACL(postACL);
publicPost.save();
禁止的操作(例如删除您没有写入权限的对象)会导致Parse.Error.OBJECT_NOT_FOUND错误代码。
出于安全目的,这防止客户端区分哪些对象ID存在但是是安全的,而哪些对象ID根本不存在。
## 重置密码
这是一个事实,一旦你在系统中引入密码,用户将忘记他们。 在这种情况下,我们的库提供了一种方法让他们安全地重置其密码。
要启动密码重置流程,请向用户提供其电子邮件地址,然后致电: <!– It’s a fact that as soon as you introduce passwords into a system, users will forget them. In such cases, our library provides a way to let them securely reset their password.
To kick off the password reset flow, ask the user for their email address, and call: –>
Parse.User.requestPasswordReset("email@example.com", {
  success: function() {
  // Password reset request was sent successfully
  },
  error: function(error) {
    // Show the error message somewhere
    alert("Error: " + error.code + " " + error.message);
  }
});
这将尝试匹配给定的电子邮件与用户的电子邮件或用户名字段,并将向他们发送密码重置电子邮件。 通过这样做,您可以选择让用户使用他们的电子邮件作为其用户名,或者您可以单独收集并将其存储在电子邮件字段中。
密码重置的流程如下: <!– This will attempt to match the given email with the user’s email or username field, and will send them a password reset email. By doing this, you can opt to have users use their email as their username, or you can collect it separately and store it in the email field.
The flow for password reset is as follows: –>
1.用户通过输入他们的电子邮件请求重置他们的密码。 2.解析向他们的地址发送电子邮件,并使用特殊的密码重置链接。 3.用户点击重置链接,并被定向到一个特殊的Parse页面,允许他们键入一个新的密码。 4.用户键入新密码。 他们的密码现在已重置为他们指定的值。
请注意,此流中的消息传递将以您在Parse上创建此应用程序时指定的名称引用您的应用程序。
查询
要查询用户,您可以简单地为Parse.Users创建一个新的Parse.Query:
var query = new Parse.Query(Parse.User);
query.equalTo("gender", "female");  // find all the women
query.find({
  success: function(women) {
    // Do stuff
  }
});
协会
涉及Parse.User的关联在框的右边工作。 例如,假设您正在制作博客应用程序。 要为用户存储新帖子并检索其所有帖子:
var user = Parse.User.current();

// Make a new post
var Post = Parse.Object.extend("Post");
var post = new Post();
post.set("title", "My New Post");
post.set("body", "This is some great content.");
post.set("user", user);
post.save(null, {
  success: function(post) {
    // Find all posts by the current user
    var query = new Parse.Query(Post);
    query.equalTo("user", user);
    query.find({
      success: function(usersPosts) {
        // userPosts contains all of the posts by the current user.
      }
    });
  }
});
Facebook用户
Parse提供了一种将Facebook与您的应用程序集成的简单方法。 Parse.FacebookUtils类集成了Parse.User和Facebook Javascript SDK,以便将用户与他们的Facebook身份联系起来很容易。
使用我们的Facebook集成,您可以将已认证的Facebook用户与Parse.User关联。 只需几行代码,您就可以在应用程序中提供使用Facebook登录选项,并且能够将其数据保存到Parse。
<!– Parse provides an easy way to integrate Facebook with your application. The Parse.FacebookUtils class integrates Parse.User and the Facebook Javascript SDK to make linking your users to their Facebook identities easy.
Using our Facebook integration, you can associate an authenticated Facebook user with a Parse.User. With just a few lines of code, you’ll be able to provide a “log in with Facebook” option in your app, and be able to save their data to Parse.
–>
建立
要开始使用Facebook与Parse,您需要:
-
设置Facebook应用,如果你还没有。 在”选择您的应用与Facebook的集成方式”下选择”使用Facebook登录的网站”选项,然后输入您的网站的网址。 2.在Parse应用程序的设置页面上添加应用程序的Facebook应用程序ID。 3.按照这些说明将Facebook JavaScript SDK加载到应用程序中。 4.用对
Parse.FacebookUtils.init()的调用替换对FB.init()的调用。 例如,如果您异步加载Facebook JavaScript SDK,您的fbAsyncInit函数将如下所示: <!– To start using Facebook with Parse, you need to: - Set up a Facebook app, if you haven’t already. Choose the “Website with Facebook Login” option under “Select how your app integrates with Facebook” and enter your site’s URL.
- Add your application’s Facebook Application ID on your Parse application’s settings page.
- Follow these instructions for loading the Facebook JavaScript SDK into your application.
- Replace your call to
FB.init()with a call toParse.FacebookUtils.init(). For example, if you load the Facebook JavaScript SDK asynchronously, yourfbAsyncInitfunction will look like this: –>
  // Initialize Parse
  Parse.initialize("$PARSE_APPLICATION_ID", "$PARSE_JAVASCRIPT_KEY");

      window.fbAsyncInit = function() {
    Parse.FacebookUtils.init({ // this line replaces FB.init({
      appId      : '{facebook-app-id}', // Facebook App ID
      status     : true,  // check Facebook Login status
      cookie     : true,  // enable cookies to allow Parse to access the session
      xfbml      : true,  // initialize Facebook social plugins on the page
      version    : 'v2.3' // point to the latest Facebook Graph API version
    });

        // Run code after the Facebook SDK is loaded.
  };

      (function(d, s, id){
    var js, fjs = d.getElementsByTagName(s)[0];
    if (d.getElementById(id)) {return;}
    js = d.createElement(s); js.id = id;
    js.src = "//connect.facebook.net/en_US/sdk.js";
    fjs.parentNode.insertBefore(js, fjs);
  }(document, 'script', 'facebook-jssdk'));
一旦Facebook JavaScript SDK完成加载,就会运行分配给fbAsyncInit的函数。 您要在加载Facebook JavaScript SDK之后运行的任何代码都应放在此函数中,并在调用Parse.FacebookUtils.init()之后。
如果你遇到任何与Facebook相关的问题,一个好的资源是从Facebook官方入门指南。
如果您遇到类似于从Parse服务器返回的问题,请尝试从应用程序的设置页面中删除您的Facebook应用程序的应用程序密钥。
与您的Parse用户使用Facebook有两个主要方法:
(1)作为Facebook用户登录并创建一个Parse.User,或
(2)将Facebook链接到现有的Parse.User。
<!– The function assigned to fbAsyncInit is run as soon as the Facebook JavaScript SDK has completed loading. Any code that you want to run after the Facebook JavaScript SDK is loaded should be placed within this function and after the call to Parse.FacebookUtils.init().
If you encounter any issues that are Facebook-related, a good resource is the official getting started guide from Facebook.
If you encounter issues that look like they’re being returned from Parse’s servers, try removing your Facebook application’s App Secret from your app’s settings page.
There are two main ways to use Facebook with your Parse users: (1) logging in as a Facebook user and creating a Parse.User, or (2) linking Facebook to an existing Parse.User. –>
登陆注册
Parse.FacebookUtils提供了一种方法来允许你的Parse.Users登录或通过Facebook注册。 这是使用logIn()方法实现的:
Parse.FacebookUtils.logIn(null, {
  success: function(user) {
    if (!user.existed()) {
      alert("User signed up and logged in through Facebook!");
    } else {
      alert("User logged in through Facebook!");
    }
  },
  error: function(user, error) {
    alert("User cancelled the Facebook login or did not fully authorize.");
  }
});
运行此代码时,会发生以下情况:
1.用户显示Facebook登录对话框。
2.用户通过Facebook验证,您的应用程序接收回调。
我们的SDK接收Facebook数据并将其保存到Parse.User。 如果它是基于Facebook ID的新用户,则创建该用户。
你的success回调函数是由用户调用的。
您可以选择提供逗号分隔的字符串,指定您的应用程序从Facebook用户需要的permissions。 例如: <!– When this code is run, the following happens:
- The user is shown the Facebook login dialog.
- The user authenticates via Facebook, and your app receives a callback.
- Our SDK receives the Facebook data and saves it to a
Parse.User. If it’s a new user based on the Facebook ID, then that user is created. - Your
successcallback is called with the user.
You may optionally provide a comma-delimited string that specifies what permissions your app requires from the Facebook user. For example: –>
Parse.FacebookUtils.logIn("user_likes,email", {
  success: function(user) {
    // Handle successful login
  },
  error: function(user, error) {
    // Handle errors and cancellation
  }
});
Parse.User集成不需要任何权限就可以开箱即用(即null或指定没有权限是完全可以接受的)。 详细了解Facebook开发人员指南的权限。
链接
如果要将现有的Parse.User关联到Facebook帐户,可以将其链接如下:
if (!Parse.FacebookUtils.isLinked(user)) {
  Parse.FacebookUtils.link(user, null, {
    success: function(user) {
      alert("Woohoo, user logged in with Facebook!");
    },
    error: function(user, error) {
      alert("User cancelled the Facebook login or did not fully authorize.");
    }
  });
}
链接时发生的步骤与登录非常相似。不同的是,在成功登录后,现有的Parse.User将使用Facebook信息进行更新。 以后通过Facebook登录现在将用户登录到他们现有的帐户。
如果您要取消Facebook与用户的链接,只需执行以下操作:
<!– The steps that happen when linking are very similar to log in. The difference is that on successful login, the existing Parse.User is updated with the Facebook information. Future logins via Facebook will now log the user into their existing account.
If you want to unlink Facebook from a user, simply do this: –>
Parse.FacebookUtils.unlink(user, {
  success: function(user) {
    alert("The user is no longer associated with their Facebook account.");
  }
});
Facebook SDK and Parse
Facebook Javascript SDK提供了一个主要的FB对象,这是许多与Facebook的API的交互的起点。 您可以在这里阅读更多关于他们的SDK。
使用Parse SDK的Facebook登录要求在调用Parse.FacebookUtils.init()之前已经加载了Facebook SDK。
我们的库为你管理FB对象。 FB单例默认与当前用户同步,因此任何调用它的方法都将作用于与当前Parse.User相关联的Facebook用户。 显式调用FB.login()或FB.logOut()会导致Parse.User和FB对象不同步,不推荐使用。
<!– The Facebook Javascript SDK provides a main FB object that is the starting point for many of the interactions with Facebook’s API. You can read more about their SDK here.
Facebook login using the Parse SDK requires that the Facebook SDK already be loaded before calling Parse.FacebookUtils.init().
Our library manages the FB object for you. The FB singleton is synchronized with the current user by default, so any methods you call on it will be acting on the Facebook user associated with the current Parse.User. Calling FB.login() or FB.logOut() explicitly will cause the Parse.User and FB object to fall out of synchronization, and is not recommended. –>
Sessions
Sessions represent an instance of a user logged into a device. Sessions are automatically created when users log in or sign up. They are automatically deleted when users log out. There is one distinct Session object for each user-installation pair; if a user issues a login request from a device they’re already logged into, that user’s previous Session object for that Installation is automatically deleted. Session objects are stored on Parse in the Session class, and you can view them on the Parse.com Data Browser. We provide a set of APIs to manage Session objects in your app.
Session is a subclass of a Parse Object, so you can query, update, and delete sessions in the same way that you manipulate normal objects on Parse. Because the Parse Cloud automatically creates sessions when you log in or sign up users, you should not manually create Session objects unless you are building a “Parse for IoT” app (e.g. Arduino or Embedded C). Deleting a Session will log the user out of the device that is currently using this session’s token.
Unlike other Parse objects, the Session class does not have Cloud Code triggers. So you cannot register a beforeSave or afterSave handler for the Session class.
Properties
The Session object has these special fields:
sessionToken(readonly): String token for authentication on Parse API requests. In the response ofSessionqueries, only your currentSessionobject will contain a session token.user: (readonly) Pointer to theUserobject that this session is for.createdWith(readonly): Information about how this session was created (e.g.{ "action": "login", "authProvider": "password"}).actioncould have values:login,signup,create, orupgrade. Thecreateaction is when the developer manually creates the session by saving aSessionobject. Theupgradeaction is when the user is upgraded to revocable session from a legacy session token.authProvidercould have values:password,anonymous,facebook, ortwitter.
restricted(readonly): Boolean for whether this session is restricted.- Restricted sessions do not have write permissions on
User,Session, andRoleclasses on Parse. Restricted sessions also cannot read unrestricted sessions. - All sessions that the Parse Cloud automatically creates during user login/signup will be unrestricted. All sessions that the developer manually creates by saving a new
Sessionobject from the client (only needed for “Parse for IoT” apps) will be restricted.
- Restricted sessions do not have write permissions on
expiresAt(readonly): Approximate UTC date when thisSessionobject will be automatically deleted. You can configure session expiration settings (either 1-year inactivity expiration or no expiration) in your app’s Parse.com dashboard settings page.installationId(can be set only once): String referring to theInstallationwhere the session is logged in from. For Parse SDKs, this field will be automatically set when users log in or sign up. All special fields exceptinstallationIdcan only be set automatically by the Parse Cloud. You can add custom fields ontoSessionobjects, but please keep in mind that any logged-in device (with session token) can read other sessions that belong to the same user (unless you disable Class-Level Permissions, see below).
Handling Invalid Session Token Error
Apps created on Parse.com before March 25, 2015 use legacy session tokens until you migrate them to use the new revocable sessions. On API requests with legacy tokens, if the token is invalid (e.g. User object was deleted), then the request is executed as a non-logged in user and no error was returned. On API requests with revocable session tokens, an invalid session token will always fail with the “invalid session token” error. This new behavior lets you know when you need to ask the user to log in again.
With revocable sessions, your current session token could become invalid if its corresponding Session object is deleted from the Parse Cloud. This could happen if you implement a Session Manager UI that lets users log out of other devices, or if you manually delete the session via Cloud Code, REST API, or Data Browser. Sessions could also be deleted due to automatic expiration (if configured in app settings). When a device’s session token no longer corresponds to a Session object on the Parse Cloud, all API requests from that device will fail with “Error 209: invalid session token”.
To handle this error, we recommend writing a global utility function that is called by all of your Parse request error callbacks. You can then handle the “invalid session token” error in this global function. You should prompt the user to login again so that they can obtain a new session token. This code could look like this:
// Objective-C
@interface ParseErrorHandlingController : NSObject

+ (void)handleParseError:(NSError *)error;

@end

@implementation ParseErrorHandlingController

+ (void)handleParseError:(NSError *)error {
  if (![error.domain isEqualToString:PFParseErrorDomain]) {
    return;
  }

  switch (error.code) {
    case kPFErrorInvalidSessionToken: {
      [self _handleInvalidSessionTokenError];
      break;
    }
    ... // Other Parse API Errors that you want to explicitly handle.
  }
}

+ (void)_handleInvalidSessionTokenError {
  //--------------------------------------
  // Option 1: Show a message asking the user to log out and log back in.
  //--------------------------------------
  // If the user needs to finish what they were doing, they have the opportunity to do so.
  //
  // UIAlertView *alertView = [[UIAlertView alloc] initWithTitle:@"Invalid Session"
  //                                                     message:@"Session is no longer valid, please log out and log in again."
  //                                                    delegate:self
  //                                           cancelButtonTitle:@"Not Now"
  //                                           otherButtonTitles:@"OK"];
  // [alertView show];

  //--------------------------------------
  // Option #2: Show login screen so user can re-authenticate.
  //--------------------------------------
  // You may want this if the logout button is inaccessible in the UI.
  //
  // UIViewController *presentingViewController = [UIApplication sharedApplication].keyWindow.rootViewController;
  // PFLogInViewController *logInViewController = [[PFLogInViewController alloc] init];
  // [presentingViewController presentViewController:logInViewController animated:YES completion:nil];
}

@end

// In all API requests, call the global error handler, e.g.
[[PFQuery queryWithClassName:@"Object"] findInBackgroundWithBlock:^(NSArray *objects, NSError *error) {
  if (!error) {
    // Query succeeded - continue your app logic here.
  } else {
    // Query failed - handle an error.
    [ParseErrorHandlingController handleParseError:error];
  }
}];
// Swift
class ParseErrorHandlingController {
  class func handleParseError(error: NSError) {
    if error.domain != PFParseErrorDomain {
      return
    }

    switch (error.code) {
    case kPFErrorInvalidSessionToken:
      handleInvalidSessionTokenError()

    ... // Other Parse API Errors that you want to explicitly handle.
  }

  private class func handleInvalidSessionTokenError() {
    //--------------------------------------
    // Option 1: Show a message asking the user to log out and log back in.
    //--------------------------------------
    // If the user needs to finish what they were doing, they have the opportunity to do so.
    //
    // let alertView = UIAlertView(
    //   title: "Invalid Session",
    //   message: "Session is no longer valid, please log out and log in again.",
    //   delegate: nil,
    //   cancelButtonTitle: "Not Now",
    //   otherButtonTitles: "OK"
    // )
    // alertView.show()

    //--------------------------------------
    // Option #2: Show login screen so user can re-authenticate.
    //--------------------------------------
    // You may want this if the logout button is inaccessible in the UI.
    //
    // let presentingViewController = UIApplication.sharedApplication().keyWindow?.rootViewController
    // let logInViewController = PFLogInViewController()
    // presentingViewController?.presentViewController(logInViewController, animated: true, completion: nil)
  }
}

// In all API requests, call the global error handler, e.g.
let query = PFQuery(className: "Object")
query.findObjectsInBackgroundWithBlock { (objects: [AnyObject]!, error: NSError!) -> Void in
  if error == nil {
    // Query Succeeded - continue your app logic here.
  } else {
    // Query Failed - handle an error.
    ParseErrorHandlingController.handleParseError(error)
  }
}
public class ParseErrorHandler {
  public static void handleParseError(ParseException e) {
    switch (e.getCode()) {
      case INVALID_SESSION_TOKEN: handleInvalidSessionToken()
        break;

      ... // Other Parse API errors that you want to explicitly handle
    }
  }

  private static void handleInvalidSessionToken() {
    //--------------------------------------
    // Option 1: Show a message asking the user to log out and log back in.
    //--------------------------------------
    // If the user needs to finish what they were doing, they have the opportunity to do so.
    //
    // new AlertDialog.Builder(getActivity())
    //   .setMessage("Session is no longer valid, please log out and log in again.")
    //   .setCancelable(false).setPositiveButton("OK", ...).create().show();

    //--------------------------------------
    // Option #2: Show login screen so user can re-authenticate.
    //--------------------------------------
    // You may want this if the logout button could be inaccessible in the UI.
    //
    // startActivityForResult(new ParseLoginBuilder(getActivity()).build(), 0);
  }
}

// In all API requests, call the global error handler, e.g.
query.findInBackground(new FindCallback<ParseObject>() {
  public void done(List<ParseObject> results, ParseException e) {
    if (e == null) {
      // Query successful, continue other app logic
    } else {
      // Query failed
      ParseErrorHandler.handleParseError(e);
    }
  }
});
function handleParseError(err) {
  switch (err.code) {
    case Parse.Error.INVALID_SESSION_TOKEN:
      Parse.User.logOut();
      ... // If web browser, render a log in screen
      ... // If Express.js, redirect the user to the log in route
      break;

    ... // Other Parse API errors that you want to explicitly handle
  }
}

// For each API request, call the global error handler
query.find().then(function() {
  ...
}, function(err) {
  handleParseError(err);
});
public class ParseErrorHandler {
  public static void HandleParseError(ParseException e) {
    switch (e.Code) {
      case ParseException.ErrorCode.InvalidSessionToken:
        HandleInvalidSessionToken()
        break;

      ... // Other Parse API errors that you want to explicitly handle
    }
  }

  private static void HandleInvalidSessionToken() {
    //--------------------------------------
    // Option 1: Show a message asking the user to log out and log back in.
    //--------------------------------------
    // If the user needs to finish what they were doing, they have the opportunity to do so.

    //--------------------------------------
    // Option #2: Show login screen so user can re-authenticate.
    //--------------------------------------
    // You may want this if the logout button is inaccessible in the UI.
  }
});

// In all API requests, call the global error handler, e.g.
query.FindAsync().ContinueWith(t => {
  if (t.IsFaulted) {
    // Query Failed - handle an error.
    ParseErrorHandler.HandleParseError(t.Exception.InnerException as ParseException);
  } else {
    // Query Succeeded - continue your app logic here.
  }
});
public class ParseErrorHandler {
  public static handleParseError(ParseException $e) {
    $code = $e->getCode();
    switch ($code) {
      case: 209: // INVALID_SESSION_TOKEN
        ParseUser::logOut();
        ... // Redirect the to login page.
        break;

      ... // Other Parse API errors that you want to explicitly handle
    }
  }
});

// For each API request, call the global error handler
try {
  $results = $query->find();
  // ...
} catch (ParseException $e) {
  ParseErrorHandler::handleParseError($e)
}
// No command line example
// No C++ example
Security
Session objects can only be accessed by the user specified in the user field. All Session objects have an ACL that is read and write by that user only. You cannot change this ACL. This means querying for sessions will only return objects that match the current logged-in user.
When you log in a user via a User login method, Parse will automatically create a new unrestricted Session object in the Parse Cloud. Same for signups and Facebook/Twitter logins.
Session objects manually created from client SDKs (by creating an instance of Session, and saving it) are always restricted. You cannot manually create an unrestricted sessions using the object creation API.
Restricted sessions are prohibited from creating, modifying, or deleting any data in the User, Session, and Role classes. Restricted session also cannot read unrestricted sessions. Restricted Sessions are useful for “Parse for IoT” devices (e.g Arduino or Embedded C) that may run in a less-trusted physical environment than mobile apps. However, please keep in mind that restricted sessions can still read data on User, Session, and Role classes, and can read/write data in any other class just like a normal session. So it is still important for IoT devices to be in a safe physical environment and ideally use encrypted storage to store the session token.
If you want to prevent restricted Sessions from modifying classes other than User, Session, or Role, you can write a Cloud Code beforeSave handler for that class:
Parse.Cloud.beforeSave("MyClass", function(request, response) {
  Parse.Session.current().then(function(session) {
    if (session.get('restricted')) {
      response.error('write operation not allowed');
    }
    response.success();
  });
});
You can configure Class-Level Permissions (CLPs) for the Session class just like other classes on Parse. CLPs restrict reading/writing of sessions via the Session API, but do not restrict Parse Cloud’s automatic session creation/deletion when users log in, sign up, and log out. We recommend that you disable all CLPs not needed by your app. Here are some common use cases for Session CLPs:
- Find, Delete — Useful for building a UI screen that allows users to see their active session on all devices, and log out of sessions on other devices. If your app does not have this feature, you should disable these permissions.
- Create — Useful for “Parse for IoT” apps (e.g. Arduino or Embedded C) that provision restricted user sessions for other devices from the phone app. You should disable this permission when building apps for mobile and web. For “Parse for IoT” apps, you should check whether your IoT device actually needs to access user-specific data. If not, then your IoT device does not need a user session, and you should disable this permission.
- Get, Update, Add Field — Unless you need these operations, you should disable these permissions.
Roles
As your app grows in scope and user-base, you may find yourself needing more coarse-grained control over access to pieces of your data than user-linked ACLs can provide. To address this requirement, Parse supports a form of Role-based Access Control. Roles provide a logical way of grouping users with common access privileges to your Parse data. Roles are named objects that contain users and other roles. Any permission granted to a role is implicitly granted to its users as well as to the users of any roles that it contains.
For example, in your application with curated content, you may have a number of users that are considered “Moderators” and can modify and delete content created by other users. You may also have a set of users that are “Administrators” and are allowed all of the same privileges as Moderators, but can also modify the global settings for the application. By adding users to these roles, you can ensure that new users can be made moderators or administrators, without having to manually grant permission to every resource for each user.
We provide a specialized class called Parse.Role that represents these role objects in your client code. Parse.Role is a subclass of Parse.Object, and has all of the same features, such as a flexible schema, automatic persistence, and a key value interface. All the methods that are on Parse.Object also exist on Parse.Role. The difference is that Parse.Role has some additions specific to management of roles.
Properties
Parse.Role has several properties that set it apart from Parse.Object:
- name: The name for the role. This value is required, and can only be set once as a role is being created. The name must consist of alphanumeric characters, spaces, -, or _. This name will be used to identify the Role without needing its objectId.
- users: A relation to the set of users that will inherit permissions granted to the containing role.
- roles: A relation to the set of roles whose users and roles will inherit permissions granted to the containing role.
Security for Role Objects
The Parse.Role uses the same security scheme (ACLs) as all other objects on Parse, except that it requires an ACL to be set explicitly. Generally, only users with greatly elevated privileges (e.g. a master user or Administrator) should be able to create or modify a Role, so you should define its ACLs accordingly. Remember, if you give write-access to a Parse.Role to a user, that user can add other users to the role, or even delete the role altogether.
To create a new Parse.Role, you would write:
// By specifying no write privileges for the ACL, we can ensure the role cannot be altered.
var roleACL = new Parse.ACL();
roleACL.setPublicReadAccess(true);
var role = new Parse.Role("Administrator", roleACL);
role.save();
You can add users and roles that should inherit your new role’s permissions through the “users” and “roles” relations on Parse.Role:
var role = new Parse.Role(roleName, roleACL);
role.getUsers().add(usersToAddToRole);
role.getRoles().add(rolesToAddToRole);
role.save();
Take great care when assigning ACLs to your roles so that they can only be modified by those who should have permissions to modify them.
Security for Other Objects
Now that you have created a set of roles for use in your application, you can use them with ACLs to define the privileges that their users will receive. Each Parse.Object can specify a Parse.ACL, which provides an access control list that indicates which users and roles should be granted read or write access to the object.
Giving a role read or write permission to an object is straightforward. You can either use the Parse.Role:
var moderators = /* Query for some Parse.Role */;
var wallPost = new Parse.Object("WallPost");
var postACL = new Parse.ACL();
postACL.setRoleWriteAccess(moderators, true);
wallPost.setACL(postACL);
wallPost.save();
You can avoid querying for a role by specifying its name for the ACL:
var wallPost = new Parse.Object("WallPost");
var postACL = new Parse.ACL();
postACL.setRoleWriteAccess("Moderators", true);
wallPost.setACL(postACL);
wallPost.save();
Role Hierarchy
As described above, one role can contain another, establishing a parent-child relationship between the two roles. The consequence of this relationship is that any permission granted to the parent role is implicitly granted to all of its child roles.
These types of relationships are commonly found in applications with user-managed content, such as forums. Some small subset of users are “Administrators”, with the highest level of access to tweaking the application’s settings, creating new forums, setting global messages, and so on. Another set of users are “Moderators”, who are responsible for ensuring that the content created by users remains appropriate. Any user with Administrator privileges should also be granted the permissions of any Moderator. To establish this relationship, you would make your “Administrators” role a child role of “Moderators”, like this:
var administrators = /* Your "Administrators" role */;
var moderators = /* Your "Moderators" role */;
moderators.getRoles().add(administrators);
moderators.save();
文件
创建一个 Parse.File
Parse.File允许您将应用程序文件存储在云中,否则这些应用程序文件将太大或难以适应常规的“Parse.Object”。 最常见的用例是存储图像,但也可以将其用于文档,视频,音乐和任何其他二进制数据(最多10 MB)。
开始使用Parse.File是很容易的。 有几种方法来创建文件。 第一个是使用base64编码的字符串。
var base64 = "V29ya2luZyBhdCBQYXJzZSBpcyBncmVhdCE=";
var file = new Parse.File("myfile.txt", { base64: base64 });
或者,您可以从字节值数组创建文件:
var bytes = [ 0xBE, 0xEF, 0xCA, 0xFE ];
var file = new Parse.File("myfile.txt", bytes);
Parse将根据文件扩展名自动检测您正在上传的文件的类型,但您可以使用第三个参数指定Content-Type:
var file = new Parse.File("myfile.zzz", fileData, "image/png");
但最常见的HTML5应用程序,你会想要使用带有文件上传控件的html表单。 在现代浏览器上,这很容易。 创建文件输入标记,允许用户从其本地驱动器中选择要上传的文件:
<input type="file" id="profilePhotoFileUpload">
然后,在点击处理程序或其他函数中,获取对该文件的引用:
var fileUploadControl = $("#profilePhotoFileUpload")[0];
if (fileUploadControl.files.length > 0) {
  var file = fileUploadControl.files[0];
  var name = "photo.jpg";

  var parseFile = new Parse.File(name, file);
}
注意在这个例子中,我们给文件名’photo.jpg。 这里有两件事要注意:
<!-- Notice in this example that we give the file a name of photo.jpg`. There’s two things to note here: –>
- 你不需要担心文件名冲突。 每次上传都有一个唯一的标识符,因此上传多个名为
photo.jpg的文件没有问题。 - 重要的是给一个具有文件扩展名的文件命名。 这让Parse找出文件类型并相应地处理它。 因此,如果您要存储PNG图像,请确保您的文件名以
.png结尾。 <!– * You don’t need to worry about filename collisions. Each upload gets a unique identifier so there’s no problem with uploading multiple files namedphoto.jpg. - It’s important that you give a name to the file that has a file extension. This lets Parse figure out the file type and handle it accordingly. So, if you’re storing PNG images, make sure your filename ends with
.png. –>
接下来,您需要将文件保存到云端。 与Parse.Object一样,根据什么类型的回调和错误处理,您可以使用save方法的许多变体。
parseFile.save().then(function() {
  // The file has been saved to Parse.
}, function(error) {
  // The file either could not be read, or could not be saved to Parse.
});
最后,保存完成后,您可以将Parse.File与Parse.Object相关联,就像其他任何数据一样:
var jobApplication = new Parse.Object("JobApplication");
jobApplication.set("applicantName", "Joe Smith");
jobApplication.set("applicantResumeFile", parseFile);
jobApplication.save();
检索文件内容
如何最佳地检索文件内容取决于您的应用程序的上下文。 由于跨域请求问题,最好是让浏览器为您完成工作。 通常,这意味着将文件的URL转换为DOM。 这里我们使用jQuery在页面上呈现上传的个人资料照片:
var profilePhoto = profile.get("photoFile");
$("profileImg")[0].src = profilePhoto.url();
如果您要在Cloud Code中处理文件的数据,可以使用我们的http网络库检索该文件:
Parse.Cloud.httpRequest({ url: profilePhoto.url() }).then(function(response) {
  // The file contents are in response.buffer.
});
您可以使用REST API删除对象引用的文件。 您将需要提供主密钥,以便允许删除文件。
如果您的文件未被应用程序中的任何对象引用,则无法通过REST API删除它们。 您可以在应用程式的[设定]页面中要求清除未使用的档案。 请记住,这样做可能会破坏依赖于通过其网址属性访问未引用文件的功能。 当前与某个对象关联的文件将不受影响。
Promises
In addition to callbacks, every asynchronous method in the Parse JavaScript SDK returns a Promise. With promises, your code can be much cleaner than the nested code you get with callbacks.
Introduction to Promises
Promises represent the next great paradigm in JavaScript programming. But understanding why they are so great is no simple matter. At its core, a Promise represents the result of a task, which may or may not have completed. The only interface requirement of a Promise is having a function called then, which can be given callbacks to be called when the promise is fulfilled or has failed. This is outlined in the CommonJS Promises/A proposal. For example, consider saving a Parse.Object, which is an asynchronous operation. In the old callback paradigm, your code would look like this:
object.save({ key: value }, {
  success: function(object) {
    // the object was saved.
  },
  error: function(object, error) {
    // saving the object failed.
  }
});
In the new Promise paradigm, that same code would look like this:
object.save({ key: value }).then(
  function(object) {
    // the object was saved.
  },
  function(error) {
    // saving the object failed.
  });
Not much different, right? So what’s the big deal? Well, the real power of promises comes from chaining multiple of them together. Calling promise.then(func) returns a new promise, which is not fulfilled until func has completed. But there’s one really special thing about the way func is used. If a callback supplied to then returns a new promise, then the promise returned by then will not be fulfilled until the promise returned by the callback is fulfilled. The details of the behavior are explained in the Promises/A+ proposal. This is a complex topic, but maybe an example would make it clearer.
Imagine you’re writing code to log in, find an object, and then update it. In the old callback paradigm, you’d end up with what we call pyramid code:
Parse.User.logIn("user", "pass", {
  success: function(user) {
    query.find({
      success: function(results) {
        results[0].save({ key: value }, {
          success: function(result) {
            // the object was saved.
          }
        });
      }
    });
  }
});
That’s getting pretty ridiculous, and that’s without any error handling code even. But because of the way promise chaining works, the code can now be much flatter:
Parse.User.logIn("user", "pass").then(function(user) {
  return query.find();
}).then(function(results) {
  return results[0].save({ key: value });
}).then(function(result) {
  // the object was saved.
});
Ah! Much better!
The then Method
Every Promise has a method named then which takes a pair of callbacks. The first callback is called if the promise is resolved, while the second is called if the promise is rejected.
obj.save().then(function(obj) {
  // the object was saved successfully.
}, function(error) {
  // the save failed.
});
Chaining Promises Together
Promises are a little bit magical, in that they let you chain them without nesting. If a callback for a promise returns a new promise, then the first one will not be resolved until the second one is. This lets you perform multiple actions without incurring the pyramid code you would get with callbacks.
var query = new Parse.Query("Student");
query.descending("gpa");
query.find().then(function(students) {
  students[0].set("valedictorian", true);
  return students[0].save();

}).then(function(valedictorian) {
  return query.find();

}).then(function(students) {
  students[1].set("salutatorian", true);
  return students[1].save();

}).then(function(salutatorian) {
  // Everything is done!

});
Error Handling
The code samples above left out error handling for simplicity, but adding it back reiterates what a mess the old callback code could be:
Parse.User.logIn("user", "pass", {
  success: function(user) {
    query.find({
      success: function(results) {
        results[0].save({ key: value }, {
          success: function(result) {
            // the object was saved.
          },
          error: function(result, error) {
            // An error occurred.
          }
        });
      },
      error: function(error) {
        // An error occurred.
      }
    });
  },
  error: function(user, error) {
    // An error occurred.
  }
});
Because promises know whether they’ve been fulfilled or failed, they can propagate errors, not calling any callback until an error handler is encountered. For example, the code above could be written simply as:
Parse.User.logIn("user", "pass").then(function(user) {
  return query.find();
}).then(function(results) {
  return results[0].save({ key: value });
}).then(function(result) {
  // the object was saved.
}, function(error) {
  // there was some error.
});
Generally, developers consider a failing promise to be the asynchronous equivalent to throwing an exception. In fact, if a callback passed to then throws an error, the promise returned will fail with that error. If any Promise in a chain returns an error, all of the success callbacks after it will be skipped until an error callback is encountered. The error callback can transform the error, or it can handle it by returning a new Promise that isn’t rejected. You can think of rejected promises kind of like throwing an exception. An error callback is like a catch block that can handle the error or rethrow it.
var query = new Parse.Query("Student");
query.descending("gpa");
query.find().then(function(students) {
  students[0].set("valedictorian", true);
  // Force this callback to fail.
  return Parse.Promise.error("There was an error.");

}).then(function(valedictorian) {
  // Now this will be skipped.
  return query.find();

}).then(function(students) {
  // This will also be skipped.
  students[1].set("salutatorian", true);
  return students[1].save();
}, function(error) {
  // This error handler WILL be called. error will be "There was an error.".
  // Let's handle the error by returning a new promise.
  return Parse.Promise.as("Hello!");

}).then(function(hello) {
  // Everything is done!
}, function(error) {
  // This isn't called because the error was already handled.
});
It’s often convenient to have a long chain of success callbacks with only one error handler at the end.
Creating Promises
When you’re getting started, you can just use the promises returned from methods like find or save. However, for more advanced scenarios, you may want to make your own promises. After you create a Promise, you’ll need to call resolve or reject to trigger its callbacks.
var successful = new Parse.Promise();
successful.resolve("The good result.");

var failed = new Parse.Promise();
failed.reject("An error message.");
If you know the result of a promise at the time it is created, there are some convenience methods you can use.
var successful = Parse.Promise.as("The good result.");

var failed = Parse.Promise.error("An error message.");
Promises in Series
Promises are convenient when you want to do a series of tasks in a row, each one waiting for the previous to finish. For example, imagine you want to delete all of the comments on your blog.
var query = new Parse.Query("Comments");
query.equalTo("post", 123);

query.find().then(function(results) {
  // Create a trivial resolved promise as a base case.
  var promise = Parse.Promise.as();
  _.each(results, function(result) {
    // For each item, extend the promise with a function to delete it.
    promise = promise.then(function() {
      // Return a promise that will be resolved when the delete is finished.
      return result.destroy();
    });
  });
  return promise;

}).then(function() {
  // Every comment was deleted.
});
Promises in Parallel
You can also use promises to perform several tasks in parallel, using the when method. You can start multiple operations at once, and use Parse.Promise.when to create a new promise that will be resolved when all of its input promises is resolved. The new promise will be successful if none of the passed-in promises fail; otherwise, it will fail with the last error. Performing operations in parallel will be faster than doing them serially, but may consume more system resources and bandwidth.
var query = new Parse.Query("Comments");
query.equalTo("post", 123);

query.find().then(function(results) {
  // Collect one promise for each delete into an array.
  var promises = [];
  _.each(results, function(result) {
    // Start this delete immediately and add its promise to the list.
    promises.push(result.destroy());
  });
  // Return a new promise that is resolved when all of the deletes are finished.
  return Parse.Promise.when(promises);

}).then(function() {
  // Every comment was deleted.
});
Creating Async Methods
With these tools, it’s easy to make your own asynchronous functions that return promises. For example, you can make a promisified version of setTimeout.
var delay = function(millis) {
  var promise = new Parse.Promise();
  setTimeout(function() {
    promise.resolve();
  }, millis);
  return promise;
};

delay(100).then(function() {
  // This ran after 100ms!
});
GeoPoints
Parse allows you to associate real-world latitude and longitude coordinates with an object. Adding a Parse.GeoPoint to a Parse.Object allows queries to take into account the proximity of an object to a reference point. This allows you to easily do things like find out what user is closest to another user or which places are closest to a user.
Parse.GeoPoint
To associate a point with an object you first need to create a Parse.GeoPoint. For example, to create a point with latitude of 40.0 degrees and -30.0 degrees longitude:
var point = new Parse.GeoPoint({latitude: 40.0, longitude: -30.0});
This point is then stored in the object as a regular field.
placeObject.set("location", point);
Note: Currently only one key in a class may be a Parse.GeoPoint.
Geo Queries
Now that you have a bunch of objects with spatial coordinates, it would be nice to find out which objects are closest to a point. This can be done by adding another restriction to Parse.Query using near. Getting a list of ten places that are closest to a user may look something like:
// User's location
var userGeoPoint = userObject.get("location");
// Create a query for places
var query = new Parse.Query(PlaceObject);
// Interested in locations near user.
query.near("location", userGeoPoint);
// Limit what could be a lot of points.
query.limit(10);
// Final list of objects
query.find({
  success: function(placesObjects) {
  }
});
At this point placesObjects will be an array of objects ordered by distance (nearest to farthest) from userGeoPoint. Note that if an additional ascending()/descending() order-by constraint is applied, it will take precedence over the distance ordering.
To limit the results using distance, check out withinMiles, withinKilometers, and withinRadians.
It’s also possible to query for the set of objects that are contained within a particular area. To find the objects in a rectangular bounding box, add the withinGeoBox restriction to your Parse.Query.
var southwestOfSF = new Parse.GeoPoint(37.708813, -122.526398);
var northeastOfSF = new Parse.GeoPoint(37.822802, -122.373962);

var query = new Parse.Query(PizzaPlaceObject);
query.withinGeoBox("location", southwestOfSF, northeastOfSF);
query.find({
  success: function(pizzaPlacesInSF) {
    ...
  }
});
Caveats
At the moment there are a couple of things to watch out for:
- Each Parse.Object class may only have one key with a Parse.GeoPoint object.
- Using the
nearconstraint will also limit results to within 100 miles. - Points should not equal or exceed the extreme ends of the ranges. Latitude should not be -90.0 or 90.0. Longitude should not be -180.0 or 180.0. Attempting to set latitude or longitude out of bounds will cause an error.
Push Notifications
If you haven’t installed the SDK yet, please head over to the Push QuickStart to get our SDK up and running.
Introduction
Push Notifications are a great way to keep your users engaged and informed about your app. You can reach your entire user base quickly and effectively. This guide will help you through the setup process and the general usage of Parse to send push notifications.
Setting Up Push
There is no setup required to use the JavaScript SDK for sending push notifications. If you haven’t configured your iOS or Android clients to use Push, take a look at their respective setup instruction using the platform toggle at the top.
Installations
Every Parse application installed on a device registered for push notifications has an associated Installation object. The Installation object is where you store all the data needed to target push notifications. For example, in a baseball app, you could store the teams a user is interested in to send updates about their performance.
Note that Installation data can only be modified by the client SDKs, the data browser, or the REST API.
This class has several special fields that help you manage and target devices.
badge: The current value of the icon badge for iOS apps. Changes to this value on the server will be used for future badge-increment push notifications.channels: An array of the channels to which a device is currently subscribed.timeZone: The current time zone where the target device is located. This value is synchronized every time anInstallationobject is saved from the device.deviceType: The type of device, “ios”, “android”, “winrt”, “winphone”, or “dotnet”(readonly).pushType: This field is reserved for directing Parse to the push delivery network to be used. If the device is registered to receive pushes via GCM, this field will be marked “gcm”. If this device is not using GCM, and is using Parse’s push notification service, it will be blank (readonly).installationId: Universally Unique Identifier (UUID) for the device used by Parse. It must be unique across all of an app’s installations. (readonly).deviceToken: The Apple or Google generated token used to deliver messages to the APNs or GCM push networks respectively.channelUris: The Microsoft-generated push URIs for Windows devices.appName: The display name of the client application to which this installation belongs.appVersion: The version string of the client application to which this installation belongs.parseVersion: The version of the Parse SDK which this installation uses.appIdentifier: A unique identifier for this installation’s client application. In iOS, this is the Bundle Identifier.
Sending Pushes
There are two ways to send push notifications using Parse: channels and advanced targeting. Channels offer a simple and easy to use model for sending pushes, while advanced targeting offers a more powerful and flexible model. Both are fully compatible with each other and will be covered in this section.
Sending notifications is often done from the Parse.com push console, the REST API or from Cloud Code. Since the JavaScript SDK is used in Cloud Code, this is the place to start if you want to send pushes from your Cloud Functions. However, if you decide to send notifications from the JavaScript SDK outside of Cloud Code or any of the other client SDKs, you will need to set Client Push Enabled in the Push Notifications settings of your Parse app.
However, be sure you understand that enabling Client Push can lead to a security vulnerability in your app, as outlined on our blog. We recommend that you enable Client Push for testing purposes only, and move your push notification logic into Cloud Code when your app is ready to go into production.
You can view your past push notifications on the Parse.com push console for up to 30 days after creating your push. For pushes scheduled in the future, you can delete the push on the push console as long as no sends have happened yet.
After you send the push, the push console shows push analytics graphs.
Using Channels
The simplest way to start sending notifications is using channels. This allows you to use a publisher-subscriber model for sending pushes. Devices start by subscribing to one or more channels, and notifications can later be sent to these subscribers. The channels subscribed to by a given Installation are stored in the channels field of the Installation object.
Subscribing to Channels
The JavaScript SDK does not currently support subscribing iOS and Android devices for pushes. Take a look at the iOS, Android or REST Push guide using the platform toggle at the top.
Sending Pushes to Channels
With the JavaScript SDK, the following code can be used to alert all subscribers of the “Giants” and “Mets” channels about the results of the game. This will display a notification center alert to iOS users and a system tray notification to Android users.
Parse.Push.send({
  channels: [ "Giants", "Mets" ],
  data: {
    alert: "The Giants won against the Mets 2-3."
  }
}, {
  success: function() {
    // Push was successful
  },
  error: function(error) {
    // Handle error
  }
});
Using Advanced Targeting
While channels are great for many applications, sometimes you need more precision when targeting the recipients of your pushes. Parse allows you to write a query for any subset of your Installation objects using the querying API and to send them a push.
Since Installation objects are just like any other object stored in Parse, you can save any data you want and even create relationships between Installation objects and your other objects. This allows you to send pushes to a very customized and dynamic segment of your user base.
Saving Installation Data
The JavaScript SDK does not currently support modifying Installation objects. Take a look at the iOS, Android or REST Push guide for more on this topic.
Sending Pushes to Queries
Once you have your data stored on your Installation objects, you can use a query to target a subset of these devices. Parse.Installation queries work just like any other Parse query.
var query = new Parse.Query(Parse.Installation);
query.equalTo('injuryReports', true);

Parse.Push.send({
  where: query, // Set our Installation query
  data: {
    alert: "Willie Hayes injured by own pop fly."
  }
}, {
  success: function() {
    // Push was successful
  },
  error: function(error) {
    // Handle error
  }
});
We can even use channels with our query. To send a push to all subscribers of the “Giants” channel but filtered by those who want score update, we can do the following:
var query = new Parse.Query(Parse.Installation);
query.equalTo('channels', 'Giants'); // Set our channel
query.equalTo('scores', true);

Parse.Push.send({
  where: query,
  data: {
    alert: "Giants scored against the A's! It's now 2-2."
  }
}, {
  success: function() {
    // Push was successful
  },
  error: function(error) {
    // Handle error
  }
});
If we store relationships to other objects in our Installation class, we can also use those in our query. For example, we could send a push notification to all users near a given location like this.
// Find users near a given location
var userQuery = new Parse.Query(Parse.User);
userQuery.withinMiles("location", stadiumLocation, 1.0);

// Find devices associated with these users
var pushQuery = new Parse.Query(Parse.Installation);
pushQuery.matchesQuery('user', userQuery);

// Send push notification to query
Parse.Push.send({
  where: pushQuery,
  data: {
    alert: "Free hotdogs at the Parse concession stand!"
  }
}, {
  success: function() {
    // Push was successful
  },
  error: function(error) {
    // Handle error
  }
});
Sending Options
Push notifications can do more than just send a message. In iOS, pushes can also include the sound to be played, the badge number to display as well as any custom data you wish to send. In Android, it is even possible to specify an Intent to be fired upon receipt of a notification. An expiration date can also be set for the notification in case it is time sensitive.
Customizing your Notifications
If you want to send more than just a message, you can set other fields in the data dictionary. There are some reserved fields that have a special meaning.
alert: the notification’s message.badge: (iOS only) the value indicated in the top right corner of the app icon. This can be set to a value or toIncrementin order to increment the current value by 1.sound: (iOS only) the name of a sound file in the application bundle.content-available: (iOS only) If you are a writing a Newsstand app, or an app using the Remote Notification Background Mode introduced in iOS7 (a.k.a. “Background Push”), set this value to 1 to trigger a background download.category: (iOS only) the identifier of theUIUserNotificationCategoryfor this push notification.uri: (Android only) an optional field that contains a URI. When the notification is opened, anActivityassociated with opening the URI is launched.title: (Android only) the value displayed in the Android system tray notification.
For example, to send a notification that increases the current badge number by 1 and plays a custom sound for iOS devices, and displays a particular title for Android users, you can do the following:
Parse.Push.send({
  channels: [ "Mets" ],
  data: {
    alert: "The Mets scored! The game is now tied 1-1.",
    badge: "Increment",
    sound: "cheering.caf",
    title: "Mets Score!"
  }
}, {
  success: function() {
    // Push was successful
  },
  error: function(error) {
    // Handle error
  }
});
It is also possible to specify your own data in this dictionary. As explained in the Receiving Notifications section for iOS and Android, iOS will give you access to this data only when the user opens your app via the notification and Android will provide you this data in the Intent if one is specified.
var query = new Parse.Query(Parse.Installation);
query.equalTo('channels', 'Indians');
query.equalTo('injuryReports', true);

Parse.Push.send({
  where: query,
  data: {
    action: "com.example.UPDATE_STATUS"
    alert: "Ricky Vaughn was injured in last night's game!",
    name: "Vaughn",
    newsItem: "Man bites dog"
  }
}, {
  success: function() {
    // Push was successful
  },
  error: function(error) {
    // Handle error
  }
});
Setting an Expiration Date
When a user’s device is turned off or not connected to the internet, push notifications cannot be delivered. If you have a time sensitive notification that is not worth delivering late, you can set an expiration date. This avoids needlessly alerting users of information that may no longer be relevant.
There are two parameters provided by Parse to allow setting an expiration date for your notification. The first is expiration_time which takes a Date specifying when Parse should stop trying to send the notification. To expire the notification exactly 1 week from now, you can use the following:
var oneWeekAway = new Date(...);

Parse.Push.send({
  where: everyoneQuery,
  expiration_time: oneWeekAway,
  data: {
    alert: "Season tickets on sale until next week!"
  }
}, {
  success: function() {
    // Push was successful
  },
  error: function(error) {
    // Handle error
  }
});
Alternatively, you can use the expiration_interval parameter to specify a duration of time before your notification expires. This value is relative to the push_time parameter used to schedule notifications. This means that a push notification scheduled to be sent out in 1 day and an expiration interval of 6 days can be received up to a week from now.
var oneDayAway = new Date(...);
var sixDaysAwayEpoch = (new Date(...)).getTime();

Parse.Push.send({
  push_time: oneDayAway,
  expiration_interval: sixDaysAwayEpoch,
  data: {
    alert: "Season tickets on sale until next week!"
  }
}, {
  success: function() {
    // Push was successful
  },
  error: function(error) {
    // Handle error
  }
});
Targeting by Platform
If you build a cross platform app, it is possible you may only want to target iOS or Android devices. There are two methods provided to filter which of these devices are targeted. Note that both platforms are targeted by default.
The following examples would send a different notification to Android and iOS users.
// Notification for Android users
var queryAndroid = new Parse.Query(Parse.Installation);
queryAndroid.equalTo('deviceType', 'android');

Parse.Push.send({
  where: queryAndroid,
  data: {
    alert: "Your suitcase has been filled with tiny robots!"
  }
});

// Notification for iOS users
var queryIOS = new Parse.Query(Parse.Installation);
queryIOS.equalTo('deviceType', 'ios');

Parse.Push.send({
  where: queryIOS,
  data: {
    alert: "Your suitcase has been filled with tiny apples!"
  }
});

// Notification for Windows 8 users
var queryWindows = new Parse.Query(Parse.Installation);
queryWindows.equalTo('deviceType', 'winrt');

Parse.Push.send({
  where: queryWindows,
  data: {
    alert: "Your suitcase has been filled with tiny glass!"
  }
});

// Notification for Windows Phone 8 users
var queryWindowsPhone = new Parse.Query(Parse.Installation);
queryWindowsPhone.equalTo('deviceType', 'winphone');

Parse.Push.send({
  where: queryWindowsPhone,
  data: {
    alert: "Your suitcase is very hip; very metro."
  }
});
Scheduling Pushes
You can schedule a push in advance by specifying a push_time. For example, if a user schedules a game reminder for a game tomorrow at noon UTC, you can schedule the push notification by sending:
var tomorrowDate = new Date(...);

var query = new Parse.Query(Parse.Installation);
query.equalTo('user_id', 'user_123');

Parse.Push.send({
  where: query,
  data: {
    alert: "You previously created a reminder for the game today"
  },
  push_time: tomorrowDate
}, {
  success: function() {
    // Push was successful
  },
  error: function(error) {
    // Handle error
  }
});
If you also specify an expiration_interval, it will be calculated from the scheduled push time, not from the time the push is submitted. This means a push scheduled to be sent in a week with an expiration interval of a day will expire 8 days after the request is sent.
The scheduled time cannot be in the past, and can be up to two weeks in the future. It can be an ISO 8601 date with a date, time, and timezone, as in the example above, or it can be a numeric value representing a UNIX epoch time in seconds (UTC). To schedule an alert for 08/22/2015 at noon UTC time, you can set the push_time to either 2015-08-022T12:00:00 or 1440226800.
Receiving Pushes
The JavaScript SDK does not currently support receiving pushes. To learn more about handling received notifications in iOS or Android, use the platform toggle at the top.
Troubleshooting
For tips on troubleshooting push notifications, check the troubleshooting sections for iOS, Android, and .NET using the platform toggle at the top.
配置
Parse.Config是通过在Parse上存储单个配置对象来远程配置应用程序的好方法。 它使您能够添加功能选通或简单的“每日消息”。 要开始使用Parse.Config,您需要在Parse Config Dashboard上添加一些键/值对(参数)到您的应用程序。
之后,您将能够在客户端上获取“Parse.Config”,如下例所示:
Parse.Config.get().then(function(config) {
  var winningNumber = config.get("winningNumber");
  var message = "Yay! The number is " + winningNumber + "!";
  console.log(message);
}, function(error) {
  // Something went wrong (e.g. request timed out)
});
检索配置
ParseConfig被建立为尽可能的鲁棒和可靠,即使面对不良的互联网连接。 默认情况下使用缓存,以确保最新成功获取的配置始终可用。 在下面的例子中,我们使用get从服务器检索最新版本的config,如果fetch失败了,我们可以简单地回到我们通过current获取的版本。
Parse.Config.get().then(function(config) {
  console.log("Yay! Config was fetched from the server.");

  var welcomeMessage = config.get("welcomeMessage");
  console.log("Welcome Message = " + welcomeMessage);
}, function(error) {
  console.log("Failed to fetch. Using Cached Config.");

  var config = Parse.Config.current();
  var welcomeMessage = config.get("welcomeMessage");
  if (welcomeMessage === undefined) {
    welcomeMessage = "Welcome!";
  }
  console.log("Welcome Message = " + welcomeMessage);
});
当前配置
你得到的每个Parse.Config实例总是不可变的。 当你从网络中检索一个新的Parse.Config时,它不会修改任何现有的Parse.Config实例,而是会创建一个新的Parse.Config,并通过Parse.Config.current() 。 因此,你可以安全地传递任何current()对象,并且安全地假设它不会自动改变。
从服务器检索配置每次你想使用它可能是麻烦的。 你可以通过简单地使用缓存的current()对象,并在一段时间内只获取一次配置来避免这种情况。
// Fetches the config at most once every 12 hours per app runtime
var refreshConfig = function() {
  var lastFetchedDate;
  var configRefreshInterval = 12 * 60 * 60 * 1000;
  return function() {
    var currentDate = new Date();
    if (lastFetchedDate === undefined ||
        currentDate.getTime() - lastFetchedDate.getTime() > configRefreshInterval) {
      Parse.Config.get();
      lastFetchedDate = currentDate;
    }
  };
}();
参数
ParseConfig支持Parse.Object支持的大多数数据类型:
- string
- number
- Date
- Parse.File
- Parse.GeoPoint
- JS Array
- JS Object
我们目前在配置中允许最多** 100 个参数,所有参数的总大小为 128KB **。
分析
Parse为你获取你的程序的内部细节提供了一些钩子。我们知道那对你了解你应用做了什么,以及一些状况,比如使用频率、时间非常重要。
虽然本节将介绍不同的方法来测试您的应用程序,以充分利用Parse的分析后端,但使用Parse存储和检索数据的开发人员已经可以利用Parse上的指标优势。
无需实施任何客户端逻辑,您可以在应用的信息中心中查看API请求的实时图表和细分(按设备类型,解析类名或REST动词),并保存这些图表过滤器,以便快速访问 您感兴趣的数据。
自定义分析
Parse.Analytics也允许你跟踪自由形式的事件,用一些string键和值。 这些额外的维度允许您通过应用的信息中心对自定义事件进行细分。
假设您的应用程式提供公寓资讯的搜寻功能,而且您想追踪使用这项功能的频率,以及一些额外的中继资料。
var dimensions = {
  // Define ranges to bucket data points into meaningful segments
  priceRange: '1000-1500',
  // Did the user filter the query?
  source: 'craigslist',
  // Do searches happen more often on weekdays or weekends?
  dayType: 'weekday'
};
// Send the dimensions to Parse along with the 'search' event
Parse.Analytics.track('search', dimensions);
Parse.Analytics甚至可以用作一个轻量级的错误跟踪器&mdash; 只需调用以下内容,您就可以访问应用程序中错误的速率和频率(按错误代码细分)的概述:
var codeString = '' + error.code;
Parse.Analytics.track('error', { code: codeString });
注意,Parse当前只存储每次调用Parse.Analytics.track()的前八个维度对。
Data
We’ve designed the Parse SDKs so that you typically don’t need to worry about how data is saved while using the client SDKs. Simply add data to the Parse Object, and it’ll be saved correctly.
Nevertheless, there are some cases where it’s useful to be aware of how data is stored on the Parse platform.
Data Storage
Internally, Parse stores data as JSON, so any datatype that can be converted to JSON can be stored on Parse. Refer to the Data Types in Objects section of this guide to see platform-specific examples.
Keys including the characters $ or ., along with the key __type key, are reserved for the framework to handle additional types, so don’t use those yourself. Key names must contain only numbers, letters, and underscore, and must start with a letter. Values can be anything that can be JSON-encoded.
Data Type Lock-in
When a class is initially created, it doesn’t have an inherent schema defined. This means that for the first object, it could have any types of fields you want.
However, after a field has been set at least once, that field is locked into the particular type that was saved. For example, if a User object is saved with field name of type String, that field will be restricted to the String type only (the server will return an error if you try to save anything else).
One special case is that any field can be set to null, no matter what type it is.
The Data Browser
The Data Browser is the web UI where you can update and create objects in each of your apps. Here, you can see the raw JSON values that are saved that represents each object in your class.
When using the interface, keep in mind the following:
- The
objectId,createdAt,updatedAtfields cannot be edited (these are set automatically). - The value “(empty)” denotes that the field has not been set for that particular object (this is different than
null). - You can remove a field’s value by hitting your Delete key while the value is selected.
The Data Browser is also a great place to test the Cloud Code validations contained in your Cloud Code functions (such as beforeSave). These are run whenever a value is changed or object is deleted from the Data Browser, just as they would be if the value was changed or deleted from your client code.
Importing Data
You may import data into your Parse app by using CSV or JSON files. To create a new class with data from a CSV or JSON file, go to the Data Browser and click the “Import” button on the left hand column.
The JSON format is an array of objects in our REST format or a JSON object with a results that contains an array of objects. It must adhere to the JSON standard. A file containing regular objects could look like:
{ "results": [
  {
    "score": 1337,
    "playerName": "Sean Plott",
    "cheatMode": false,
    "createdAt": "2012-07-11T20:56:12.347Z",
    "updatedAt": "2012-07-11T20:56:12.347Z",
    "objectId": "fchpZwSuGG"
  }]
}
Objects in either format should contain keys and values that also satisfy the following:
- Key names must contain only numbers, letters, and underscore, and must start with a letter.
- No value may contain a hard newline ‘
\n’.
Normally, when objects are saved to Parse, they are automatically assigned a unique identifier through the objectId field, as well as a createdAt field and updatedAt field which represent the time that the object was created and last modified in the Parse Cloud. These fields can be manually set when data is imported from a JSON file. Please keep in mind the following:
- Use a unique 10 character alphanumeric string as the value of your
objectIdfields. - Use a UTC timestamp in the ISO 8601 format when setting a value for the
createdAtfield or theupdatedAtfield.
In addition to the exposed fields, objects in the Parse User class can also have the bcryptPassword field set. The value of this field is a String that is the bcrypt hashed password + salt in the modular crypt format described in this StackOverflow answer. Most OpenSSL based bcrypt implementations should have built-in methods to produce these strings.
A file containing a User object could look like:
{ "results":
  [{
    "username": "cooldude",
    "createdAt": "1983-09-13T22:42:30.548Z",
    "updatedAt": "2015-09-04T10:12:42.137Z",
    "objectId": "ttttSEpfXm",
    "sessionToken": "dfwfq3dh0zwe5y2sqv514p4ib",
    "bcryptPassword": "$2a$10$ICV5UeEf3lICfnE9W9pN9.O9Ved/ozNo7G83Qbdk5rmyvY8l16MIK"
  }]
}
Note that in CSV the import field types are limited to String, Boolean, and Number.
Exporting your Data
You can request an export of your data at any time from your app’s Settings page. The data export runs at a lower priority than production queries, so if your app is still serving queries, production traffic will always be given a higher priority, which may slow down the delivery of your data export.
Export Formats
Each collection will be exported in the same JSON format used by our REST API and delivered in a single zipped file. Since data is stored internally as JSON, this allows us to ensure that the export closely matches how the data is saved to Parse. Other formats such as CSV cannot represent all of the data types supported by Parse without losing information. If you’d like to work with your data in CSV format, you can use any of the JSON-to-CSV converters available widely on the web.
Offline Analysis
For offline analysis of your data, we highly recommend using alternate ways to access your data that do not require extracting the entire collection at once. For example, you can try exporting only the data that has changed since your last export. Here are some ways of achieving this:
-
Use the JavaScript SDK in a node app.
Parse.Query.each()will allow you to extract every single object that matches a query. You can use date constraints to make sure the query only matches data that has been updated since you last ran this app. Your node app can write this data to disk for offline analysis. -
Use the REST API in a script. You can run queries against your class and use skip/limit to page through results, which can then be written to disk for offline analysis. You can again use date constraints to make sure only newly updated data is extracted.
-
If the above two options do not fit your needs, you can try using the Data Browser to export data selectively. Use the Funnel icon to create a filter for the specific data that you need to export, such as newly updated objects. Once the filter has been applied, click on the Export data icon on the upper right of your Data Browser. This type of export will only include the objects that match your criteria.
Relations
There are three kinds of relationships. One-to-one relationships enable one object to be associated with another object. One-to-many relationships enable one object to have many related objects. Finally, many-to-many relationships enable complex relationships among many objects.
There are four ways to build relationships in Parse:
One-to-Many
When you’re thinking about one-to-many relationships and whether to implement Pointers or Arrays, there are several factors to consider. First, how many objects are involved in this relationship? If the “many” side of the relationship could contain a very large number (greater than 100 or so) of objects, then you have to use Pointers. If the number of objects is small (fewer than 100 or so), then Arrays may be more convenient, especially if you typically need to get all of the related objects (the “many” in the “one-to-many relationship”) at the same time as the parent object.
Using Pointers
Let’s say we have a game app. The game keeps track of the player’s score and achievements every time she chooses to play. In Parse, we can store this data in a single Game object. If the game becomes incredibly successful, each player will store thousands of Game objects in the system. For circumstances like this, where the number of relationships can be arbitrarily large, Pointers are the best option.
Suppose in this game app, we want to make sure that every Game object is associated with a Parse User. We can implement this like so:
ParseObject game = new ParseObject("Game");
game.put("createdBy", ParseUser.getCurrentUser());
PFObject *game= [PFObject objectWithClassName:@"Game"];
[game setObject:[PFUser currentUser] forKey:@"createdBy"];
let game = PFObject(className:"Game")
game["createdBy"] = PFUser.currentUser()
$game = ParseObject::create("Game");
$game->set("createdBy", ParseUser::getCurrentUser());
var game = new ParseObject("Game");
game["createdBy"] = ParseUser.CurrentUser;
var game = new Parse.Object("Game");
game.set("createdBy", Parse.User.current());
# No REST API example
// No C++ example
We can obtain all of the Game objects created by a Parse User with a query:
ParseQuery<ParseObject> gameQuery = ParseQuery.getQuery("Game");
gameQuery.whereEqualTo("createdBy", ParseUser.getCurrentUser());
PFQuery *gameQuery = [PFQuery queryWithClassName:@"Game"];
[gameQuery whereKey:@"createdBy" equalTo:[PFUser currentUser]];
let gameQuery = PFQuery(className:"Game")
if let user = PFUser.currentUser() {
  gameQuery.whereKey("createdBy", equalTo: user)
}
$gameQuery = new ParseQuery("Game");
$gameQuery->equalTo("createdBy", ParseUser::getCurrentUser());
var query = ParseObject.getQuery("Game").WhereEqualTo("createdBy", ParseUser.CurrentUser);
var query = new Parse.Query("Game");
query.equalTo("createdBy", Parse.User.current());
# No REST API example
// No C++ example
And, if we want to find the Parse User who created a specific Game, that is a lookup on the createdBy key:
// say we have a Game object
ParseObject game = ...

// getting the user who created the Game
ParseUser createdBy = game.getUser("createdBy");
// say we have a Game object
PFObject *game = ...

// getting the user who created the Game
PFUser *createdBy = [game objectForKey@"createdBy"];
// say we have a Game object
let game = ...

// getting the user who created the Game
let createdBy = game["createdBy"]
// say we have a Game object
$game = ...

// getting the user who created the Game
$user = $game["createdBy"];
// say we have a Game object
ParseObject game = ...

// getting the user who created the Game
ParseUser user = game["createdBy"];
// say we have a Game object
var game = ...

// getting the user who created the Game
var user = game.get("createdBy");
# No REST API example
// No C++ example
For most scenarios, Pointers will be your best bet for implementing one-to-many relationships.
Using Arrays
Arrays are ideal when we know that the number of objects involved in our one-to-many relationship are going to be small. Arrays will also provide some productivity benefit via the includeKey parameter. Supplying the parameter will enable you to obtain all of the “many” objects in the “one-to-many” relationship at the same time that you obtain the “one” object. However, the response time will be slower if the number of objects involved in the relationship turns out to be large.
Suppose in our game, we enabled players to keep track of all the weapons their character has accumulated as they play, and there can only be a dozen or so weapons. In this example, we know that the number of weapons is not going to be very large. We also want to enable the player to specify the order in which the weapons will appear on screen. Arrays are ideal here because the size of the array is going to be small and because we also want to preserve the order the user has set each time they play the game:
Let’s start by creating a column on our Parse User object called weaponsList.
Now let’s store some Weapon objects in the weaponsList:
// let's say we have four weapons
ParseObject scimitar = ...
ParseObject plasmaRifle = ...
ParseObject grenade = ...
ParseObject bunnyRabbit = ...

// stick the objects in an array
ArrayList<ParseObject> weapons = new ArrayList<ParseObject>();
weapons.add(scimitar);
weapons.add(plasmaRifle);
weapons.add(grenade);
weapons.add(bunnyRabbit);

// store the weapons for the user
ParseUser.getCurrentUser().put("weaponsList", weapons);
// let's say we have four weapons
PFObject *scimitar = ...
PFObject *plasmaRifle = ...
PFObject *grenade = ...
PFObject *bunnyRabbit = ...

// stick the objects in an array
NSArray *weapons = @[scimitar, plasmaRifle, grenade, bunnyRabbit];

// store the weapons for the user
[[PFUser currentUser] setObject:weapons forKey:@weaponsList"];
// let's say we have four weapons
let scimitar = ...
let plasmaRifle = ...
let grenade = ...
let bunnyRabbit = ...

// stick the objects in an array
let weapons = [scimitar, plasmaRifle, grenade, bunnyRabbit]

// store the weapons for the user
let user = PFUser.currentUser()
user["weaponsList"] = weapons
// let's say we have four weapons
$scimitar = ...
$plasmaRifle = ...
$grenade = ...
$bunnyRabbit = ...

// stick the objects in an array
$weapons = [$scimitar, $plasmaRifle, $grenade, $bunnyRabbit];

// store the weapons for the user
$user = ParseUser::getCurrentUser();
$user->set("weaponsList", weapons);
// let's say we have four weapons
var scimitar = ...
var plasmaRifle = ...
var grenade = ...
var bunnyRabbit = ...

// stick the objects in an array
var weapons = new List<ParseObject>();
weapons.Add(scimitar);
weapons.Add(plasmaRifle);
weapons.Add(grenade);
weapons.Add(bunnyRabbit);

// store the weapons for the user
var user = ParseUser.CurrentUser;
user.AddRangeToList("weaponsList", weapons);
// let's say we have four weapons
var scimitar = ...
var plasmaRifle = ...
var grenade = ...
var bunnyRabbit = ...

// stick the objects in an array
var weapons = [scimitar, plasmaRifle, grenade, bunnyRabbit];

// store the weapons for the user
var user = Parse.User.current();
user.set("weaponsList", weapons);
# No REST API example
// No C++ example
Later, if we want to retrieve the Weapon objects, it’s just one line of code:
ArrayList<ParseObject> weapons = ParseUser.getCurrentUser().get("weaponsList");
NSArray *weapons = [[PFUser currentUser] objectForKey:@"weaponsList"];
let weapons = PFUser.currentUser()?.objectForKey("weaponsList")
$weapons = ParseUser::getCurrentUser()->get("weaponsList");
var weapons = ParseUser.CurrentUser.Get<IList<Object>>("weaponsList");
var weapons = Parse.User.current().get("weaponsList")
# No REST API example
// No C++ example
Sometimes, we will want to fetch the “many” objects in our one-to-many relationship at the same time as we fetch the “one” object. One trick we could employ is to use the includeKey (or include in Android) parameter whenever we use a Parse Query to also fetch the array of Weapon objects (stored in the weaponsList column) along with the Parse User object:
// set up our query for a User object
ParseQuery<ParseUser> userQuery = ParseUser.getQuery();

// configure any constraints on your query...
// for example, you may want users who are also playing with or against you
// tell the query to fetch all of the Weapon objects along with the user
// get the "many" at the same time that you're getting the "one"
userQuery.include("weaponsList");

// execute the query
userQuery.findInBackground(new FindCallback<ParseUser>() {
  public void done(List<ParseUser> userList, ParseException e) {
    // userList contains all of the User objects, and their associated Weapon objects, too
  }
});
// set up our query for a User object
PFQuery *userQuery = [PFUser query];

// configure any constraints on your query...
// for example, you may want users who are also playing with or against you

// tell the query to fetch all of the Weapon objects along with the user
// get the "many" at the same time that you're getting the "one"
[userQuery includeKey:@"weaponsList"];

// execute the query
[userQuery findObjectsInBackgroundWithBlock:^(NSArray *objects, NSError *error) {
    // objects contains all of the User objects, and their associated Weapon objects, too
}];
// set up our query for a User object
let userQuery = PFUser.query();

// configure any constraints on your query...
// for example, you may want users who are also playing with or against you

// tell the query to fetch all of the Weapon objects along with the user
// get the "many" at the same time that you're getting the "one"
userQuery?.includeKey("weaponsList");

// execute the query
userQuery?.findObjectsInBackgroundWithBlock {
    (objects: [AnyObject]?, error: NSError?) -> Void in
    // objects contains all of the User objects, and their associated Weapon objects, too
}
// set up our query for a User object
$userQuery = ParseUser::query();

// configure any constraints on your query...
// for example, you may want users who are also playing with or against you

// tell the query to fetch all of the Weapon objects along with the user
// get the "many" at the same time that you're getting the "one"
$userQuery->includeKey("weaponsList");

// execute the query
$results = $userQuery->find();
// results contains all of the User objects, and their associated Weapon objects, too
// set up our query for a User object
var userQuery = ParseUser.Query;

// configure any constraints on your query...
// for example, you may want users who are also playing with or against you

// tell the query to fetch all of the Weapon objects along with the user
// get the "many" at the same time that you're getting the "one"
userQuery = userQuery.Include("weaponsList");

// execute the query
IEnumerable<ParseUser> results = await userQuery.FindAsync();
// results contains all of the User objects, and their associated Weapon objects, too
// set up our query for a User object
var userQuery = new Parse.Query(Parse.User);

// configure any constraints on your query...
// for example, you may want users who are also playing with or against you

// tell the query to fetch all of the Weapon objects along with the user
// get the "many" at the same time that you're getting the "one"
userQuery.include("weaponsList");

// execute the query
userQuery.find({
  success: function(results){
    // results contains all of the User objects, and their associated Weapon objects, too
  }
});
# No REST API example
// No C++ example
You can also get the “one” side of the one-to-many relationship from the “many” side. For example, if we want to find all Parse User objects who also have a given Weapon, we can write a constraint for our query like this:
// add a constraint to query for whenever a specific Weapon is in an array
userQuery.whereEqualTo("weaponsList", scimitar);

// or query using an array of Weapon objects...
userQuery.whereEqualTo("weaponsList", arrayOfWeapons);
// add a constraint to query for whenever a specific Weapon is in an array
[userQuery whereKey:@"weaponsList" equalTo:scimitar];

// or query using an array of Weapon objects...
[userQuery whereKey:@"weaponsList" containedIn:arrayOfWeapons];
// add a constraint to query for whenever a specific Weapon is in an array
userQuery?.whereKey("weaponsList", equalTo: scimitar);

// or query using an array of Weapon objects...
userQuery?.whereKey("weaponsList", containedIn: arrayOfWeapons)
// add a constraint to query for whenever a specific Weapon is in an array
$userQuery->equalTo("weaponsList", $scimitar);

// or query using an array of Weapon objects...
$userQuery->containedIn("weaponsList", $arrayOfWeapons);
// add a constraint to query for whenever a specific Weapon is in an array
userQuery = userQuery.WhereEqualTo("weaponsList", scimitar);

// or query using an array of Weapon objects...
userQuery = userQuery.WhereContainedIn("weaponsList", arrayOfWeapons);
// add a constraint to query for whenever a specific Weapon is in an array
userQuery.equalTo("weaponsList", scimitar);

// or query using an array of Weapon objects...
userQuery.containedIn("weaponsList", arrayOfWeapons);
# No REST API example
// No C++ example
Many-to-Many
Now let’s tackle many-to-many relationships. Suppose we had a book reading app and we wanted to model Book objects and Author objects. As we know, a given author can write many books, and a given book can have multiple authors. This is a many-to-many relationship scenario where you have to choose between Arrays, Parse Relations, or creating your own Join Table.
The decision point here is whether you want to attach any metadata to the relationship between two entities. If you don’t, Parse Relation or using Arrays are going to be the easiest alternatives. In general, using arrays will lead to higher performance and require fewer queries. If either side of the many-to-many relationship could lead to an array with more than 100 or so objects, then, for the same reason Pointers were better for one-to-many relationships, Parse Relation or Join Tables will be better alternatives.
On the other hand, if you want to attach metadata to the relationship, then create a separate table (the “Join Table”) to house both ends of the relationship. Remember, this is information about the relationship, not about the objects on either side of the relationship. Some examples of metadata you may be interested in, which would necessitate a Join Table approach, include:
Using Parse Relations
Using Parse Relations, we can create a relationship between a Book and a few Author objects. In the Data Browser, you can create a column on the Book object of type relation and name it authors.
After that, we can associate a few authors with this book:
// let’s say we have a few objects representing Author objects
ParseObject authorOne =
ParseObject authorTwo =
ParseObject authorThree =

// now we create a book object
ParseObject book = new ParseObject("Book");

// now let’s associate the authors with the book
// remember, we created a "authors" relation on Book
ParseRelation<ParseObject> relation = book.getRelation("authors");
relation.add(authorOne);
relation.add(authorTwo);
relation.add(authorThree);

// now save the book object
book.saveInBackground();
// let’s say we have a few objects representing Author objects
PFObject *authorOne = …
PFObject *authorTwo = …
PFObject *authorThree = …

// now we create a book object
PFObject *book= [PFObject objectWithClassName:@"Book"];

// now let’s associate the authors with the book
// remember, we created a "authors" relation on Book
PFRelation *relation = [book relationForKey:@"authors"];
[relation addObject:authorOne];
[relation addObject:authorTwo];
[relation addObject:authorThree];

// now save the book object
[book saveInBackground];
// let’s say we have a few objects representing Author objects
let authorOne = ...
let authorTwo = ...
let authorThree = ...

// now we create a book object
let book = PFObject(className: "Book")

// now let’s associate the authors with the book
// remember, we created a "authors" relation on Book
let relation = book.relationForKey("authors")
relation.addObject(authorOne)
relation.addObject(authorTwo)
relation.addObject(authorThree)

// now save the book object
book.saveInBackground()
// let’s say we have a few objects representing Author objects
$authorOne = ...
$authorTwo = ...
$authorThree = ...

// now we create a book object
$book = new ParseObject("Book");

// now let’s associate the authors with the book
// remember, we created a "authors" relation on Book
$relation = $book->getRelation("authors");
$relation->add($authorOne);
$relation->add($authorTwo);
$relation->add($authorThree);

// now save the book object
$book->save();
// let’s say we have a few objects representing Author objects
var authorOne = ...
var authorTwo = ...
var authorThree = ...

// now we create a book object
var book = new ParseObject("Book");

// now let’s associate the authors with the book
// remember, we created a "authors" relation on Book
var relation = book.GetRelation<ParseObject>("authors");
relation.Add(authorOne);
relation.Add(authorTwo);
relation.Add(authorThree);

// now save the book object
await book.SaveAsync();
// let’s say we have a few objects representing Author objects
var authorOne = ...
var authorTwo = ...
var authorThree = ...

// now we create a book object
var book = new Parse.Object("Book");

// now let’s associate the authors with the book
// remember, we created a "authors" relation on Book
var relation = book.relation("authors");
relation.add(authorOne);
relation.add(authorTwo);
relation.add(authorThree);

// now save the book object
book.save();
# No REST API example
// No C++ example
To get the list of authors who wrote a book, create a query:
// suppose we have a book object
ParseObject book = ...

// create a relation based on the authors key
ParseRelation relation = book.getRelation("authors");

// generate a query based on that relation
ParseQuery query = relation.getQuery();

// now execute the query
// suppose we have a book object
PFObject *book = ...

// create a relation based on the authors key
PFRelation *relation = [book relationForKey:@"authors"];

// generate a query based on that relation
PFQuery *query = [relation query];

// now execute the query
// suppose we have a book object
let book = ...

// create a relation based on the authors key
let relation = book.relationForKey("authors")

// generate a query based on that relation
let query = relation.query()

// now execute the query
// suppose we have a book object
$book = ...

// create a relation based on the authors key
$relation = $book->getRelation("authors");

// generate a query based on that relation
$query = $relation->getQuery();

// now execute the query
// suppose we have a book object
var book = ...

// create a relation based on the authors key
var relation = book.GetRelation<ParseObject>("authors");

// generate a query based on that relation
var query = relation.Query;

// now execute the query
// suppose we have a book object
var book = ...

// create a relation based on the authors key
var relation = book.relation("authors");

// generate a query based on that relation
var query = relation.query();

// now execute the query
# No REST API example
// No C++ example
Perhaps you even want to get a list of all the books to which an author contributed. You can create a slightly different kind of query to get the inverse of the relationship:
// suppose we have a author object, for which we want to get all books
ParseObject author = ...

// first we will create a query on the Book object
ParseQuery<ParseObject> query = ParseQuery.getQuery("Book");

// now we will query the authors relation to see if the author object we have
// is contained therein
query.whereEqualTo("authors", author);
// suppose we have a author object, for which we want to get all books
PFObject *author = ...

// first we will create a query on the Book object
PFQuery *query = [PFQuery queryWithClassName:@"Book"];

// now we will query the authors relation to see if the author object
// we have is contained therein
[query whereKey:@"authors" equalTo:author];
// suppose we have a author object, for which we want to get all books
let author = ...

// first we will create a query on the Book object
let query = PFQuery(className: "Book")

// now we will query the authors relation to see if the author object
// we have is contained therein
query?.whereKey("authors", equalTo: author)
// suppose we have a author object, for which we want to get all books
$author = ...

// first we will create a query on the Book object
$query = new ParseQuery("Book");

// now we will query the authors relation to see if the author object we have
// is contained therein
$query->equalTo("authors", $author);
// suppose we have a author object, for which we want to get all books
var author = ...

// first we will create a query on the Book object
var query = ParseObject.GetQuery("Book");

// now we will query the authors relation to see if the author object we have
// is contained therein
query = query.WhereEqualTo("authors", author);
// suppose we have a author object, for which we want to get all books
var author = ...

// first we will create a query on the Book object
var query = new Parse.Query("Book");

// now we will query the authors relation to see if the author object we have
// is contained therein
query.equalTo("authors", author);
# No REST API example
// No C++ example
Using Join Tables
There may be certain cases where we want to know more about a relationship. For example, suppose we were modeling a following/follower relationship between users: a given user can follow another user, much as they would in popular social networks. In our app, we not only want to know if User A is following User B, but we also want to know when User A started following User B. This information could not be contained in a Parse Relation. In order to keep track of this data, you must create a separate table in which the relationship is tracked. This table, which we will call Follow, would have a from column and a to column, each with a pointer to a Parse User. Alongside the relationship, you can also add a column with a Date object named date.
Now, when you want to save the following relationship between two users, create a row in the Follow table, filling in the from, to, and date keys appropriately:
// suppose we have a user we want to follow
ParseUser otherUser = ...

// create an entry in the Follow table
ParseObject follow = new ParseObject("Follow");
follow.put("from", ParseUser.getCurrentUser());
follow.put("to", otherUser);
follow.put("date", Date());
follow.saveInBackground();
// suppose we have a user we want to follow
PFUser *otherUser = ...

// create an entry in the Follow table
PFObject *follow = [PFObject objectWithClassName:@"Follow"];
[follow setObject:[PFUser currentUser]  forKey:@"from"];
[follow setObject:otherUser forKey:@"to"];
[follow setObject:[NSDate date] forKey@"date"];
[follow saveInBackground];
// suppose we have a user we want to follow
let otherUser = ...

// create an entry in the Follow table
let follow = PFObject(className: "Follow")
follow.setObject(PFUser.currentUser()!, forKey: "from")
follow.setObject(otherUser, forKey: "to")
follow.setObject(NSDate(), forKey: "date")
follow.saveInBackground()
// suppose we have a user we want to follow
$otherUser = ...

// create an entry in the Follow table
$follow = new ParseObject("Follow");
$follow->set("from", ParseUser::getCurrentUser());
$follow->set("to", $otherUser);
$follow->set("date", new DateTime());
$follow->save();
// suppose we have a user we want to follow
ParseUser otherUser = ...

// create an entry in the Follow table
var follow = new ParseObject("Follow");
follow["from"] = ParseUser.CurrentUser;
follow["to"] = otherUser;
follow["date"] = DateTime.UtcNow;
await follow.SaveAsync();
var otherUser = ...

// create an entry in the Follow table
var follow = new Parse.Object("Follow");
follow.set("from", Parse.User.current());
follow.set("to", otherUser);
follow.set("date", Date());
follow.save();
# No REST API example
// No C++ example
If we want to find all of the people we are following, we can execute a query on the Follow table:
// set up the query on the Follow table
ParseQuery<ParseObject> query = ParseQuery.getQuery("Follow");
query.whereEqualTo("from", ParseUser.getCurrentUser());

// execute the query
query.findInBackground(newFindCallback<ParseObject>() {
    public void done(List<ParseObject> followList, ParseException e) {

    }
});
// set up the query on the Follow table
PFQuery *query = [PFQuery queryWithClassName:@"Follow"];
[query whereKey:@"from" equalTo:[PFUser currentUser]];

// execute the query
[query findObjectsInBackgroundWithBlock:^(NSArray *objects, NSError *error) {
  for(PFObject *o in objects) {
    // o is an entry in the Follow table
    // to get the user, we get the object with the to key
    PFUser *otherUser = [o objectForKey@"to"];

    // to get the time when we followed this user, get the date key
    PFObject *when = [o objectForKey@"date"];
  }
}];
// set up the query on the Follow table
let query = PFQuery(className: "Follow")
query.whereKey("from", equalTo: PFUser.currentUser()!)

// execute the query
query.findObjectsInBackgroundWithBlock{
	(objects: [AnyObject]?, error: NSError?) -> Void in
    if let objects = objects {
        for o in objects {
            // o is an entry in the Follow table
            // to get the user, we get the object with the to key
            let otherUse = o.objectForKey("to") as? PFUser

            // to get the time when we followed this user, get the date key
            let when = o.objectForKey("date") as? PFObject
        }
    }
}
// set up the query on the Follow table
$query = new ParseQuery("Follow");
$query->equalTo("from", ParseUser::getCurrentUser());

// execute the query
$results = $query->find();
// set up the query on the Follow table
ParseQuery<ParseObject> query = ParseQuery.getQuery("Follow");
query = query.WhereEqualTo("from", ParseUser.CurrentUser);
// execute the query
IEnumerable<ParseObject> results = await query.FindAsync();
var query = new Parse.Query("Follow");
query.equalTo("from", Parse.User.current());
query.find({
success: function(users){
...
}
});
# No REST API example
// No C++ example
It’s also pretty easy to find all the users that are following the current user by querying on the to key:
// set up the query on the Follow table
ParseQuery<ParseObject> query = ParseQuery.getQuery("Follow");
query.whereEqualTo("to", ParseUser.getCurrentUser());
// execute the query
query.findInBackground(newFindCallback<ParseObject>() {
public void done(List<ParseObject> followList, ParseException e) {
}
});
// set up the query on the Follow table
PFQuery *query = [PFQuery queryWithClassName:@"Follow"];
[query whereKey:@"to" equalTo:[PFUser currentUser]];
[query findObjectsInBackgroundWithBlock:^(NSArray *objects, NSError *error) {
for(PFObject *o in objects) {
// o is an entry in the Follow table
// to get the user, we get the object with the from key
PFUser *otherUser = [o objectForKey@"from"];
// to get the time the user was followed, get the date key
PFObject *when = [o objectForKey@"date"];
}
}];
// set up the query on the Follow table
let query = PFQuery(className: "Follow")
query.whereKey("to", equalTo: PFUser.currentUser()!)
query.findObjectsInBackgroundWithBlock{
(objects: [AnyObject]?, error: NSError?) -> Void in
if let objects = objects {
for o in objects {
// o is an entry in the Follow table
// to get the user, we get the object with the to key
let otherUse = o.objectForKey("to") as? PFUser
// to get the time when we followed this user, get the date key
let when = o.objectForKey("date") as? PFObject
}
}
}
// create an entry in the Follow table
$query = new ParseQuery("Follow");
$query->equalTo("to", ParseUser::getCurrentUser());
$results = $query->find();
// create an entry in the Follow table
var query = ParseObject.GetQuery("Follow")
.WhereEqualTo("to", ParseUser.CurrentUser);
IEnumerable<ParseObject> results = await query.FindAsync();
// create an entry in the Follow table
var query = new Parse.Query("Follow");
query.equalTo("to", Parse.User.current());
query.find({
success: function(users){
...
}
});
# No REST API example
// No C++ example
Using an Array
Arrays are used in Many-to-Many relationships in much the same way that they are for One-to-Many relationships. All objects on one side of the relationship will have an Array column containing several objects on the other side of the relationship.
Suppose we have a book reading app with Book and Author objects. The Book object will contain an Array of Author objects (with a key named authors). Arrays are a great fit for this scenario because it’s highly unlikely that a book will have more than 100 or so authors. We will put the Array in the Book object for this reason. After all, an author could write more than 100 books.
Here is how we save a relationship between a Book and an Author.
// let's say we have an author
ParseObject author = ...
// and let's also say we have an book
ParseObject book = ...
// add the author to the authors list for the book
book.put("authors", author);
// let's say we have an author
PFObject *author = ...
// and let's also say we have an book
PFObject *book = ...
// add the author to the authors list for the book
[book addObject:author forKey:@"authors"];
// let's say we have an author
let author = ...
// and let's also say we have an book
let book = ...
// add the author to the authors list for the book
book.addObject(author, forKey: "authors")
// let's say we have an author
$author = ...
// and let's also say we have an book
$book = ...
// add the author to the authors list for the book
$book->addUnique("authors", array($author));
// let's say we have an author
var author = ...
// and let's also say we have an book
var book = ...
// add the author to the authors list for the book
book.AddToList("authors", author);
// let's say we have an author
var author = ...
// and let's also say we have an book
var book = ...
// add the author to the authors list for the book
book.add("authors", author);
# No REST API example
// No C++ example
Because the author list is an Array, you should use the includeKey (or include on Android) parameter when fetching a Book so that Parse returns all the authors when it also returns the book:
// set up our query for the Book object
ParseQuery bookQuery = ParseQuery.getQuery("Book");
// configure any constraints on your query...
// tell the query to fetch all of the Author objects along with the Book
bookQuery.include("authors");
// execute the query
bookQuery.findInBackground(newFindCallback<ParseObject>() {
public void done(List<ParseObject> bookList, ParseException e) {
}
});
// set up our query for the Book object
PFQuery *bookQuery = [PFQuery queryWithClassName:@"Book"];
// configure any constraints on your query...
// tell the query to fetch all of the Author objects along with the Book
[bookQuery includeKey:@"authors"];
// execute the query
[bookQuery findObjectsInBackgroundWithBlock:^(NSArray *objects, NSError *error) {
// objects is all of the Book objects, and their associated
// Author objects, too
}];
// set up our query for the Book object
let bookQuery = PFQuery(className: "Book")
// configure any constraints on your query...
// tell the query to fetch all of the Author objects along with the Book
bookQuery.includeKey("authors")
// execute the query
bookQuery.findObjectsInBackgroundWithBlock{
(objects: [AnyObject]?, error: NSError?) -> Void in
// objects is all of the Book objects, and their associated
// Author objects, too
}
// set up our query for the Book object
$bookQuery = new ParseQuery("Book");
// configure any constraints on your query...
// tell the query to fetch all of the Author objects along with the Book
$bookQuery->includeKey("authors");
// execute the query
$books= $bookQuery->find();
// set up our query for the Book object
var bookQuery = ParseObject.GetQuery("Book");
// configure any constraints on your query...
// tell the query to fetch all of the Author objects along with the Book
bookQuery = bookQuery.Include("authors");
// execute the query
IEnumerable<ParseObject> books= await bookQuery.FindAsync();
// set up our query for the Book object
var bookQuery = new Parse.Query("Book");
// configure any constraints on your query...
// tell the query to fetch all of the Author objects along with the Book
bookQuery.include("authors");
// execute the query
bookQuery.find({
success: function(books){
...
}
});
# No REST API example
// No C++ example
At that point, getting all the Author objects in a given Book is a pretty straightforward call:
ArrayList<ParseObject> authorList = book.getList("authors");
NSArray *authorList = [book objectForKey@"authors"];
let authorList = book.objectForKey("authors") as? NSArray
$authorList = $book->get("authors");
var authorList = book.Get<List<ParseObject>>("authors");
var authorList = book.get("authors")
# No REST API example
// No C++ example
Finally, suppose you have an Author and you want to find all the Book objects in which she appears. This is also a pretty straightforward query with an associated constraint:
// set up our query for the Book object
ParseQuery bookQuery = ParseQuery.getQuery("Book");
// configure any constraints on your query...
booKQuery.whereEqualTo("authors", author);
// tell the query to fetch all of the Author objects along with the Book
bookQuery.include("authors");
// execute the query
bookQuery.findInBackground(newFindCallback<ParseObject>() {
public void done(List<ParseObject> bookList, ParseException e) {
}
});
// suppose we have an Author object
PFObject *author = ...
// set up our query for the Book object
PFQuery *bookQuery = [PFQuery queryWithClassName:@"Book"];
// configure any constraints on your query...
[bookQuery whereKey:@"authors" equalTo:author];
// tell the query to fetch all of the Author objects along with the Book
[bookQuery includeKey:@"authors"];
// execute the query
[bookQuery findObjectsInBackgroundWithBlock:^(NSArray *objects, NSError *error) {
// objects is all of the Book objects, and their associated Author objects, too
}];
// suppose we have an Author object
let author = ...
// set up our query for the Book object
let bookQuery = PFQuery(className: "Book")
// configure any constraints on your query...
bookQuery.whereKey("authors", equalTo: author)
// tell the query to fetch all of the Author objects along with the Book
bookQuery.includeKey("authors")
// execute the query
bookQuery.findObjectsInBackgroundWithBlock{
(objects: [AnyObject]?, error: NSError?) -> Void in
// objects is all of the Book objects, and their associated Author objects, too
}
// set up our query for the Book object
$bookQuery = new ParseQuery("Book");
// configure any constraints on your query...
$bookQuery->equalTo("authors", $author);
// tell the query to fetch all of the Author objects along with the Book
$bookQuery->includeKey("authors");
// execute the query
$books = $bookQuery->find();
// set up our query for the Book object
var bookQuery = ParseObject.GetQuery("Book");
// configure any constraints on your query...
bookQuery = bookQuery.WhereEqualTo("authors", author);
// tell the query to fetch all of the Author objects along with the Book
bookQuery = bookQuery.Include("authors");
// execute the query
IEnumerable<ParseObject> books = await bookQuery.FindAsync();
// set up our query for the Book object
var bookQuery = new Parse.Query("Book");
// configure any constraints on your query...
bookQuery.equalTo("authors", author);
// tell the query to fetch all of the Author objects along with the Book
bookQuery.include("authors");
// execute the query
bookQuery.find({
success: function(books){
...
}
});
# No REST API example
// No C++ example
One-to-One
In Parse, a one-to-one relationship is great for situations where you need to split one object into two objects. These situations should be rare, but two examples include:
- Limiting visibility of some user data. In this scenario, you would split the object in two, where one portion of the object contains data that is visible to other users, while the related object contains data that is private to the original user (and protected via ACLs).
- Splitting up an object for size. In this scenario, your original object is greater than the 128K maximum size permitted for an object, so you decide to create a secondary object to house extra data. It is usually better to design your data model to avoid objects this large, rather than splitting them up. If you can’t avoid doing so, you can also consider storing large data in a Parse File.
Thank you for reading this far. We apologize for the complexity. Modeling relationships in data is a hard subject, in general. But look on the bright side: it’s still easier than relationships with people.
错误处理
大多数Parse Javascript函数都使用回调进行报告它们成功或者失败的对象,类似于一个Backbone的”options”对象。这两种主要的回调函数是success和error。
在一个操作完成且没有错误的时候,success就会被调用。
一般来说,它的参数将会是Parse.Object中的save或者get,或者一个Parse.Object的find数组。
error将会在与Parse Cloud服务器进行交互时发生任何错误的时候被调用。
这些错误与连接到服务器或执行请求操作出现问题时有关。让我们来看另一个例子。
在下面的代码中,我们尝试获取一个不存在的objectId对象。 Parse 云服务器将返回一个错误 - 所以这里是如何在回调中正确处理它:
var query = new Parse.Query(Note);
query.get("aBcDeFgH", {
success: function(results) {
// This function will *not* be called.
alert("Everything went fine!");
},
error: function(model, error) {
// This will be called.
// error is an instance of Parse.Error with details about the error.
if (error.code === Parse.Error.OBJECT_NOT_FOUND) {
alert("Uh oh, we couldn't find the object!");
}
}
});
查询也可能失败,因为设备无法连接到解析云。 这里是相同的回调,但有一点额外的代码来处理这种情况:
var query = new Parse.Query(Note);
query.get("thisObjectIdDoesntExist", {
success: function(results) {
// This function will *not* be called.
alert("Everything went fine!");
},
error: function(model, error) {
// This will be called.
// error is an instance of Parse.Error with details about the error.
if (error.code === Parse.Error.OBJECT_NOT_FOUND) {
alert("Uh oh, we couldn't find the object!");
} else if (error.code === Parse.Error.CONNECTION_FAILED) {
alert("Uh oh, we couldn't even connect to the Parse Cloud!");
}
}
});
对于影响特定Parse.Object的save和signUp方法,错误函数的第一个参数是对象本身,第二个参数是Parse.Error。 这是为了与骨干类型框架兼容。
对于所有可能的Parse.Error代码的列表,向下滚动到错误代码,或参见JavaScript API Parse.Error。
Security
As your app development progresses, you will want to use Parse’s security features in order to safeguard data. This document explains the ways in which you can secure your apps.
If your app is compromised, it’s not only you as the developer who suffers, but potentially the users of your app as well. Continue reading for our suggestions for sensible defaults and precautions to take before releasing your app into the wild.
Client vs. Server
When an app first connects to Parse, it identifies itself with an Application ID and a Client key (or REST Key, or .NET Key, or JavaScript Key, depending on which platform you’re using). These are not secret and by themselves they do not secure an app. These keys are shipped as a part of your app, and anyone can decompile your app or proxy network traffic from their device to find your client key. This exploit is even easier with JavaScript — one can simply “view source” in the browser and immediately find your client key.
This is why Parse has many other security features to help you secure your data. The client key is given out to your users, so anything that can be done with just the client key is doable by the general public, even malicious hackers.
The master key, on the other hand, is definitely a security mechanism. Using the master key allows you to bypass all of your app’s security mechanisms, such as class-level permissions and ACLs. Having the master key is like having root access to your app’s servers, and you should guard your master key with the same zeal with which you would guard your production machines’ root password.
The overall philosophy is to limit the power of your clients (using client keys), and to perform any sensitive actions requiring the master key in Cloud Code. You’ll learn how to best wield this power in the section titled Implementing Business Logic in Cloud Code.
A final note: All connections are made with HTTPS and SSL, and Parse will reject all non-HTTPS connections. As a result, you don’t need to worry about man-in-the-middle attacks.
Class-Level Permissions
The second level of security is at the schema and data level. Enforcing security measures at this level will restrict how and when client applications can access and create data on Parse. When you first begin developing your Parse application, all of the defaults are set so that you can be a more productive developer. For example:
- A client application can create new classes on Parse
- A client application can add fields to classes
- A client application can modify or query for objects on Parse
You can configure any of these permissions to apply to everyone, no one, or to specific users or roles in your app. Roles are groups that contain users or other roles, which you can assign to an object to restrict its use. Any permission granted to a role is also granted to any of its children, whether they are users or other roles, enabling you to create an access hierarchy for your apps. Each of the Parse guides includes a detailed description of employing Roles in your apps.
Once you are confident that you have the right classes and relationships between classes in your app, you should begin to lock it down by doing the following:
Almost every class that you create should have these permissions tweaked to some degree. For classes where every object has the same permissions, class-level settings will be most effective. For example, one common use case entails having a class of static data that can be read by anyone but written by no one.
Restricting class creation
As a start, you can configure your application so that clients cannot create new classes on Parse. This is done from the Settings tab on the Data Browser. Scroll down to the App Permissions section and turn off Allow client class creation. Once enabled, classes may only be created from the Data Browser. This will prevent attackers from filling your database with unlimited, arbitrary new classes.
Configuring Class-Level Permissions
Parse lets you specify what operations are allowed per class. This lets you restrict the ways in which clients can access or modify your classes. To change these settings, go to the Data Browser, select a class, and click the “Security” button.
You can configure the client’s ability to perform each of the following operations for the selected class:
-
Read:
-
Get: With Get permission, users can fetch objects in this table if they know their objectIds.
-
Find: Anyone with Find permission can query all of the objects in the table, even if they don’t know their objectIds. Any table with public Find permission will be completely readable by the public, unless you put an ACL on each object.
-
-
Write:
-
Update: Anyone with Update permission can modify the fields of any object in the table that doesn’t have an ACL. For publicly readable data, such as game levels or assets, you should disable this permission.
-
Create: Like Update, anyone with Create permission can create new objects of a class. As with the Update permission, you’ll probably want to turn this off for publicly readable data.
-
Delete: With this permission, people can delete any object in the table that doesn’t have an ACL. All they need is its objectId.
-
-
Add fields: Parse classes have schemas that are inferred when objects are created. While you’re developing your app, this is great, because you can add a new field to your object without having to make any changes on the backend. But once you ship your app, it’s very rare to need to add new fields to your classes automatically. You should pretty much always turn off this permission for all of your classes when you submit your app to the public.
For each of the above actions, you can grant permission to all users (which is the default), or lock permissions down to a list of roles and users. For example, a class that should be available to all users would be set to read-only by only enabling get and find. A logging class could be set to write-only by only allowing creates. You could enable moderation of user-generated content by providing update and delete access to a particular set of users or roles.
Object-Level Access Control
Once you’ve locked down your schema and class-level permissions, it’s time to think about how data is accessed by your users. Object-level access control enables one user’s data to be kept separate from another’s, because sometimes different objects in a class need to be accessible by different people. For example, a user’s private personal data should be accessible only to them.
Parse also supports the notion of anonymous users for those apps that want to store and protect user-specific data without requiring explicit login.
When a user logs into an app, they initiate a session with Parse. Through this session they can add and modify their own data but are prevented from modifying other users’ data.
Access Control Lists
The easiest way to control who can access which data is through access control lists, commonly known as ACLs. The idea behind an ACL is that each object has a list of users and roles along with what permissions that user or role has. A user needs read permissions (or must belong to a role that has read permissions) in order to retrieve an object’s data, and a user needs write permissions (or must belong to a role that has write permissions) in order to update or delete that object.
Once you have a User, you can start using ACLs. Remember: Users can be created through traditional username/password signup, through a third-party login system like Facebook or Twitter, or even by using Parse’s automatic anonymous users functionality. To set an ACL on the current user’s data to not be publicly readable, all you have to do is:
PFUser *user = [PFUser currentUser];
user.ACL = [PFACL ACLWithUser:user];
if let user = PFUser.currentUser() {
user.ACL = PFACL(user: user)
}
ParseUser user = ParseUser.getCurrentUser();
user.setACL(new ParseACL(user));
var user = Parse.User.current();
user.setACL(new Parse.ACL(user));
var user = ParseUser.CurrentUser;
user.ACL = new ParseACL(user);
$user = ParseUser::getCurrentUser();
$user->setACL(new ParseACL($user))
# No command line example
// No C++ example
Most apps should do this. If you store any sensitive user data, such as email addresses or phone numbers, you need to set an ACL like this so that the user’s private information isn’t visible to other users. If an object doesn’t have an ACL, it’s readable and writeable by everyone. The only exception is the _User class. We never allow users to write each other’s data, but they can read it by default. (If you as the developer need to update other _User objects, remember that your master key can provide the power to do this.)
To make it super easy to create user-private ACLs for every object, we have a way to set a default ACL that will be used for every new object you create:
[PFACL setDefaultACL:[PFACL ACL] withAccessForCurrentUser:YES];
PFACL.setDefaultACL(PFACL(), withAccessForCurrentUser: true)
ParseACL.setDefaultACL(new ParseACL(), true);
// not available in the JavaScript SDK
// not available in the .NET SDK
ParseACL::setDefaultACL(new ParseACL(), true);
# No command line example
// No C++ example
If you want the user to have some data that is public and some that is private, it’s best to have two separate objects. You can add a pointer to the private data from the public one.
PFObject *privateData = [PFObject objectWithClassName:@"PrivateUserData"];
privateData.ACL = [PFACL ACLWithUser:[PFUser currentUser]];
[privateData setObject:@"555-5309" forKey:@"phoneNumber"];
[[PFUser currentUser] setObject:privateData forKey:@"privateData"];
if let currentUser = PFUser.currentUser() {
let privateData = PFObject(className: "PrivateUserData")
privateData.ACL = PFACL(user: currentUser)
privateData.setObject("555-5309", forKey: "phoneNumber")
currentUser.setObject(privateData, forKey: "privateData")
}
ParseObject privateData = new ParseObject("PrivateUserData");
privateData.setACL(new ParseACL(ParseUser.getCurrentUser()));
privateData.put("phoneNumber", "555-5309");
ParseUser.getCurrentUser().put("privateData", privateData);
var privateData = Parse.Object.extend("PrivateUserData");
privateData.setACL(new Parse.ACL(Parse.User.current()));
privateData.set("phoneNumber", "555-5309");
Parse.User.current().set("privateData", privateData);
var privateData = new ParseObject("PrivateUserData");
privateData.ACL = new ParseACL(ParseUser.CurrentUser);
privateData["phoneNumber"] = "555-5309";
ParseUser.CurrentUser["privateData"] = privateData;
$privateData = ParseObject::create("PrivateUserData");
$privateData->setACL(new ParseACL(ParseUser::getCurrentUser()));
$privateData->set("phoneNumber", "555-5309");
ParseUser::getCurrentUser()->set("privateData", $privateData);
# No command line example
// No C++ example
Of course, you can set different read and write permissions on an object. For example, this is how you would create an ACL for a public post by a user, where anyone can read it:
PFACL *acl = [PFACL ACL];
[acl setPublicReadAccess:true];
[acl setWriteAccess:true forUser:[PFUser currentUser]];
let acl = PFACL()
acl.setPublicReadAccess(true)
if let currentUser = PFUser.currentUser() {
acl.setWriteAccess(true, forUser: currentUser)
}
ParseACL acl = new ParseACL();
acl.setPublicReadAccess(true);
acl.setWriteAccess(ParseUser.getCurrentUser(), true);
var acl = new Parse.ACL();
acl.setPublicReadAccess(true);
acl.setWriteAccess(Parse.User.current().id, true);
var acl = new ParseACL();
acl.PublicReadAccess = true;
acl.SetRoleWriteAccess(ParseUser.CurrentUser.ObjectId, true);
$acl = new ParseACL();
$acl->setPublicReadAccess(true);
$acl->setWriteAccess(ParseUser::getCurrentUser(), true);
# No command line example
// No C++ example
Sometimes it’s inconvenient to manage permissions on a per-user basis, and you want to have groups of users who get treated the same (like a set of admins with special powers). Roles are are a special kind of object that let you create a group of users that can all be assigned to the ACL. The best thing about roles is that you can add and remove users from a role without having to update every single object that is restricted to that role. To create an object that is writeable only by admins:
// Assuming you've already created a role called "admins"...
PFACL *acl = [PFACL ACL];
[acl setPublicReadAccess:true];
[acl setWriteAccess:true forRoleWithName:@"admins"];
let acl = PFACL()
acl.setPublicReadAccess(true)
acl.setWriteAccess(true, forRoleWithName: "admins")
// Assuming you've already created a role called "admins"...
ParseACL acl = new ParseACL();
acl.setPublicReadAccess(true);
acl.setRoleWriteAccess("admins", true);
var acl = new Parse.ACL();
acl.setPublicReadAccess(true);
acl.setRoleWriteAccess("admins", true);
var acl = new ParseACL();
acl.PublicReadAccess = true;
acl.SetRoleWriteAccess("admins", true);
$acl = new ParseACL();
$acl->setPublicReadAccess(true);
$acl->setRoleWriteAccessWithName("admins", true);
# No command line example
// No C++ example
Of course, this snippet assumes you’ve already created a role named “admins”. This is often reasonable when you have a small set of special roles set up while developing your app. Roles can also be created and updated on the fly — for example, adding new friends to a “friendOf___” role after each connection is made.
All this is just the beginning. Applications can enforce all sorts of complex access patterns through ACLs and class-level permissions. For example:
- For private data, read and write access can be restricted to the owner.
- For a post on a message board, the author and members of the “Moderators” role can have “write” access, and the general public can have “read” access.
- For logging data that will only be accessed by the developer through the REST API using the master key, the ACL can deny all permissions.
- Data created by a privileged group of users or the developer, like a global message of the day, can have public read access but restrict write access to an “Administrators” role.
- A message sent from one user to another can give “read” and “write” access just to those users.
For the curious, here’s the format for an ACL that restricts read and write permissions to the owner (whose objectId is identified by "aSaMpLeUsErId") and enables other users to read the object:
{
"*": { "read":true },
"aSaMpLeUsErId": { "read" :true, "write": true }
}
And here’s another example of the format of an ACL that uses a Role:
{
"role:RoleName": { "read": true },
"aSaMpLeUsErId": { "read": true, "write": true }
}
Pointer Permissions
Pointer permissions are a special type of class-level permission that create a virtual ACL on every object in a class, based on users stored in pointer fields on those objects. For example, given a class with an owner field, setting a read pointer permission on owner will make each object in the class only readable by the user in that object’s owner field. For a class with a sender and a reciever field, a read pointer permission on the receiver field and a read and write pointer permission on the sender field will make each object in the class readable by the user in the sender and receiver field, and writable only by the user in the sender field.
Given that objects often already have pointers to the user(s) that should have permissions on the object, pointer permissions provide a simple and fast solution for securing your app using data which is already there, that doesn’t require writing any client code or cloud code.
Pointer permissions are like virtual ACLs. They don’t appear in the ACL column, buf if you are familiar with how ACLs work, you can think of them like ACLs. In the above example with the sender and receiver, each object will act as if it has an ACL of:
{
"<SENDER_USER_ID>": {
"read": true,
"write": true
},
"<RECEIVER_USER_ID>": {
"read": true
}
}
Note that this ACL is not actually created on each object. Any existing ACLs will not be modified when you add or remove pointer permissions, and any user attempting to interact with an object can only interact with the object if both the virtual ACL created by the pointer permissions, and the real ACL already on the object allow the interaction. For this reason, it can sometimes be confusing to combine pointer permissions and ACLs, so we recommend using pointer permissions for classes that don’t have many ACLs set. Fortunately, it’s easy to remove pointer permissions if you later decide to use Cloud Code or ACLs to secure your app.
Requires Authentication permission (requires parse-server >= 2.3.0)
Starting version 2.3.0, parse-server introduces a new Class Level Permission requiresAuthentication.
This CLP prevents any non authenticated user from performing the action protected by the CLP.
For example, you want to allow your authenticated users to find and get Announcement’s from your application and your admin role to have all privileged, you would set the CLP:
// POST http://my-parse-server.com/schemas/Announcement
// Set the X-Parse-Application-Id and X-Parse-Master-Key header
// body:
{
classLevelPermissions:
{
"find": {
"requireAuthentication": true,
"role:admin": true
},
"get": {
"requireAuthentication": true,
"role:admin": true
},
"create": { "role:admin": true },
"update": { "role:admin": true },
"delete": { "role:admin": true },
}
}
Effects:
- Non authenticated users won’t be able to do anything.
- Authenticated users (any user with a valid sessionToken) will be able to read all the objects in that class
- Users belonging to the admin role, will be able to perform all operations.
:warning: Note that this is in no way securing your content, if you allow anyone to login to your server, every client will still be able to query this object.
CLP and ACL interaction
Class-Level Permissions (CLPs) and Access Control Lists (ACLs) are both powerful tools for securing your app, but they don’t always interact exactly how you might expect. They actually represent two separate layers of security that each request has to pass through to return the correct information or make the intended change. These layers, one at the class level, and one at the object level, are shown below. A request must pass through BOTH layers of checks in order to be authorized. Note that despite acting similarly to ACLs, Pointer Permissions are a type of class level permission, so a request must pass the pointer permission check in order to pass the CLP check.
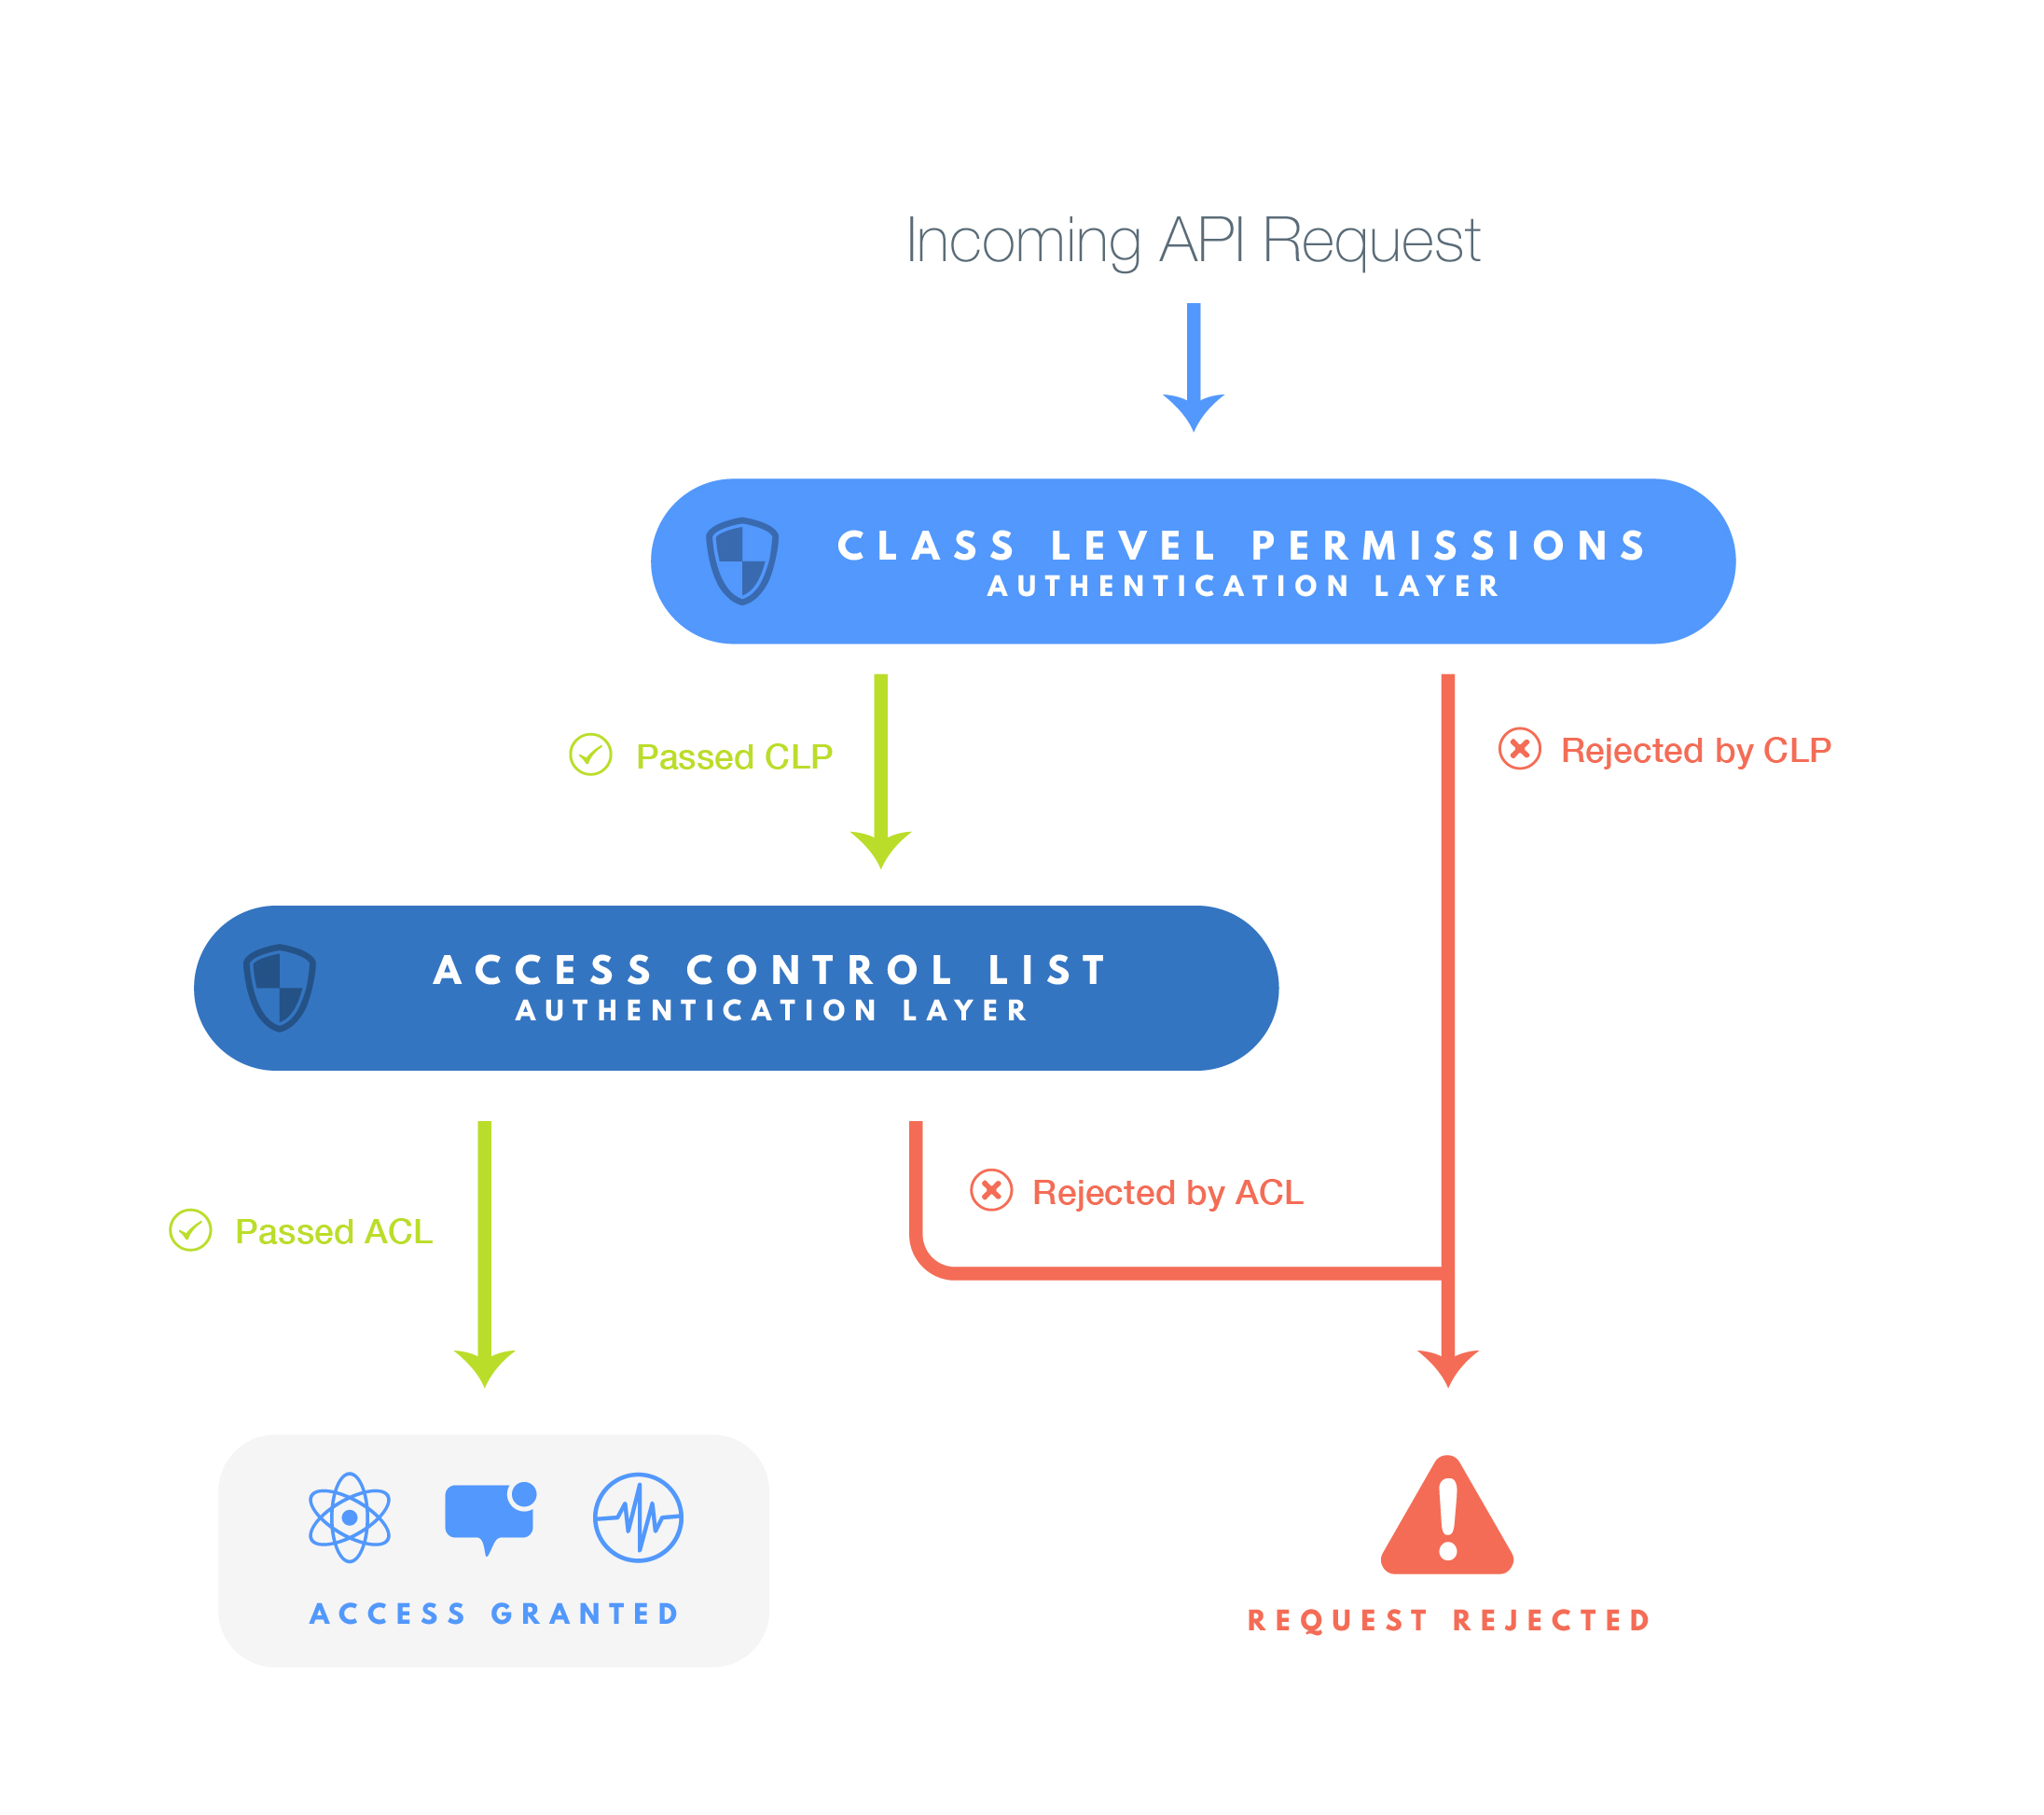
As you can see, whether a user is authorized to make a request can become complicated when you use both CLPs and ACLs. Let’s look at an example to get a better sense of how CLPs and ACLs can interact. Say we have a Photo class, with an object, photoObject. There are 2 users in our app, user1 and user2. Now lets say we set a Get CLP on the Photo class, disabling public Get, but allowing user1 to perform Get. Now let’s also set an ACL on photoObject to allow Read - which includes GET - for only user2.
You may expect this will allow both user1 and user2 to Get photoObject, but because the CLP layer of authentication and the ACL layer are both in effect at all times, it actually makes it so neither user1 nor user2 can Get photoObject. If user1 tries to Get photoObject, it will get through the CLP layer of authentication, but then will be rejected because it does not pass the ACL layer. In the same way, if user2 tries to Get photoObject, it will also be rejected at the CLP layer of authentication.
Now lets look at example that uses Pointer Permissions. Say we have a Post class, with an object, myPost. There are 2 users in our app, poster, and viewer. Lets say we add a pointer permission that gives anyone in the Creator field of the Post class read and write access to the object, and for the myPost object, poster is the user in that field. There is also an ACL on the object that gives read access to viewer. You may expect that this will allow poster to read and edit myPost, and viewer to read it, but viewer will be rejected by the Pointer Permission, and poster will be rejected by the ACL, so again, neither user will be able to access the object.
Because of the complex interaction between CLPs, Pointer Permissions, and ACLs, we recommend being careful when using them together. Often it can be useful to use CLPs only to disable all permissions for a certain request type, and then using Pointer Permissions or ACLs for other request types. For example, you may want to disable Delete for a Photo class, but then put a Pointer Permission on Photo so the user who created it can edit it, just not delete it. Because of the especially complex way that Pointer Permissions and ACLs interact, we usually recommend only using one of those two types of security mechanisms.
Security Edge Cases
There are some special classes in Parse that don’t follow all of the same security rules as every other class. Not all classes follow Class-Level Permissions (CLPs) or Access Control Lists (ACLs) exactly how they are defined, and here those exceptions are documented. Here “normal behavior” refers to CLPs and ACLs working normally, while any other special behaviors are described in the footnotes.
_User |
_Installation |
|
|---|---|---|
| Get | normal behaviour [1, 2, 3] | ignores CLP, but not ACL |
| Find | normal behavior [3] | master key only [6] |
| Create | normal behavior [4] | ignores CLP |
| Update | normal behavior [5] | ignores CLP, but not ACL [7] |
| Delete | normal behavior [5] | master key only [7] |
| Add Field | normal behavior | normal behavior |
-
Logging in, or
/1/loginin the REST API, does not respect the Get CLP on the user class. Login works just based on username and password, and cannot be disabled using CLPs. -
Retrieving the current user, or becoming a User based on a session token, which are both
/1/users/mein the REST API, do not respect the Get CLP on the user class. -
Read ACLs do not apply to the logged in user. For example, if all users have ACLs with Read disabled, then doing a find query over users will still return the logged in user. However, if the Find CLP is disabled, then trying to perform a find on users will still return an error.
-
Create CLPs also apply to signing up. So disabling Create CLPs on the user class also disables people from signing up without the master key.
-
Users can only Update and Delete themselves. Public CLPs for Update and Delete may still apply. For example, if you disable public Update for the user class, then users cannot edit themselves. But no matter what the write ACL on a user is, that user can still Update or Delete itself, and no other user can Update or Delete that user. As always, however, using the master key allows users to update other users, independent of CLPs or ACLs.
-
Get requests on installations follow ACLs normally. Find requests without master key is not allowed unless you supply the
installationIdas a constraint. -
Update requests on installations do adhere to the ACL defined on the installation, but Delete requests are master-key-only. For more information about how installations work, check out the installations section of the REST guide.
Data Integrity in Cloud Code
For most apps, care around keys, class-level permissions, and object-level ACLs are all you need to keep your app and your users’ data safe. Sometimes, though, you’ll run into an edge case where they aren’t quite enough. For everything else, there’s Cloud Code.
Cloud Code allows you to upload JavaScript to Parse’s servers, where we will run it for you. Unlike client code running on users’ devices that may have been tampered with, Cloud Code is guaranteed to be the code that you’ve written, so it can be trusted with more responsibility.
One particularly common use case for Cloud Code is preventing invalid data from being stored. For this sort of situation, it’s particularly important that a malicious client not be able to bypass the validation logic.
To create validation functions, Cloud Code allows you to implement a beforeSave trigger for your class. These triggers are run whenever an object is saved, and allow you to modify the object or completely reject a save. For example, this is how you create a Cloud Code beforeSave trigger to make sure every user has an email address set:
Parse.Cloud.beforeSave(Parse.User, function(request, response) {
var user = request.object;
if (!user.get("email")) {
response.error("Every user must have an email address.");
} else {
response.success();
}
});
Our Cloud Code guide provides instructions on how to upload this trigger to our servers.
Validations can lock down your app so that only certain values are acceptable. You can also use afterSave validations to normalize your data (e.g. formatting all phone numbers or currency identically). You get to retain most of the productivity benefits of accessing Parse data directly from your client applications, but you can also enforce certain invariants for your data on the fly.
Common scenarios that warrant validation include:
- Making sure phone numbers have the right format
- Sanitizing data so that its format is normalized
- Making sure that an email address looks like a real email address
- Requiring that every user specifies an age within a particular range
- Not letting users directly change a calculated field
- Not letting users delete specific objects unless certain conditions are met
Implementing Business Logic in Cloud Code
While validation often makes sense in Cloud Code, there are likely certain actions that are particularly sensitive, and should be as carefully guarded as possible. In these cases, you can remove permissions or the logic from clients entirely and instead funnel all such operations to Cloud Code functions.
When a Cloud Code function is called, it can invoke the useMasterKey function to gain the ability to modify user data. With the master key, your Cloud Code function can override any ACLs and write data. This means that it’ll bypass all the security mechanisms you’ve put in place in the previous sections.
Say you want to allow a user to “like” a Post object without giving them full write permissions on the object. You can do this by having the client call a Cloud Code function instead of modifying the Post itself:
The master key should be used carefully. When invoked, the master key is in effect for the duration of the Cloud Code function in which it is called:
Parse.Cloud.define("like", function(request, response) {
Parse.Cloud.useMasterKey();
// Everything after this point will bypass ACLs and other security
// even if I do things besides just updating a Post object.
});
A more prudent way to use the master key would be to pass it as a parameter on a per-function basis. For example, instead of the above, set useMasterKey to true in each individual API function:
Parse.Cloud.define("like", function(request, response) {
var post = new Parse.Object("Post");
post.id = request.params.postId;
post.increment("likes");
post.save(null, { useMasterKey: true }).then(function() {
// If I choose to do something else here, it won't be using
// the master key and I'll be subject to ordinary security measures.
response.success();
}, function(error) {
response.error(error);
});
});
One very common use case for Cloud Code is sending push notifications to particular users. In general, clients can’t be trusted to send push notifications directly, because they could modify the alert text, or push to people they shouldn’t be able to. Your app’s settings will allow you to set whether “client push” is enabled or not; we recommend that you make sure it’s disabled. Instead, you should write Cloud Code functions that validate the data to be pushed and sent before sending a push.
Parse Security Summary
Parse provides a number of ways for you to secure data in your app. As you build your app and evaluate the kinds of data you will be storing, you can make the decision about which implementation to choose.
It is worth repeating that that the Parse User object is readable by all other users by default. You will want to set the ACL on your User object accordingly if you wish to prevent data contained in the User object (for example, the user’s email address) from being visible by other users.
Most classes in your app will fall into one of a couple of easy-to-secure categories. For fully public data, you can use class-level permissions to lock down the table to put publicly readable and writeable by no one. For fully private data, you can use ACLs to make sure that only the user who owns the data can read it. But occasionally, you’ll run into situations where you don’t want data that’s fully public or fully private. For example, you may have a social app, where you have data for a user that should be readable only to friends whom they’ve approved. For this you’ll need to a combination of the techniques discussed in this guide to enable exactly the sharing rules you desire.
We hope that you’ll use these tools to do everything you can to keep your app’s data and your users’ data secure. Together, we can make the web a safer place.
Performance
As your app scales, you will want to ensure that it performs well under increased load and usage. This document provides guidelines on how you can optimize your app’s performance. While you can use Parse Server for quick prototyping and not worry about performance, you will want to keep our performance guidelines in mind when you’re initially designing your app. We strongly advise that you make sure you’ve followed all suggestions before releasing your app.
You can improve your app’s performance by looking at the following:
- Writing efficient queries.
- Writing restrictive queries.
- Using client-side caching.
- Using Cloud Code.
- Avoiding count queries.
- Using efficient search techniques.
Keep in mind that not all suggestions may apply to your app. Let’s look into each one of these in more detail.
Write Efficient Queries
Parse objects are stored in a database. A Parse query retrieves objects that you are interested in based on conditions you apply to the query. To avoid looking through all the data present in a particular Parse class for every query, the database can use an index. An index is a sorted list of items matching a given criteria. Indexes help because they allow the database to do an efficient search and return matching results without looking at all of the data. Indexes are typically smaller in size and available in memory, resulting in faster lookups.
Indexing
You are responsible for managing your database and maintaining indexes when using Parse Server. If your data is not indexed, every query will have to go through the the entire data for a class to return a query result. On the other hand, if your data is indexed appropriately, the number of documents scanned to return a correct query result should be low.
The order of a query constraint’s usefulness is:
- Equal to
- Contained In
- Less than, Less than or Equal to, Greater than, Greater than or Equal to
- Prefix string matches
- Not equal to
- Not contained in
- Everything else
Take a look at the following query to retrieve GameScore objects:
var GameScore = Parse.Object.extend("GameScore");
var query = new Parse.Query(GameScore);
query.equalTo("score", 50);
query.containedIn("playerName",
["Jonathan Walsh", "Dario Wunsch", "Shawn Simon"]);
PFQuery *query = [PFQuery queryWithClassName:@"GameScore"];
[query whereKey:@"score" equalTo:@50];
[query whereKey:@"playerName"
containedIn:@[@"Jonathan Walsh", @"Dario Wunsch", @"Shawn Simon"]];
let query = PFQuery.queryWithClassName("GameScore")
query.whereKey("score", equalTo: 50)
query.whereKey("playerName", containedIn: ["Jonathan Walsh", "Dario Wunsch", "Shawn Simon"])
ParseQuery<ParseObject> query = ParseQuery.getQuery("GameScore");
query.whereEqualTo("score", 50);
query.whereContainedIn("playerName", Arrays.asList("Jonathan Walsh", "Dario Wunsch", "Shawn Simon"));
var names = new[] { "Jonathan Walsh", "Dario Wunsch", "Shawn Simon" };
var query = new ParseObject.GetQuery("GameScore")
.WhereEqualTo("score", 50)
.WhereContainedIn("playerName", names);
# No REST API example
// No C++ example
Creating an index query based on the score field would yield a smaller search space in general than creating one on the playerName field.
When examining data types, booleans have a very low entropy and and do not make good indexes. Take the following query constraint:
query.equalTo("cheatMode", false);
[query whereKey:@"cheatMode" equalTo:@NO];
query.whereKey("cheatMode", equalTo: false)
query.whereEqualTo("cheatMode", false);
query.WhereEqualTo("cheatMode", false);
# No REST API example
// No C++ example
The two possible values for "cheatMode" are true and false. If an index was added on this field it would be of little use because it’s likely that 50% of the records will have to be looked at to return query results.
Data types are ranked by their expected entropy of the value space for the key:
- GeoPoints
- Array
- Pointer
- Date
- String
- Number
- Other
Even the best indexing strategy can be defeated by suboptimal queries.
Efficient Query Design
Writing efficient queries means taking full advantage of indexes. Let’s take a look at some query constraints that negate the use of indexes:
- Not Equal To
- Not Contained In
Additionally, the following queries under certain scenarios may result in slow query responses if they can’t take advantage of indexes:
- Regular Expressions
- Ordered By
Not Equal To
For example, let’s say you’re tracking high scores for a game in a GameScore class. Now say you want to retrieve the scores for all players except a certain one. You could create this query:
var GameScore = Parse.Object.extend("GameScore");
var query = new Parse.Query(GameScore);
query.notEqualTo("playerName", "Michael Yabuti");
query.find().then(function(results) {
// Retrieved scores successfully
});
PFQuery *query = [PFQuery queryWithClassName:@"GameScore"];
[query whereKey:@"playerName" notEqualTo:@"Michael Yabuti"];
[query findObjectsInBackgroundWithBlock:^(NSArray *objects, NSError *error) {
if (!error) {
// Retrieved scores successfully
}
}];
let query = PFQuery.queryWithClassName("GameScore")
query.whereKey("playerName", notEqualTo: "Michael Yabuti")
query.findObjectsInBackgroundWithBlock {
(objects, error) in
if !error {
// Retrieved scores successfully
}
}
ParseQuery<ParseObject> query = ParseQuery.getQuery("GameScore");
query.whereNotEqualTo("playerName", "Michael Yabuti");
query.findInBackground(new FindCallback<ParseObject>() {
@Override
public void done(List<ParseObject> list, ParseException e) {
if ( e == null) {
// Retrieved scores successfully
}
}
});
var results = await ParseObject.GetQuery("GameScore")
.WhereNotEqualTo("playerName", "Michael Yabuti")
.FindAsync();
# No REST API example
// No C++ example
This query can’t take advantage of indexes. The database has to look at all the objects in the "GameScore" class to satisfy the constraint and retrieve the results. As the number of entries in the class grows, the query takes longer to run.
Luckily, most of the time a “Not Equal To” query condition can be rewritten as a “Contained In” condition. Instead of querying for the absence of values, you ask for values which match the rest of the column values. Doing this allows the database to use an index and your queries will be faster.
For example if the User class has a column called state which has values “SignedUp”, “Verified”, and “Invited”, the slow way to find all users who have used the app at least once would be to run the query:
var query = new Parse.Query(Parse.User);
query.notEqualTo("state", "Invited");
PFQuery *query = [PFUser query];
[query whereKey:@"state" notEqualTo:@"Invited"];
var query = PFUser.query()
query.whereKey("state", notEqualTo: "Invited")
ParseQuery<ParseUser> query = ParseQuery.getQuery(ParseUser.class);
query.whereNotEqualTo("state", "Invited");
var query = ParseUser.Query
.WhereNotEqualTo("state", "Invited");
# No REST API example
// No C++ example
It would be faster to use the “Contained In” condition when setting up the query:
query.containedIn("state", ["SignedUp", "Verified"]);
[query whereKey:@"state"
containedIn:@[@"SignedUp", @"Verified"]];
query.whereKey("state", containedIn: ["SignedUp", "Verified"])
query.whereContainedIn("state", Arrays.asList("SignedUp", "Verified"));
query.WhereContainedIn("state", new[] { "SignedUp", "Verified" });
# No REST API example
// No C++ example
Sometimes, you may have to completely rewrite your query. Going back to the "GameScore" example, let’s say we were running that query to display players who had scored higher than the given player. We could do this differently, by first getting the given player’s high score and then using the following query:
var GameScore = Parse.Object.extend("GameScore");
var query = new Parse.Query(GameScore);
// Previously retrieved highScore for Michael Yabuti
query.greaterThan("score", highScore);
query.find().then(function(results) {
// Retrieved scores successfully
});
PFQuery *query = [PFQuery queryWithClassName:@"GameScore"];
// Previously retrieved highScore for Michael Yabuti
[query whereKey:@"score" greaterThan:highScore];
[query findObjectsInBackgroundWithBlock:^(NSArray *objects, NSError *error) {
if (!error) {
// Retrieved scores successfully
}
}];
let query = PFQuery.queryWithClassName("GameScore")
// Previously retrieved highScore for Michael Yabuti
query.whereKey("score", greaterThan: highScore)
query.findObjectsInBackgroundWithBlock {
(objects, error) in
if !error {
// Retrieved scores successfully
}
}
ParseQuery<ParseObject> query = ParseQuery.getQuery("GameScore");
// Previously retrieved highScore for Michael Yabuti
query.whereGreaterThan("score", highScore);
query.findInBackground(new FindCallback<ParseObject>() {
@Override
public void done(List<ParseObject> list, ParseException e) {
if (e == null) {
// Retrieved scores successfully
}
}
});
// Previously retrieved highScore for Michael Yabuti
var results = await ParseObject.GetQuery("GameScore")
.WhereGreaterThan("score", highScore)
.FindAsync();
# No REST API example
// No C++ example
The new query you use depends on your use case. This may sometimes mean a redesign of your data model.
Not Contained In
Similar to “Not Equal To”, the “Not Contained In” query constraint can’t use an index. You should try and use the complementary “Contained In” constraint. Building on the User example, if the state column had one more value, “Blocked”, to represent blocked users, a slow query to find active users would be:
var query = new Parse.Query(Parse.User);
query.notContainedIn("state", ["Invited", "Blocked"];
PFQuery *query = [PFUser query];
[query whereKey:@"state" notContainedIn:@[@"Invited", @"Blocked"]];
var query = PFUser.query()
query.whereKey("state", notContainedIn: ["Invited", "Blocked"])
ParseQuery<ParseUser> query = ParseQuery.getQuery(ParseUser.class);
query.whereNotContainedIn("state", Arrays.asList("Invited", "Blocked"));
var query = ParseUser.Query
.WhereNotContainedIn("state", new[] { "Invited", "Blocked" });
# No REST API example
// No C++ example
Using a complimentary “Contained In” query constraint will always be faster:
query.containedIn("state", ["SignedUp", "Verified"]);
[query whereKey:@"state" containedIn:@[@"SignedUp", @"Verified"]];
query.whereKey("state", containedIn: ["SignedUp", "Verified"])
query.whereContainedIn("state", Arrays.asList("SignedUp", "Verified"));
query.WhereContainedIn("state", new[] { "SignedUp", "Verified"});
# No REST API example
// No C++ example
This means rewriting your queries accordingly. Your query rewrites will depend on your schema set up. It may mean redoing that schema.
Regular Expressions
Regular expression queries should be avoided due to performance considerations. MongoDB is not efficient for doing partial string matching except for the special case where you only want a prefix match. Queries that have regular expression constraints are therefore very expensive, especially for classes with over 100,000 records. Consider restricting how many such operations can be run on a particular app at any given time.
You should avoid using regular expression constraints that don’t use indexes. For example, the following query looks for data with a given string in the "playerName" field. The string search is case insensitive and therefore cannot be indexed:
query.matches("playerName", "Michael", “i”);
[query whereKey:@"playerName" matchesRegex:@"Michael" modifiers:@"i"];
query.whereKey("playerName", matchesRegex: "Michael", modifiers: "i")
query.whereMatches("playerName", "Michael", "i");
query.WhereMatches("playerName", "Michael", "i")
# No REST API example
// No C++ example
The following query, while case sensitive, looks for any occurrence of the string in the field and cannot be indexed:
query.contains("playerName", "Michael");
[query whereKey:@"playerName" containsString:@"Michael"];
query.whereKey("playerName", containsString: "Michael")
query.whereContains("playerName", "Michael");
query.WhereContains("playerName", "Michael")
# No REST API example
// No C++ example
These queries are both slow. In fact, the matches and contains query constraints are not covered in our querying guides on purpose and we do not recommend using them. Depending on your use case, you should switch to using the following constraint that uses an index, such as:
query.startsWith("playerName", "Michael");
[query whereKey:@"playerName" hasPrefix:@"Michael"];
query.whereKey("playerName", hasPrefix: "Michael")
query.whereStartsWith("playerName", "Michael");
query.WhereStartsWith("playerName", "Michael")
# No REST API example
// No C++ example
This looks for data that starts with the given string. This query will use the backend index, so it will be faster even for large datasets.
As a best practice, when you use regular expression constraints, you’ll want to ensure that other constraints in the query reduce the result set to the order of hundreds of objects to make the query efficient. If you must use the matches or contains constraints for legacy reasons, then use case sensitive, anchored queries where possible, for example:
query.matches("playerName", "^Michael");
[query whereKey:@"playerName" matchesRegex:@"^Michael"];
query.whereKey("playerName", matchesRegex: "^Michael")
query.whereMatches("playerName", "^Michael");
query.WhereMatches("playerName", "^Michael")
# No REST API example
// No C++ example
Most of the use cases around using regular expressions involve implementing search. A more performant way of implementing search is detailed later.
Write Restrictive Queries
Writing restrictive queries allows you to return only the data that the client needs. This is critical in a mobile environment were data usage can be limited and network connectivity unreliable. You also want your mobile app to appear responsive and this is directly affected by the objects you send back to the client. The Querying section shows the types of constraints you can add to your existing queries to limit the data returned. When adding constraints, you want to pay attention and design efficient queries.
You can limit the number of query results returned. The limit is 100 by default but anything from 1 to 1000 is a valid limit:
query.limit(10); // limit to at most 10 results
query.limit = 10; // limit to at most 10 results
query.limit = 10 // limit to at most 10 results
query.setLimit(10); // limit to at most 10 results
query.Limit(10); // limit to at most 10 results
# No REST API example
// No C++ example
If you’re issuing queries on GeoPoints, make sure you specify a reasonable radius:
var query = new Parse.Query(PlaceObject);
query.withinMiles("location", userGeoPoint, 10.0);
query.find().then(function(placesObjects) {
// Get a list of objects within 10 miles of a user's location
});
PFQuery *query = [PFQuery queryWithClassName:@"Place"];
[query whereKey:@"location" nearGeoPoint:userGeoPoint withinMiles:10.0];
[query findObjectsInBackgroundWithBlock:^(NSArray *places, NSError *error) {
if (!error) {
// List of objects within 10 miles of a user's location
}
}];
let query = PFQuery.queryWithClassName("Place")
query.whereKey("location", nearGeoPoint: userGeoPoint, withinMiles: 10.0)
query.findObjectsInBackgroundWithBlock {
(places, error) in
if !error {
// List of places within 10 miles of a user's location
}
}
ParseQuery<ParseObject> query = ParseQuery.getQuery("Place");
query.whereWithinMiles("location", userGeoPoint, 10.0);
query.findInBackground(new FindCallback<ParseObject>() {
@Override
public void done(List<ParseObject> list, ParseException e) {
if (e == null) {
// List of places within 10 miles of a user's location
}
}
});
var results = await ParseObject.GetQuery("GameScore")
.WhereWithinDistance("location", userGeoPoint, ParseGeoDistance.FromMiles(10.0))
.FindAsync();
# No REST API example
// No C++ example
You can further limit the fields returned by calling select:
var GameScore = Parse.Object.extend("GameScore");
var query = new Parse.Query(GameScore);
query.select("score", "playerName");
query.find().then(function(results) {
// each of results will only have the selected fields available.
});
PFQuery *query = [PFQuery queryWithClassName:@"GameScore"];
[query selectKeys:@[@"score", @"playerName"]];
[query findObjectsInBackgroundWithBlock:^(NSArray *objects, NSError *error) {
if (!error) {
// each of results will only have the selected fields available.
}
}];
let query = PFQuery.queryWithClassName("GameScore")
query.selectKeys(["score", "playerName"])
query.findObjectsInBackgroundWithBlock {
(objects, error) in
if !error {
// each of results will only have the selected fields available.
}
}
ParseQuery<ParseObject> query = ParseQuery.getQuery("GameScore");
query.selectKeys(Arrays.asList("score", "playerName"));
query.findInBackground(new FindCallback<ParseObject>() {
@Override
public void done(List<ParseObject> list, ParseException e) {
if (e == null) {
// each of results will only have the selected fields available.
}
}
});
var results = await ParseObject.GetQuery("GameScore")
.Select(new[] { "score", "playerName" })
.FindAsync();
// each of results will only have the selected fields available.
# No REST API example
// No C++ example
Client-side Caching
For queries run from iOS and Android, you can turn on query caching. See the iOS and Android guides for more details. Caching queries will increase your mobile app’s performance especially in cases where you want to display cached data while fetching the latest data from Parse.
Use Cloud Code
Cloud Code allows you to run custom JavaScript logic on Parse Server instead of on the client.
You can use this to offload processing to the Parse servers thus increasing your app’s perceived performance. You can create hooks that run whenever an object is saved or deleted. This is useful if you want to validate or sanitize your data. You can also use Cloud Code to modify related objects or kick off other processes such as sending off a push notification.
We saw examples of limiting the data returned by writing restrictive queries. You can also use Cloud Functions to help limit the amount of data returned to your app. In the following example, we use a Cloud Function to get a movie’s average rating:
Parse.Cloud.define("averageStars", function(request, response) {
var Review = Parse.Object.extend("Review");
var query = new Parse.Query(Review);
query.equalTo("movie", request.params.movie);
query.find().then(function(results) {
var sum = 0;
for (var i = 0; i < results.length; ++i) {
sum += results[i].get("stars");
}
response.success(sum / results.length);
}, function(error) {
response.error("movie lookup failed");
});
});
You could have ran a query on the Review class on the client, returned only the stars field data and computed the result on the client. As the number of reviews for a movie increases you can see that the data being returned to the device using this methodology also increases. Implementing the functionality through a Cloud Function returns the one result if successful.
As you look at optimizing your queries, you’ll find that you may have to change the queries - sometimes even after you’ve shipped your app to the App Store or Google Play. The ability to change your queries without a client update is possible if you use Cloud Functions. Even if you have to redesign your schema, you could make all the changes in your Cloud Functions while keeping the client interface the same to avoid an app update. Take the average stars Cloud Function example from before, calling it from a client SDK would look like this:
Parse.Cloud.run("averageStars", { "movie": "The Matrix" }).then(function(ratings) {
// ratings is 4.5
});
[PFCloud callFunctionInBackground:@"averageStars"
withParameters:@{@"movie": @"The Matrix"}
block:^(NSNumber *ratings, NSError *error) {
if (!error) {
// ratings is 4.5
}
}];
PFCloud.callFunctionInBackground("averageStars", withParameters: ["movie": "The Matrix"]) {
(ratings, error) in
if !error {
// ratings is 4.5
}
}
HashMap<String, String> params = new HashMap();
params.put("movie", "The Matrix");
ParseCloud.callFunctionInBackground("averageStars", params, new FunctionCallback<Float>() {
@Override
public void done(Float aFloat, ParseException e) {
if (e == null) {
// ratings is 4.5
}
}
});
IDictionary<string, object> dictionary = new Dictionary<string, object>
{
{ "movie", "The Matrix" }
};
ParseCloud.CallFunctionAsync<float>("averageStars", dictionary).ContinueWith(t => {
var result = t.Result;
// result is 4.5
});
# No REST API example
// No C++ example
If later on, you need to modify the underlying data model, your client call can remain the same, as long as you return back a number that represents the ratings result.
Avoid Count Operations
For classes with over 1,000 objects, count operations are limited by timeouts. Thus, it is preferable to architect your application to avoid this count operation.
Suppose you are displaying movie information in your app and your data model consists of a Movie class and a Review class that contains a pointer to the corresponding movie. You might want to display the review count for each movie on the top-level navigation screen using a query like this:
var Review = Parse.Object.extend("Review");
var query = new Parse.Query("Review");
// movieId corresponds to a given movie's id
query.equalTo(“movie”, movieId);
query.count().then(function(count) {
// Request succeeded
});
PFQuery *query = [PFQuery queryWithClassName:@"Review"];
// movieId corresponds to a given movie's id
[query whereKey:@"movie" equalTo:movieId];
[query countObjectsInBackgroundWithBlock:^(int number, NSError *error) {
if (!error) {
// Request succeeded
}
}];
let query = PFQuery.queryWithClassName("Review")
// movieId corresponds to a given movie's id
query.whereKey("movie", equalTo: movieId)
query.countObjectsInBackgroundWithBlock {
(number, error) in
if !error {
// Request succeeded
}
}
ParseQuery<ParseObject> query = ParseQuery.getQuery("Review");
// movieId corresponds to a given movie's id
query.whereEqualTo("movie", movieId);
query.countInBackground(new CountCallback() {
@Override
public void done(int i, ParseException e) {
if ( e == null) {
// Request succeeded
}
}
});
var count = await ParseObject.GetQuery("Review")
// movieId corresponds to a given movie's id
.WhereEqualTo("movie", movieId)
.CountAsync();
# No REST API example
// No C++ example
If you run the count query for each of the UI elements, they will not run efficiently on large data sets. One approach to avoid using the count() operator could be to add a field to the Movie class that represents the review count for that movie. When saving an entry to the Review class you could increment the corresponding movie’s review count field. This can be done in an afterSave handler:
Parse.Cloud.afterSave("Review", function(request) {
// Get the movie id for the Review
var movieId = request.object.get("movie").id;
// Query the Movie represented by this review
var Movie = Parse.Object.extend("Movie");
var query = new Parse.Query(Movie);
query.get(movieId).then(function(movie) {
// Increment the reviews field on the Movie object
movie.increment("reviews");
movie.save();
}, function(error) {
throw "Got an error " + error.code + " : " + error.message;
});
});
Your new optimized query would not need to look at the Review class to get the review count:
var Movie = Parse.Object.extend("Movie");
var query = new Parse.Query(Movie);
query.find().then(function(results) {
// Results include the reviews count field
}, function(error) {
// Request failed
});
PFQuery *query = [PFQuery queryWithClassName:@"Movie"];
[query findObjectsInBackgroundWithBlock:^(NSArray *objects, NSError *error) {
if (!error) {
// Results include the reviews count field
}
}];
let query = PFQuery.queryWithClassName("Movie")
query.findObjectsInBackgroundWithBlock {
(objects, error) in
if !error {
// Results include the reviews count field
}
}
ParseQuery<ParseObject> query = ParseQuery.getQuery("Movie");
query.findInBackground(new FindCallback<ParseObject>() {
@Override
public void done(List<ParseObject> list, ParseException e) {
if (e == null) {
// Results include the reviews count field
}
}
});
var results = await ParseObject.GetQuery("Movie")
.FindAsync();
// Results include the reviews count field
# No REST API example
// No C++ example
You could also use a separate Parse Object to keep track of counts for each review. Whenever a review gets added or deleted, you can increment or decrement the counts in an afterSave or afterDelete Cloud Code handler. The approach you choose depends on your use case.
Implement Efficient Searches
As mentioned previously, MongoDB is not efficient for doing partial string matching. However, this is an important use case when implementing search functionality that scales well in production.
Simplistic search algorithms simply scan through all the class data and executes the query on each entry. The key to making searches run efficiently is to minimize the number of data that has to be examined when executing each query by using an index as we’ve outlined earlier. You’ll need to build your data model in a way that it’s easy for us to build an index for the data you want to be searchable. For example, string matching queries that don’t match an exact prefix of the string won’t be able to use an index leading to timeout errors as the data set grows.
Let’s walk through an example of how you could build an efficient search. You can apply the concepts you learn in this example to your use case. Say your app has users making posts, and you want to be able to search those posts for hashtags or particular keywords. You’ll want to pre-process your posts and save the list of hashtags and words into array fields. You can do this processing either in your app before saving the posts, or you can use a Cloud Code beforeSave hook to do this on the fly:
var _ = require("underscore");
Parse.Cloud.beforeSave("Post", function(request, response) {
var post = request.object;
var toLowerCase = function(w) { return w.toLowerCase(); };
var words = post.get("text").split(/\b/);
words = _.map(words, toLowerCase);
var stopWords = ["the", "in", "and"]
words = _.filter(words, function(w) {
return w.match(/^\w+$/) && ! _.contains(stopWords, w);
});
var hashtags = post.get("text").match(/#.+?\b/g);
hashtags = _.map(hashtags, toLowerCase);
post.set("words", words);
post.set("hashtags", hashtags);
response.success();
});
This saves your words and hashtags in array fields, which MongoDB will store with a multi-key index. There are some important things to notice about this. First of all it’s converting all words to lower case so that we can look them up with lower case queries, and get case insensitive matching. Secondly, it’s filtering out common words like ‘the’, ‘in’, and ‘and’ which will occur in a lot of posts, to additionally reduce useless scanning of the index when executing the queries.
Once you’ve got the keywords set up, you can efficiently look them up using “All” constraint on your query:
var Post = Parse.Object.extend("Post");
var query = new Parse.Query(Post);
query.containsAll("hashtags", [“#parse”, “#ftw”]);
query.find().then(function(results) {
// Request succeeded
}, function(error) {
// Request failed
});
PFQuery *query = [PFQuery queryWithClassName:@"Post"];
[query whereKey:@"hashtags" containsAllObjectsInArray:@[@"#parse", @"#ftw"]];
[query findObjectsInBackgroundWithBlock:^(NSArray *objects, NSError *error) {
if (!error) {
// Request succeeded
}
}];
let query = PFQuery.queryWithClassName("Post")
query.whereKey("hashtags", containsAllObjectsInArray: ["#parse", "#ftw"])
query.findObjectsInBackgroundWithBlock {
(objects, error) in
if !error {
// Request succeeded
}
}
ParseQuery<ParseObject> query = ParseQuery.getQuery("Post");
query.whereContainsAll("hashtags", Arrays.asList("#parse", "#ftw"));
query.findInBackground(new FindCallback<ParseObject>() {
@Override
public void done(List<ParseObject> list, ParseException e) {
if (e == null) {
// Request succeeded
}
}
});
var results = await ParseObject.GetQuery("Post")
.WhereContainsAll("hashtags", new[] { "#parse", "#ftw" })
.FindAsync();
# No REST API example
// No C++ example
Limits and Other Considerations
There are some limits in place to ensure the API can provide the data you need in a performant manner. We may adjust these in the future. Please take a moment to read through the following list:
Objects
- Parse Objects are limited in size to 128 KB.
- We recommend against creating more than 64 fields on a single Parse Object to ensure that we can build effective indexes for your queries.
- We recommend against using field names that are longer than 1,024 characters, otherwise an index for the field will not be created.
Queries
- Queries return 100 objects by default. Use the
limitparameter to change this, up to a value of 1,000. - Queries can only return up to 1,000 objects in a single result set. This includes any resolved pointers. You can use
skipandlimitto page through results. - The maximum value accepted by
skipis 10,000. If you need to get more objects, we recommend sorting the results and then using a constraint on the sort column to filter out the first 10,000 results. You will then be able to continue paging through results starting from askipvalue of 0. For example, you can sort your results bycreatedAt ASCand then filter out any objects older than thecreatedAtvalue of the 10,000th object when starting again from 0. - Alternatively, you may use the
each()method in the JavaScript SDK to page through all objects that match the query. - Skips and limits can only be used on the outer query.
- You may increase the limit of a inner query to 1,000, but skip cannot be used to get more results past the first 1,000.
- Constraints that collide with each other will result in only one of the constraint being applied. An example of this would be two
equalToconstraints over the same key with two different values, which contradicts itself (perhaps you’re looking for ‘contains’). - No geo-queries inside compound OR queries.
- Using
$exists: falseis not advised. - The
eachquery method in the JavaScript SDK cannot be used in conjunction with queries using geo-point constraints. - A maximum of 500,000 objects will be scanned per query. If your constraints do not successfully limit the scope of the search, this can result in queries with incomplete results.
- A
containsAllquery constraint can only take up to 9 items in the comparison array.
Push Notifications
- Delivery of notifications is a “best effort”, not guaranteed. It is not intended to deliver data to your app, only to notify the user that there is new data available.
Cloud Code
- The
paramspayload that is passed to a Cloud Function is limited to 50 MB.
Error Codes
The following is a list of all the error codes that can be returned by the Parse API. You may also refer to RFC2616 for a list of http error codes. Make sure to check the error message for more details.
API Issues
| Name | Code | Description |
|---|---|---|
UserInvalidLoginParams |
101 | Invalid login parameters. Check error message for more details. |
ObjectNotFound |
101 | The specified object or session doesn’t exist or could not be found. Can also indicate that you do not have the necessary permissions to read or write this object. Check error message for more details. |
InvalidQuery |
102 | There is a problem with the parameters used to construct this query. This could be an invalid field name or an invalid field type for a specific constraint. Check error message for more details. |
InvalidClassName |
103 | Missing or invalid classname. Classnames are case-sensitive. They must start with a letter, and a-zA-Z0-9_ are the only valid characters. |
MissingObjectId |
104 | An unspecified object id. |
InvalidFieldName |
105 | An invalid field name. Keys are case-sensitive. They must start with a letter, and a-zA-Z0-9_ are the only valid characters. Some field names may be reserved. Check error message for more details. |
InvalidPointer |
106 | A malformed pointer was used. You would typically only see this if you have modified a client SDK. |
InvalidJSON |
107 | Badly formed JSON was received upstream. This either indicates you have done something unusual with modifying how things encode to JSON, or the network is failing badly. Can also indicate an invalid utf-8 string or use of multiple form encoded values. Check error message for more details. |
CommandUnavailable |
108 | The feature you tried to access is only available internally for testing purposes. |
NotInitialized |
109 | You must call Parse.initialize before using the Parse library. Check the Quick Start guide for your platform. |
ObjectTooLarge |
116 | The object is too large. Parse Objectss have a max size of 128 kilobytes. |
ExceededConfigParamsError |
116 | You have reached the limit of 100 config parameters. |
InvalidLimitError |
117 | An invalid value was set for the limit. Check error message for more details. |
InvalidSkipError |
118 | An invalid value was set for skip. Check error message for more details. |
OperationForbidden |
119 | The operation isn’t allowed for clients due to class-level permissions. Check error message for more details. |
CacheMiss |
120 | The result was not found in the cache. |
InvalidNestedKey |
121 | An invalid key was used in a nested JSONObject. Check error message for more details. |
InvalidACL |
123 | An invalid ACL was provided. |
InvalidEmailAddress |
125 | The email address was invalid. |
DuplicateValue |
137 | Unique field was given a value that is already taken. |
InvalidRoleName |
139 | Role’s name is invalid. |
ReservedValue |
139 | Field value is reserved. |
ExceededCollectionQuota |
140 | You have reached the quota on the number of classes in your app. Please delete some classes if you need to add a new class. |
ScriptFailed |
141 | Cloud Code script failed. Usually points to a JavaScript error. Check error message for more details. |
FunctionNotFound |
141 | Cloud function not found. Check that the specified Cloud function is present in your Cloud Code script and has been deployed. |
JobNotFound |
141 | Background job not found. Check that the specified job is present in your Cloud Code script and has been deployed. |
SuccessErrorNotCalled |
141 | success/error was not called. A cloud function will return once response.success() or response.error() is called. A background job will similarly finish execution once status.success() or status.error() is called. If a function or job never reaches either of the success/error methods, this error will be returned. This may happen when a function does not handle an error response correctly, preventing code execution from reaching the success() method call. |
MultupleSuccessErrorCalls |
141 | Can’t call success/error multiple times. A cloud function will return once response.success() or response.error() is called. A background job will similarly finish execution once status.success() or status.error() is called. If a function or job calls success() and/or error() more than once in a single execution path, this error will be returned. |
ValidationFailed |
142 | Cloud Code validation failed. |
WebhookError |
143 | Webhook error. |
InvalidImageData |
150 | Invalid image data. |
UnsavedFileError |
151 | An unsaved file. |
InvalidPushTimeError |
152 | An invalid push time was specified. |
HostingError |
158 | Hosting error. |
InvalidEventName |
160 | The provided analytics event name is invalid. |
ClassNotEmpty |
255 | Class is not empty and cannot be dropped. |
AppNameInvalid |
256 | App name is invalid. |
MissingAPIKeyError |
902 | The request is missing an API key. |
InvalidAPIKeyError |
903 | The request is using an invalid API key. |
Push related errors
| Name | Code | Description |
|---|---|---|
IncorrectType |
111 | A field was set to an inconsistent type. Check error message for more details. |
InvalidChannelName |
112 | Invalid channel name. A channel name is either an empty string (the broadcast channel) or contains only a-zA-Z0-9_ characters and starts with a letter. |
InvalidSubscriptionType |
113 | Bad subscription type. Check error message for more details. |
InvalidDeviceToken |
114 | The provided device token is invalid. |
PushMisconfigured |
115 | Push is misconfigured in your app. Check error message for more details. |
PushWhereAndChannels |
115 | Can’t set channels for a query-targeted push. You can fix this by moving the channels into your push query constraints. |
PushWhereAndType |
115 | Can’t set device type for a query-targeted push. You can fix this by incorporating the device type constraints into your push query. |
PushMissingData |
115 | Push is missing a ‘data’ field. |
PushMissingChannels |
115 | Non-query push is missing a ‘channels’ field. Fix by passing a ‘channels’ or ‘query’ field. |
ClientPushDisabled |
115 | Client-initiated push is not enabled. Check your Parse app’s push notification settings. |
RestPushDisabled |
115 | REST-initiated push is not enabled. Check your Parse app’s push notification settings. |
ClientPushWithURI |
115 | Client-initiated push cannot use the “uri” option. |
PushQueryOrPayloadTooLarge |
115 | Your push query or data payload is too large. Check error message for more details. |
InvalidExpirationError |
138 | Invalid expiration value. |
MissingPushIdError |
156 | A push id is missing. Deprecated. |
MissingDeviceTypeError |
157 | The device type field is missing. Deprecated. |
File related errors
| Name | Code | Description |
|---|---|---|
InvalidFileName |
122 | An invalid filename was used for Parse File. A valid file name contains only a-zA-Z0-9_. characters and is between 1 and 128 characters. |
MissingContentType |
126 | Missing content type. |
MissingContentLength |
127 | Missing content length. |
InvalidContentLength |
128 | Invalid content length. |
FileTooLarge |
129 | File size exceeds maximum allowed. |
FileSaveError |
130 | Error saving a file. |
FileDeleteError |
131 | File could not be deleted. |
Installation related errors
| Name | Code | Description |
|---|---|---|
InvalidInstallationIdError |
132 | Invalid installation id. |
InvalidDeviceTypeError |
133 | Invalid device type. |
InvalidChannelsArrayError |
134 | Invalid channels array value. |
MissingRequiredFieldError |
135 | Required field is missing. |
ChangedImmutableFieldError |
136 | An immutable field was changed. |
Purchase related errors
| Name | Code | Description |
|---|---|---|
ReceiptMissing |
143 | Product purchase receipt is missing. |
InvalidPurchaseReceipt |
144 | Product purchase receipt is invalid. |
PaymentDisabled |
145 | Payment is disabled on this device. |
InvalidProductIdentifier |
146 | The product identifier is invalid. |
ProductNotFoundInAppStore |
147 | The product is not found in the App Store. |
InvalidServerResponse |
148 | The Apple server response is not valid. |
ProductDownloadFilesystemError |
149 | The product fails to download due to file system error. |
User related errors
| Name | Code | Description |
|---|---|---|
UsernameMissing |
200 | The username is missing or empty. |
PasswordMissing |
201 | The password is missing or empty. |
UsernameTaken |
202 | The username has already been taken. |
UserEmailTaken |
203 | Email has already been used. |
UserEmailMissing |
204 | The email is missing, and must be specified. |
UserWithEmailNotFound |
205 | A user with the specified email was not found. |
SessionMissing |
206 | A user object without a valid session could not be altered. |
MustCreateUserThroughSignup |
207 | A user can only be created through signup. |
AccountAlreadyLinked |
208 | An account being linked is already linked to another user. |
InvalidSessionToken |
209 | The device’s session token is no longer valid. The application should ask the user to log in again. |
Linked services errors
| Name | Code | Description |
|---|---|---|
LinkedIdMissing |
250 | A user cannot be linked to an account because that account’s id could not be found. |
InvalidLinkedSession |
251 | A user with a linked (e.g. Facebook or Twitter) account has an invalid session. Check error message for more details. |
InvalidGeneralAuthData |
251 | Invalid auth data value used. |
BadAnonymousID |
251 | Anonymous id is not a valid lowercase UUID. |
FacebookBadToken |
251 | The supplied Facebook session token is expired or invalid. |
FacebookBadID |
251 | A user with a linked Facebook account has an invalid session. |
FacebookWrongAppID |
251 | Unacceptable Facebook application id. |
TwitterVerificationFailed |
251 | Twitter credential verification failed. |
TwitterWrongID |
251 | Submitted Twitter id does not match the id associated with the submitted access token. |
TwitterWrongScreenName |
251 | Submitted Twitter handle does not match the handle associated with the submitted access token. |
TwitterConnectFailure |
251 | Twitter credentials could not be verified due to problems accessing the Twitter API. |
UnsupportedService |
252 | A service being linked (e.g. Facebook or Twitter) is unsupported. Check error message for more details. |
UsernameSigninDisabled |
252 | Authentication by username and password is not supported for this application. Check your Parse app’s authentication settings. |
AnonymousSigninDisabled |
252 | Anonymous users are not supported for this application. Check your Parse app’s authentication settings. |
FacebookSigninDisabled |
252 | Authentication by Facebook is not supported for this application. Check your Parse app’s authentication settings. |
TwitterSigninDisabled |
252 | Authentication by Twitter is not supported for this application. Check your Parse app’s authentication settings. |
InvalidAuthDataError |
253 | An invalid authData value was passed. Check error message for more details. |
LinkingNotSupportedError |
999 | Linking to an external account not supported yet with signup_or_login. Use update instead. |
Client-only errors
| Name | Code | Description |
|---|---|---|
ConnectionFailed |
100 | The connection to the Parse servers failed. |
AggregateError |
600 | There were multiple errors. Aggregate errors have an “errors” property, which is an array of error objects with more detail about each error that occurred. |
FileReadError |
601 | Unable to read input for a Parse File on the client. |
XDomainRequest |
602 | A real error code is unavailable because we had to use an XDomainRequest object to allow CORS requests in Internet Explorer, which strips the body from HTTP responses that have a non-2XX status code. |
Operational issues
| Name | Code | Description |
|---|---|---|
RequestTimeout |
124 | The request was slow and timed out. Typically this indicates that the request is too expensive to run. You may see this when a Cloud function did not finish before timing out, or when a Parse.Cloud.httpRequest connection times out. |
InefficientQueryError |
154 | An inefficient query was rejected by the server. Refer to the Performance Guide and slow query log. |
RequestLimitExceeded |
155 | This application has exceeded its request limit (legacy Parse.com apps only). |
TemporaryRejectionError |
159 | An application’s requests are temporary rejected by the server (legacy Parse.com apps only). |
DatabaseNotMigratedError |
428 | You should migrate your database as soon as possible (legacy Parse.com apps only). |
Other issues
| Name | Code | Description |
|---|---|---|
OtherCause |
-1 | An unknown error or an error unrelated to Parse occurred. |
InternalServerError |
1 | Internal server error. No information available. |
ServiceUnavailable |
2 | The service is currently unavailable. |
ClientDisconnected |
4 | Connection failure. |