Parse Server is an open source version of the Parse backend that can be deployed to any infrastructure that can run Node.js. You can find the source on the GitHub repo.
- Parse Server is not dependent on the hosted Parse backend.
- Parse Server uses MongoDB directly, and is not dependent on the Parse hosted database.
- You can migrate an existing app to your own infrastructure.
- You can develop and test your app locally using Node.
Prerequisites
- Node 4.3
- MongoDB version 2.6.X or 3.0.X
- Python 2.x (For Windows users, 2.7.1 is the required version)
- For deployment, an infrastructure provider like Heroku or AWS
Compatibility with hosted Parse
There are a few areas where Parse Server does not provide compatibility with the Parse hosted backend. If you’re migrating a hosted Parse.com app to Parse Server, please take some time to carefully read through the list of compatibility issues.
Getting Started
The fastest and easiest way to get started is to run MongoDB and Parse Server locally. Use the bootstrap script to set up Parse Server in the current directory.
$ sh <(curl -fsSL https://raw.githubusercontent.com/parseplatform/parse-server/master/bootstrap.sh)
$ npm install -g mongodb-runner
$ mongodb-runner start
$ npm start
You can use any arbitrary string as your application id and master key. These will be used by your clients to authenticate with the Parse Server.
That’s it! You are now running a standalone version of Parse Server on your machine.
Saving your first object
Now that you’re running Parse Server, it is time to save your first object. We’ll use the REST API, but you can easily do the same using any of the Parse SDKs. Run the following:
curl -X POST \
-H "X-Parse-Application-Id: APPLICATION_ID" \
-H "Content-Type: application/json" \
-d '{"score":1337,"playerName":"Sean Plott","cheatMode":false}' \
http://localhost:1337/parse/classes/GameScore
You should get a response similar to this:
{
  "objectId": "2ntvSpRGIK",
  "createdAt": "2016-03-11T23:51:48.050Z"
}
You can now retrieve this object directly (make sure to replace 2ntvSpRGIK with the actual objectId you received when the object was created):
$ curl -X GET \
  -H "X-Parse-Application-Id: APPLICATION_ID" \
  http://localhost:1337/parse/classes/GameScore/2ntvSpRGIK
// Response
{
  "objectId": "2ntvSpRGIK",
  "score": 1337,
  "playerName": "Sean Plott",
  "cheatMode": false,
  "updatedAt": "2016-03-11T23:51:48.050Z",
  "createdAt": "2016-03-11T23:51:48.050Z"
}
Keeping tracks of individual object ids is not ideal, however. In most cases you will want to run a query over the collection, like so:
$ curl -X GET \
  -H "X-Parse-Application-Id: APPLICATION_ID" \
  http://localhost:1337/parse/classes/GameScore
// The response will provide all the matching objects within the `results` array:
{
  "results": [
    {
      "objectId": "2ntvSpRGIK",
      "score": 1337,
      "playerName": "Sean Plott",
      "cheatMode": false,
      "updatedAt": "2016-03-11T23:51:48.050Z",
      "createdAt": "2016-03-11T23:51:48.050Z"
    }
  ]
}
To learn more about using saving and querying objects on Parse Server, check out the documentation for the SDK you will be using in your app.
Connect your app to Parse Server
Parse provides SDKs for all the major platforms. Refer to the rest of the Parse Server guide to learn how to connect your app to Parse Server.
Running Parse Server elsewhere
Once you have a better understanding of how the project works, please refer to the Deploying Parse Server section to learn more about additional ways of running Parse Server.
Database
Parse Server uses MongoDB as the database for your application. If you have not used MongoDB before, we highly recommend familiarizing yourself with it first before proceeding.
The Mongo requirements for Parse Server are:
- MongoDB version 2.6.X or 3.0.X
- The failIndexKeyTooLong parameter must be set to
false. - An SSL connection is recommended (but not required).
- We strongly recommend that your MongoDB servers be hosted in the US-East region for minimal lantecy.
If this is your first time setting up a production MongoDB instance, we recommend using either mLab or ObjectRocket. These are database-as-a-service companies which provide fully managed MongoDB instances, and can help you scale up as needed.
If you are migrating an existing Parse app to a MongoDB instance that isn’t backed by WiredTiger or RocksDB, a good rule of thumb is to assume you will need 10X the space you currently are using with Parse.
When using MongoDB with your Parse app, there are some differences with the hosted Parse database:
- You need to manage your indexes yourself. Hosted Parse automatically adds indexes based on the incoming query stream.
- You need to size up your database as your data grows.
If you are planning to run MongoDB on your own infrastructure, we highly recommend using the RocksDB Storage Engine.
Why do I need to set failIndexKeyTooLong=false?
MongoDB only allows index keys that are 1024 bytes or smaller. If a write operation attempts to store a value greater than 1024 bytes in size to a field that has been indexed, it will fail with an error. Due to how Parse dynamically indexes collections based on query traffic, we inevitably have indexed some fields with values larger than 1024 bytes. To avoid random write errors, we configured failIndexKeyTooLong=false on our databases, and accept the write even if the field is indexed. A side effect of this is that data with fields larger than 1024 bytes will appear to be “missing” depending on which index is selected by the MongoDB query planner.
Customers migrating their data only need to configure this parameter if they have indexed fields larger than 1024 bytes in size and they have collections larger than 1 million documents. For smaller apps, we will automatically clean up offending indexes during the migration. Larger apps should follow these steps as a best practice:
- Configure
failIndexKeyTooLong=falseon the destination database - Migrate all data per the migration guide.
- Evaluate all existing indexes and drop indexes for fields with data larger than 1024 bytes. The number of fields and indexes will depend entirely on the nature of your application and its data.
- Configure
failIndexKeyTooLong=trueon the database
Usage
Parse Server is meant to be mounted on an Express app. Express is a web framework for Node.js. The fastest way to get started is to clone the Parse Server repo, which at its root contains a sample Express app with the Parse API mounted.
The constructor returns an API object that conforms to an Express Middleware. This object provides the REST endpoints for a Parse app. Create an instance like so:
var api = new ParseServer({
  databaseURI: 'mongodb://your.mongo.uri',
  cloud: './cloud/main.js',
  appId: 'myAppId',
  fileKey: 'myFileKey',
  masterKey: 'mySecretMasterKey',
  push: { ... }, // See the Push wiki page
  filesAdapter: ...,
});
The parameters are as follows:
databaseURI: Connection string URI for your MongoDB.cloud: Path to your app’s Cloud Code.appId: A unique identifier for your app.fileKey: A key that specifies a prefix used for file storage. For migrated apps, this is necessary to provide access to files already hosted on Parse.masterKey: A key that overrides all permissions. Keep this secret.clientKey: The client key for your app. (optional)restAPIKey: The REST API key for your app. (optional)javascriptKey: The JavaScript key for your app. (optional)dotNetKey: The .NET key for your app. (optional)push: An object containing push configuration. See PushfilesAdapter: An object that implements the FilesAdapter interface. For example, the S3 files adapteroauth: Configure support for 3rd party authentication.
The Parse Server object was built to be passed directly into app.use, which will mount the Parse API at a specified path in your Express app:
var express = require('express');
var ParseServer = require('parse-server').ParseServer;

var app = express();
var api = new ParseServer({ ... });

// Serve the Parse API at /parse URL prefix
app.use('/parse', api);

var port = 1337;
app.listen(port, function() {
  console.log('parse-server-example running on port ' + port + '.');
});
And with that, you will have a Parse Server running on port 1337, serving the Parse API at /parse.
Keys
Parse Server does not require the use of client-side keys. This includes the client key, JavaScript key, .NET key, and REST API key. The Application ID is sufficient to secure your app.
However, you have the option to specify any of these four keys upon initialization. Upon doing so, Parse Server will enforce that any clients passing a key matches. The behavior is consistent with hosted Parse.
Using Parse SDKs with Parse Server
To use a Parse SDK with Parse Server, change the server URL to your Parse API URL (make sure you have the latest version of the SDKs). For example, if you have Parse Server running locally mounted at /parse:
iOS / OS X / watchOS / tvOS
Swift
let configuration = ParseClientConfiguration {
    $0.applicationId = "YOUR_APP_ID"
    $0.clientKey = ""
    $0.server = "http://localhost:1337/parse"
}
Parse.initializeWithConfiguration(configuration)
Objective-C
[Parse initializeWithConfiguration:[ParseClientConfiguration configurationWithBlock:^(id<ParseMutableClientConfiguration> configuration) {
   configuration.applicationId = @"YOUR_APP_ID";
   configuration.clientKey = @"";
   configuration.server = @"http://localhost:1337/parse";
}]];
Android
Parse.initialize(new Parse.Configuration.Builder(myContext)
    .applicationId("YOUR_APP_ID")
    .clientKey(null)
    .server("http://localhost:1337/parse/") // The trailing slash is important.

    ...

    .build()
);
JavaScript
Parse.initialize("YOUR_APP_ID");
Parse.serverURL = 'http://localhost:1337/parse'
.NET
ParseClient.initialize(new ParseClient.Configuration {
    ApplicationId = "YOUR_APP_ID",
    Server = "http://localhost:1337/parse/"
});
PHP
ParseClient::initialize('YOUR_APP_ID', 'YOUR_CLIENT_KEY', 'YOUR_MASTER_KEY');
ParseClient::setServerURL('http://localhost:1337/parse');
Deploying Parse Server
The fastest and easiest way to start using Parse Server is to run MongoDB and Parse Server locally. Once you have a better understanding of how the project works, read on to learn how to deploy Parse Server to major infrastructure providers. If your provider is not listed here, please take a look at the list of articles from the community as someone may have already written a guide for it.
Deploying to Heroku and mLab
Heroku and mLab provide an easy way to deploy Parse Server, especially if you’re new to managing your own backend infrastructure.
Here are the steps:
- Create a repo for your Express app with the Parse Server middleware mounted (you can use our sample project, or start your own).
- Create a Heroku account (if you don’t have one already) and use the Heroku Toolbelt to log in and prepare a new app in the same directory as your Express app. Take a look at Heroku’s Getting Started with Node.js guide for more details.
- Use the mLab addon:
heroku addons:create mongolab:sandbox(or, you can create a Mongo instance yourself, either directly with mLab or your own box) - Use heroku config and note the URI provided by mLab under the var MONGOLAB_URI
- Copy this URI and set it as a new config variable: heroku config:set
DATABASE_URI=mongodb://... - Deploy it:
git push heroku master
You may also refer to the Heroku Dev Center article on Deploying a Parse Server to Heroku.
Push Notifications
Parse Server provides basic push notification functionality for iOS and Android. With this feature, you can:
- Target installations by platform
- Target installations by a
ParseQuery - Send push notifications to Android devices through Google Cloud Messaging (GCM)
- Send push notifications to iOS devices through Apple Push Notification Service (APNS)
- Use most of the sending options
However, there are a few caveats:
- Does not support super high throughput since it does not employ a job queue system
- Client push is not supported. You can only use
masterKeyto send push notifications - Delivery reports are not supported
- Scheduled push is not supported
API
We support most of the sending options similar to the hosted Parse.com service. Check the detailed doc here. Parse Server supports the following:
channelsto target installations by channelswhereto target installations byParseQueryalertunderdatafor notification message- number
badgeunderdatafor iOS badge number soundunderdatafor iOS soundcontent-availableunderdatafor iOS background jobcategoryunderdatafor iOS categorytitleunderdatafor Android notification titleuriunderdatafor Android notification launched URI- custom data under
datafor ios and Android
Here is the list of sending options we do not support yet:
* push_time for scheduled push
* Increment badge under data for iOS badge number
Quick Start
1. Prepare APNS and GCM Credentials
You will need to obtain some credentials from GCM and APNS in order to send push notifications to iOS and Android devices.
APNS (iOS)
If you are setting up push notifications on iOS for the first time, follow the Parse Push Notifications tutorial to obtain a production Apple Push Certificate. Parse has always guided users to export a PFX (.p12) file from Keychain Access, and we support that format in Parse Server as well. Optionally, the module supports accepting the push certificate and key in .pem format.
GCM (Android)
To get your GCM sender ID, enable GCM for your Android project in the Google Developer Console. Take note of your project number. It should be a large integer like 123427208255. This project number is your GCM sender ID.
To get your GCM API key, go to the Google developer credentials page, and either create a new API key or reuse an existing one.
By default, the hosted Parse service (parse.com) sends pushes to your Android app with its own GCM sender ID. With your Parse Server, this setup will no longer work. Instead, your Parse Server will send GCM pushes with its own GCM sender ID and API key. You should register a GCM sender ID and update your app as soon as possible. Until users update, you can continue sending push notifications through Parse.com.
2. Configure Parse Server
When initializing Parse Server, you should pass an additional push configuration. For example
var server = new ParseServer({
  databaseURI: '...',
  cloud: '...',
  appId: '...',
  masterKey: '...',
  push: {
    android: {
      senderId: '...',
      apiKey: '...'
    },
    ios: {
      pfx: '/file/path/to/XXX.p12',
      passphrase: '', // optional password to your p12/PFX
      bundleId: '',
      production: false
    }
  }
});
The configuration format is
push: {
  android: {
    senderId: '', // The Sender ID of GCM
    apiKey: '' // The Server API Key of GCM
  },
  ios: {
    pfx: '', // The filename of private key and certificate in PFX or PKCS12 format from disk
    passphrase: '', // optional password to your p12
    cert: '', // If not using the .p12 format, the path to the certificate PEM to load from disk
    key: '', // If not using the .p12 format, the path to the private key PEM to load from disk
    bundleId: '', // The bundle identifier associate with your app
    production: false // Specifies which environment to connect to: Production (if true) or Sandbox
  }
}
For iOS, if you need to support both the dev and prod certificates, you can provide an array of configurations like
push: {
  ios: [
    {
      pfx: '', // Dev PFX or P12
      bundleId: '',
      production: false // Dev
    },
    {
      pfx: '', // Prod PFX or P12
      bundleId: '',
      production: true // Prod
    }
  ]
}
If you have a list of certificates, Parse Server’s strategy on choosing them is trying to match installations’ appIdentifier with bundleId first. If it can find some valid certificates, it will use those certificates to establish the connection to APNS and send notifications. If it can not find, it will try to send the notifications with all certificates. Prod certificates first, then dev certificates.
3. Configure Client Apps
Configure an app which connects to Parse Server. We have provided a detailed list of steps to configure your iOS and Android clients.
4. Send Push Notifications
Currently Parse Server only supports sending push notifications by your masterKey. The easiest way to do that is to curl:
curl -X POST \
  -H "X-Parse-Application-Id: you_app_id" \
  -H "X-Parse-Master-Key: your_master_key" \
  -H "Content-Type: application/json" \
  -d '{
        "where": {
          "deviceType": {
            "$in": [
              "ios",
              "android"
            ]
          }
        },
        "data": {
          "title": "The Shining",
          "alert": "All work and no play makes Jack a dull boy."
        }
      }'\   http://your_server_address/parse/push
Push notifications can also be sent from cloud code:
// With promises
Parse.Push.send({
  where: { ... },
  data: { ... }
}, { useMasterKey: true })
.then(function() {
  // Push sent!
}, function(error) {
  // There was a problem :(
});

// With Legacy Backbone callbacks
Parse.Push.send({
  where: query,
  data: {
    alert: 'Test',
    badge: 1,
    sound: 'default'
  }
}, {
  useMasterKey: true,
  success: function() {
    // Push sent!
  },
  error: function(error) {
    // There was a problem :(
  }
});
After sending this to your Parse Server, you should see the push notifications show up on your devices.
Note: The iOS simulator cannot receive push notifications. You must run iOS apps on an iOS device.
In your Parse Server logs, you can see something similar to
GCM request and response {"request":{"params":{"priority":"normal","data":{"time":"2016-02-10T03:21:59.065Z","push_id":"NTDgWw7kp8","data":"{\"alert\":\"All work and no play makes Jack a dull boy.\"}"}}},"response":{"multicast_id":5318039027588186000,"success":1,"failure":0,"canonical_ids":0,"results":[{"registration_id":"APA91bEdLpZnXT76vpkvkD7uWXEAgfrZgkiH_ybkzXqhaNcRw1KHOY0s9GUKNgneGxe2PqJ5Swk1-Vf852kpHAP0Mhoj5wd1MVXpRsRr_3KTQo_dkNd_5wcQ__yWnWLxbeM3kg_JziJK","message_id":"0:1455074519347821%df0f8ea7f9fd7ecd"}]}}
APNS Connected
APNS Notification transmitted to:7a7d2864598e1f65e6e02135245b7daf8ea510514e6376f072dc29d53facaa41
These logs mean that the GCM and APNS connections are working.
Push Adapter
Parse Server provides a PushAdapter which abstracts the way we actually send push notifications. The default implementation is ParsePushAdapter, which uses GCM for Android push and APNS for iOS push. However, if you want to use other push providers, you can implement your own PushAdapter. Your adapter needs to implement send(data, installations), which is used for sending data to the installations. You can use ParsePushAdapter as a reference. After you implement your PushAdapter, you can pass that instance to Parse Server like this
var server = new ParseServer({
  databaseURI: '...',
  cloud: '...',
  appId: '...',
  masterKey: '...',
  push: {
    adapter: your_adapter
  }
});
By doing this, after Parse Server decodes the push API request and runs the installation query, your PushAdapter’s send(data, installations) will be called and is responsible for sending the notifications. If you provide your custom PushAdapter, the default ParsePushAdapter will be ignored.
Future Improvements
The current solution provides a good starting point for push notifications. We have a lot of ideas to improve the feature:
- Support more platforms
- Support more sending options
- Support more push providers
- Support scheduled pushes
- Support delivery report and error handling
- Support job queue and benchmarking
If you’re interested in any of these features, don’t hesitate to jump in and send a PR to the repo. We would love to work with you!
Notes
Silent Notifications
If you have migrated from Parse.com Push and you are seeing situations where silent notifications are failing to deliver, please ensure that your payload is setting the content-available attribute to Int(1) and not “1”. This value will be explicitly checked.
PPNS
Configuring your clients to receive Push Notifications
The following will guide you through the necessary steps to configure your iOS and Android client apps to receive push notifications from Parse Server. If you haven’t yet, you will first need to prepare your APNS and GCM credentials as documented in Step 1 of the Push Notifications Quick Start.
iOS Apps
First you will need to set up your app to use Parse Server. Go through the Parse iOS QuickStart first and come back here once your app is connected to Parse Server.
Register Device for Push Notifications
Open up your AppDelegate.swift, AppDelegate.m, or AppDelegate.cs file and make your app register for remote notifications by adding the following in your application:didFinishLaunchingWithOptions: function:
// Swift
let types: UIUserNotificationType = [.Alert, .Badge, .Sound]
let settings = UIUserNotificationSettings(forTypes: types, categories: nil)
application.registerUserNotificationSettings(settings)
application.registerForRemoteNotifications()
// Objective-C
UIUserNotificationType userNotificationTypes = (UIUserNotificationTypeAlert |
                                                UIUserNotificationTypeBadge |
                                                UIUserNotificationTypeSound);
UIUserNotificationSettings *settings = [UIUserNotificationSettings settingsForTypes:userNotificationTypes
                                                                         categories:nil];
[application registerUserNotificationSettings:settings];
[application registerForRemoteNotifications];
// Xamarin
UIUserNotificationType notificationTypes = (UIUserNotificationType.Alert |
                                            UIUserNotificationType.Badge |
                                            UIUserNotificationType.Sound);
var settings = UIUserNotificationSettings.GetSettingsForTypes(notificationTypes,
                                                              new NSSet(new string[] { }));
UIApplication.SharedApplication.RegisterUserNotificationSettings(settings);
UIApplication.SharedApplication.RegisterForRemoteNotifications();

// Handle Push Notifications
ParsePush.ParsePushNotificationReceived += (object sender, ParsePushNotificationEventArgs args) => {
  // Process Push Notification payload here.
};
Store the device token and handle the UI for notifications by adding the following to your main app delegate:
// Swift
func application(application: UIApplication, didRegisterForRemoteNotificationsWithDeviceToken deviceToken: NSData) {
    let installation = PFInstallation.currentInstallation()
    installation.setDeviceTokenFromData(deviceToken)
    installation.saveInBackground()
}

func application(application: UIApplication, didFailToRegisterForRemoteNotificationsWithError error: NSError) {
    if error.code == 3010 {
        print("Push notifications are not supported in the iOS Simulator.")
    } else {
        print("application:didFailToRegisterForRemoteNotificationsWithError: %@", error)
    }
}

func application(application: UIApplication, didReceiveRemoteNotification userInfo: [NSObject : AnyObject]) {
    PFPush.handlePush(userInfo)
}
// Objective-C
- (void)application:(UIApplication *)application didRegisterForRemoteNotificationsWithDeviceToken:(NSData *)deviceToken {
  // Store the deviceToken in the current installation and save it to Parse.
  PFInstallation *currentInstallation = [PFInstallation currentInstallation];
  [currentInstallation setDeviceTokenFromData:deviceToken];
  [currentInstallation saveInBackground];
}

- (void)application:(UIApplication *)application didReceiveRemoteNotification:(NSDictionary *)userInfo {
  [PFPush handlePush:userInfo];
}
// Xamarin
public override void DidRegisterUserNotificationSettings(UIApplication application,
    UIUserNotificationSettings notificationSettings) {
  application.RegisterForRemoteNotifications();
}

public override void RegisteredForRemoteNotifications(UIApplication application,
    NSData deviceToken) {
  ParseInstallation installation = ParseInstallation.CurrentInstallation;
  installation.SetDeviceTokenFromData(deviceToken);

  installation.SaveAsync();
}

public override void ReceivedRemoteNotification(UIApplication application,
    NSDictionary userInfo) {
  // We need this to fire userInfo into ParsePushNotificationReceived.
  ParsePush.HandlePush(userInfo);
}
Compile and run!
If you configured your app correctly, installation objects will automatically be saved to Parse Server when you run your app. You can run this curl command to verify:
curl -X GET \
  -H "X-Parse-Application-Id: YOUR_APP_ID" \
  -H "X-Parse-Master-Key: YOUR_MASTER_KEY" \
  http://your_parse_server:1337/parse/installations
Proceed to Step 4.
Android apps
First you will need to set up your app to use Parse Server. Go through the Parse Android QuickStart first and come back here once your app is connected to Parse Server.
Configure Broadcast Receiver and Permissions
Add the following service and broadcast receiver definitions to AndroidManifest.xml immediately before the closing </application> tag:
<service android:name="com.parse.PushService" />
<receiver android:name="com.parse.ParsePushBroadcastReceiver"
android:exported="false">
<intent-filter>
<action android:name="com.parse.push.intent.RECEIVE" />
<action android:name="com.parse.push.intent.DELETE" />
<action android:name="com.parse.push.intent.OPEN" />
</intent-filter>
</receiver>
<receiver android:name="com.parse.GcmBroadcastReceiver"
android:permission="com.google.android.c2dm.permission.SEND">
<intent-filter>
<action android:name="com.google.android.c2dm.intent.RECEIVE" />
<action android:name="com.google.android.c2dm.intent.REGISTRATION" />

<!--
IMPORTANT: Change "com.parse.starter" to match your app's package name.
-->
<category android:name="com.parse.starter" />
</intent-filter>
</receiver>

<!--
IMPORTANT: Change "YOUR_SENDER_ID" to your GCM Sender Id.
-->
<meta-data android:name="com.parse.push.gcm_sender_id"
  android:value="id:YOUR_SENDER_ID" />;
Change the android:name attribute of <category> element above to match your application’s package name.
Change “YOUR_SENDER_ID” to the GCM Sender Id you obtained back in Step 1. See our Android push guide for more details on this attribute.
Migrating a hosted Parse app? Note that you cannot send GCM pushes to old versions of your app that do not contain the com.parse.push.gcm_sender_id attribute in your app manifest, since those versions of the app haven’t registered for push using your GCM sender ID.
Also add the permissions below, typically immediately before the opening <application> tag:
<uses-permission android:name="android.permission.INTERNET" />
<uses-permission android:name="android.permission.ACCESS_NETWORK_STATE" />
<uses-permission android:name="android.permission.WAKE_LOCK" />
<uses-permission android:name="android.permission.VIBRATE" />
<uses-permission android:name="com.google.android.c2dm.permission.RECEIVE" />
<!--
GET_ACCOUNTS is only required for GCM on devices running Android lower than
4.0.4. You may leave out this permission if you are targetting 4.0.4+.
-->
<uses-permission android:name="android.permission.GET_ACCOUNTS" />

<!--
IMPORTANT: Change "com.parse.starter.permission.C2D_MESSAGE" in the lines below
to match your app's package name + ".permission.C2D_MESSAGE".
-->
<permission android:protectionLevel="signature"
  android:name="com.parse.starter.permission.C2D_MESSAGE" />
<uses-permission android:name="com.parse.starter.permission.C2D_MESSAGE" />
Change the android:name attribute in the last two lines of the snippet above to match your application’s package name.
Register Device for Push Notifications
Create an Installation object by adding the following to the onCreate method of your Application class:
// Native: Application.java
public void onCreate() {
  // ...
  ParseInstallation.getCurrentInstallation().saveInBackground();
}
// Xamarin: Application.cs

// IMPORTANT: Change "parsexamarinpushsample" to match your namespace.
[Application(Name = "parsexamarinpushsample.ParseApplication")]
class ParseApplication : Application {
  // ...

  public override void OnCreate() {
    base.OnCreate();

    // ...

    ParsePush.ParsePushNotificationReceived += ParsePush.DefaultParsePushNotificationReceivedHandler;
  }
}
Compile and run!
If you configured your app correctly, installation objects will automatically be saved to Parse Server when you run your app. You can run this curl command to verify:
curl -X GET \
  -H "X-Parse-Application-Id: YOUR_APP_ID" \
  -H "X-Parse-Master-Key: YOUR_MASTER_KEY" \
  http://your_parse_server:1337/parse/installations
Proceed to Step 4.
Configuring File Adapters
Parse Server allows developers to choose from several options when hosting files:
GridStoreAdapter, which is backed by MongoDB;S3Adapter, which is backed by Amazon S3; orGCSAdapter, which is backed by Google Cloud Storage
GridStoreAdapter is used by default and requires no setup, but if you’re interested in using S3 or Google Cloud Storage, additional configuration information is available below.
When using files on Parse, you will need to use the publicServerURL option in your Parse Server config. This is the URL that files will be accessed from, so it should be a URL that resolves to your Parse Server. Make sure to include your mount point in this URL.
Configuring S3Adapter
If you’d like to use Amazon S3, follow these instructions to configure Parse Server to use S3Adapter.
Set up your bucket and permissions
First you will create a bucket in S3 to hold these files.
- Log into your AWS account or create a new one.
- Head to the S3 service and choose Create Bucket
- Fill out a unique Bucket Name and click Create. The bucket name should not contain any period ‘.’ for
directAccessto work. All other defaults are OK. - Now head to the Identity and Access Management (IAM) service.
- Click the Users tab, then Create New User.
- Fill out at least one user name and make sure Generate an access key for each user is selected before clicking Create.
- Make sure to Download Credentials on the next screen.
- Now select the Policies tab, then Create Policy.
- Select Create Your Own Policy, fill out a Policy Name.
-
Copy the following config in Policy Document, changing BUCKET_NAME for the name of the bucket you created earlier. (note: this is a little more permissive than Parse Server needs, but it works for now)
{ "Version": "2012-10-17", "Statement": [ { "Effect": "Allow", "Action": [ "s3:*" ], "Resource": [ "arn:aws:s3:::BUCKET_NAME", "arn:aws:s3:::BUCKET_NAME/*" ] } ] } - Make sure to Validate Policy first, then click Create Policy.
- Go back to the Users tab and select the user you created earlier.
- In Permissions, select Attach Policy and find the policy we just created to attach it.
Configuration options
Writing to your Amazon S3 bucket from Parse Server is as simple as configuring and using the S3 files adapter.
Using environment variables
If you’re running a standalone Parse Server, you can use the following environment variables to configure the S3 adapter:
| Variable Name | Description | Notes |
|---|---|---|
| PARSE_SERVER_FILES_ADAPTER | Set this variable to ‘./Files/S3Adapter.js’. | Required |
| S3_ACCESS_KEY | The AWS access key for a user that has the required permissions. | Required |
| S3_SECRET_KEY | The AWS secret key for the user. | Required |
| S3_BUCKET | The name of your S3 bucket. Needs to be globally unique in all of S3. | Required |
| S3_REGION | The AWS region to connect to. | Optional. Default: ‘us-east-1’ |
| S3_BUCKET_PREFIX | Create all the files with the specified prefix added to the filename. Can be used to put all the files for an app in a folder with ‘folder/’. | Optional. |
| S3_DIRECT_ACCESS | Whether reads are going directly to S3 or proxied through your Parse Server. If set to true, files will be made publicly accessible, and reads will not be proxied. | Optional. Default: false |
Passing as options
If you’re using Node.js/Express:
...
var S3Adapter = require('parse-server').S3Adapter;

var api = new ParseServer({
  databaseURI: databaseUri || 'mongodb://localhost:27017/dev',
  appId: process.env.APP_ID || 'APPLICATION_ID',
  masterKey: process.env.MASTER_KEY || 'MASTER_KEY',
  ...
  filesAdapter: new S3Adapter(
    "S3_ACCESS_KEY",
    "S3_SECRET_KEY",
    "S3_BUCKET",
    {directAccess: true}
  ),
  ...
});
Don’t forget to change S3_ACCESS_KEY, S3_SECRET_KEY and S3_BUCKET to their correct value.
S3Adapter constructor options
new S3Adapter(accessKey, secretKey, bucket, options)
| Parameter | Description | Notes |
|---|---|---|
| accessKey | The AWS access key for a user that has the required permissions | Required. |
| secretKey | The AWS secret key for the user | Required. |
| bucket | The name of your S3 bucket. | Required. |
| options | JavaScript object (map) that can contain: | |
| region | Key in options. Set the AWS region to connect to. |
Optional. Default: ‘us-east-1’ |
| bucketPrefix | Key in options. Set to create all the files with the specified prefix added to the filename. Can be used to put all the files for an app in a folder with ‘folder/’. |
Optional. Default: ‘’ |
| directAccess | Key in options. Controls whether reads are going directly to S3 or proxied through your Parse Server. If set to true, files will be made publicly accessible, and reads will not be proxied. |
Optional. Default: false |
Configuring GCSAdapter
Unlike the S3 adapter, you must create a new Cloud Storage bucket, as this is not created automatically. See the Google Cloud guide on Authentication for more details.
Installation
Starting 2.2.6, GCS Adapter is not provided by default by parse-server. To install run:
npm install --save parse-server-gcs-adapter
Configuration options
Writing to your Google Cloud Storage bucket from Parse Server is as simple as configuring and using the GCS files adapter.
Using environment variables
You can use Google Cloud Storage to host your static files by setting the following environment variables:
| Variable Name | Description | Notes |
|---|---|---|
| PARSE_SERVER_FILES_ADAPTER | Set this variable to ‘parse-server-gcs-adapter’. | Required. |
| GCP_PROJECT_ID | The project ID from the Google Developer’s Console. | Required. |
| GCP_KEYFILE_PATH | Full path to the a .json, .pem, or .p12 key downloaded from the Google Developers Console. | Required. |
| GCS_BUCKET | The name of your GCS bucket. | Required. |
| GCS_BUCKET_PREFIX | Create all the files with the specified prefix added to the filename. Can be used to put all the files for an app in a folder with ‘folder/’. | Optional. |
| GCS_DIRECT_ACCESS | Whether reads are going directly to GCS or proxied through your Parse Server. | Optional. Default: false |
Passing as options
If you’re using Node.js/Express:
...
var GCSAdapter = require('parse-server-gcs-adatper');

var api = new ParseServer({
  databaseURI: databaseUri || 'mongodb://localhost:27017/dev',
  appId: process.env.APP_ID || 'APPLICATION_ID',
  masterKey: process.env.MASTER_KEY || 'MASTER_KEY',
  ...
  filesAdapter: new GCSAdapter(
    "GCP_PROJECT_ID",
    "GCP_KEYFILE_PATH",
    "GCS_BUCKET",
    {directAccess: true}
  ),
  ...
});
GCSAdapter constructor options
new GCSAdapter(projectId, keyfilePath, bucket, options)
| Parameter | Description | Notes |
|---|---|---|
| projectId | The project ID from the Google Developer’s Console. | Required. |
| keyfilePath | Full path to the a .json, .pem, or .p12 key downloaded from the Google Developers Console. | Required. |
| bucket | The name of your GCS bucket. | Required. |
| options | JavaScript object (map) that can contain: | |
| bucketPrefix | Key in options. Set to create all the files with the specified prefix added to the filename. Can be used to put all the files for an app in a folder with ‘folder/’. |
Optional. Default: ‘’ |
| directAccess | Key in options. Controls whether reads are going directly to GCS or proxied through your Parse Server. |
Optional. Default: false |
Configuring Cache Adapters
By default, parse-server provides an internal cache layer to speed up schema verifications, user, roles and sessions lookup.
In some cases, in distributed environment, you may want to use a distributed cache like Redis.
parse-server comes with an optional redis cache adapter.
Those cache adapters can be cleaned at anytime internally, you should not use them to cache data and you should let parse-server manage their data lifecycle.
RedisCacheAdapter
var RedisCacheAdapter = require('parse-server').RedisCacheAdapter;
var redisOptions = {url: 'YOUR REDIS URL HERE'}
var redisCache = new RedisCacheAdapter(redisOptions);

var api = new ParseServer({
  databaseURI: databaseUri || 'mongodb://localhost:27017/dev',
  appId: process.env.APP_ID || 'APPLICATION_ID',
  masterKey: process.env.MASTER_KEY || 'MASTER_KEY',
  ...
  cacheAdapter: cacheAdapter,
  ...
});
The redisOptions are passed directly to the redis.createClient method. For more informations, refer to the redis.createClient documentation.
Note that at the moment, only passing a single argument is supported.
Live Queries
Parse.Query is one of the key concepts for Parse. It allows you to retrieve Parse.Objects by specifying some conditions, making it easy to build apps such as a dashboard, a todo list or even some strategy games. However, Parse.Query is based on a pull model, which is not suitable for apps that need real-time support.
Suppose you are building an app that allows multiple users to edit the same file at the same time. Parse.Query would not be an ideal tool since you can not know when to query from the server to get the updates.
To solve this problem, we introduce Parse LiveQuery. This tool allows you to subscribe to a Parse.Query you are interested in. Once subscribed, the server will notify clients whenever a Parse.Object that matches the Parse.Query is created or updated, in real-time.
Parse LiveQuery contains two parts, the LiveQuery server and the LiveQuery clients. In order to use live queries, you need to set up both of them.
Server Setup
The LiveQuery server should work with a Parse Server. The easiest way to setup the LiveQuery server is to make it run with the Parse Server in the same process. When you initialize the Parse Server, you need to define which Parse.Object classes you want to enable LiveQuery like this:
let api = new ParseServer({
  ...,
  liveQuery: {
    classNames: ['Test', 'TestAgain']
  }
});
After that, you need to initialize a LiveQuery server like this:
// Initialize a LiveQuery server instance, app is the express app of your Parse Server
let httpServer = require('http').createServer(app);
httpServer.listen(port);
var parseLiveQueryServer = ParseServer.createLiveQueryServer(httpServer);
The ws protocol URL of the LiveQuery server is the hostname and port which the httpServer is listening to. For example, if the httpSever is listening to localhost:8080, the ws protocol of the LiveQuery server is ws://localhost:8080/. We will allow you to customize the path of ws protocol URL of the LiveQuery server later, currently it is fixed and you can not set path.
Client Setup
We provide JavaScript and iOS LiveQuery Clients for now. Lets use the JavaScript client as an example. In order to use LiveQuery, you need to initialize a Parse.Query object and subscribe to it.
let query = new Parse.Query('People');
query.equalTo('name', 'Mengyan');
let subscription = query.subscribe();
After you get the subscription, you can use it to receive the updates of the related Parse.Object. For example, if someone creates a People object whose name field is Mengyan, then you can get the People object like this:
subscription.on('create', (people) => {
  console.log(people.get('name')); // This should output Mengyan
});
After that, if someone updates this People object like changing its score to 100, then you can get the People object like this:
subscription.on('update', (people) => {
  console.log(people.get('score')); // This should output 100
});
If you are done with the LiveQuery, you can simply unsubscribe the subscription to finish receiving events
subscription.unsubscribe();
Events
We support five types of event:
createenterupdateleavedelete
Further Reading
You can check the LiveQuery protocol specification to learn more about each event type.
For more details about the JavaScript LiveQuery Client SDK, check out the open source code and the Live Query section in the JavaScript Guide.
For the iOS LiveQuery Client SDK, check out the open source code and the Live Query section in the iOS Guide.
LiveQuery Protocol
The LiveQuery Protocol is the key to the Parse LiveQuery. The clients and server communicate through WebSocket using this protocol. Clients can follow the protocol to connect to the LiveQuery server, subscribe/unsubscribe a Parse.Query and get updates from the LiveQuery server.
The LiveQuery protocol is a simple protocol that encapsulates messages in JSON strings and runs over a WebSocket connection. You can find the specification in the For the specification, check out the Parse Server wiki page.
LiveQuery Server
Configuration
The full configuration of the LiveQuery server should look like this:
{
  appId: 'myAppId',
  masterKey: 'myMasterKey',
  keyPairs: {
    "restAPIKey": "",
    "javascriptKey": "",
    "clientKey": "",
    "windowsKey": "",
    "masterKey": ""
  },
  serverURL: 'serverURL',
  websocketTimeout: 10 * 1000,
  cacheTimeout: 60 * 600 * 1000,
  logLevel: 'VERBOSE'
}
Options
appId- Required. This string should match theappIdin use by your Parse Server. If you deploy the LiveQuery server alongside Parse Server, the LiveQuery server will try to use the sameappId.masterKey- Required. This string should match themasterKeyin use by your Parse Server. If you deploy the LiveQuery server alongside Parse Server, the LiveQuery server will try to use the samemasterKey.serverURL- Required. This string should match theserverURLin use by your Parse Server. If you deploy the LiveQuery server alongside Parse Server, the LiveQuery server will try to use the sameserverURL.keyPairs- Optional. A JSON object that serves as a whitelist of keys. It is used for validating clients when they try to connect to the LiveQuery server. Check the following Security section and our protocol specification for details.websocketTimeout- Optional. Number of milliseconds between ping/pong frames. The WebSocket server sends ping/pong frames to the clients to keep the WebSocket alive. This value defines the interval of the ping/pong frame from the server to clients. Defaults to 10 * 1000 ms (10 s).cacheTimeout- Optional. Number in milliseconds. When clients provide thesessionTokento the LiveQuery server, the LiveQuery server will try to fetch itsParseUser’s objectId from parse server and store it in the cache. The value defines the duration of the cache. Check the following Security section and our protocol specification for details. Defaults to 30 * 24 * 60 * 60 * 1000 ms (~30 days).logLevel- Optional. This string defines the log level of the LiveQuery server. We supportVERBOSE,INFO,ERROR,NONE. Defaults toINFO.
Basic Architecture
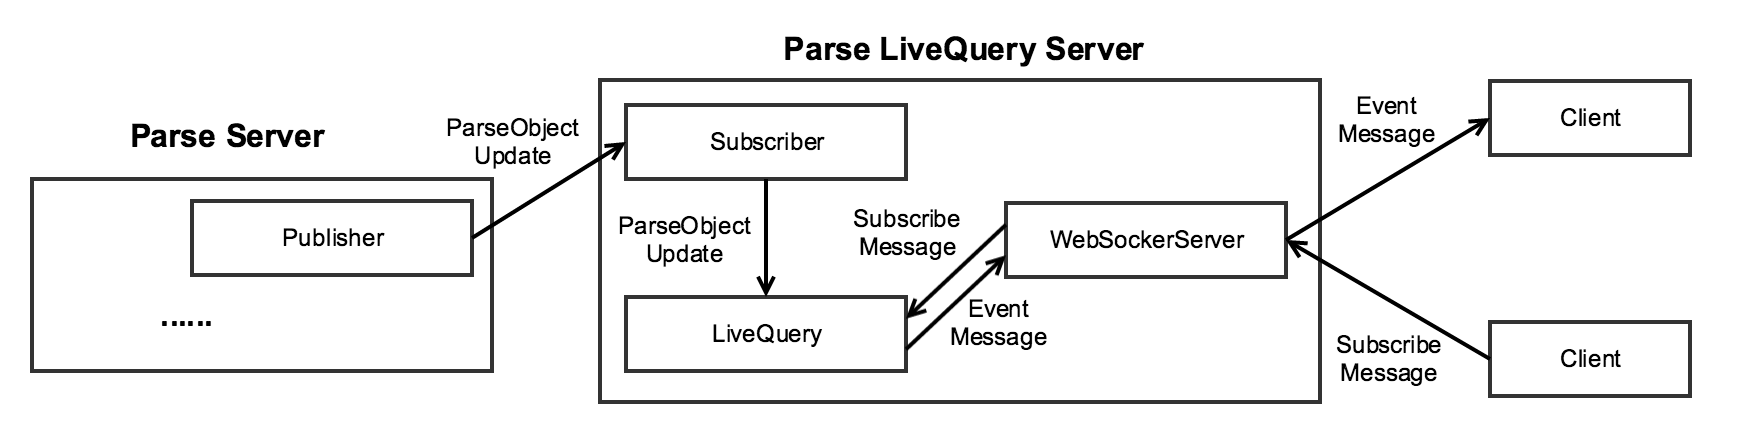
The LiveQuery server is a separate server from Parse Server. As shown in the picture, it mainly contains four components at the runtime.
- The Publisher. It is responsible for publishing the update of a
Parse.Object. When aParse.Objectchanges, it will publish a message to the subscribers. The message contains the originalParse.Objectand the newParse.Object. The Publisher is inside the Parse Server at the runtime. - The Subscriber. It is responsible for receiving the messages which are sent from the Publisher. After it gets the messages, it can pass them to the LiveQuery component for processing.
- The WebSocketServer. It is responsible for maintaining the WebSocket connections with clients. It can pass the subscribe/unsubscribe messages from clients to the LiveQuery component. When the LiveQuery component finds a
Parse.Objectfulfills aParse.Query, it will get the event message from LiveQuery component and send it to the clients. - The LiveQuery. It is the key component of the LiveQuery Server. It maintains the subscription status of clients. After it gets the
Parse.Objectupdates from the Subscriber, it can do the query matching and generate the event messages for clients.
Scalability
Based on your usage, different components of the LiveQuery server may become the bottleneck. If you app has high throughput, the Publisher/Subscriber may have problems. If you subscribe to many complex Parse.Querys, the LiveQuery component may cause issues. If you need to maintain lots of clients, the WebSocketServer may be the bottleneck. Thus, we highly recommend you to do the load testing for your app if you want to use LiveQuery server in production.
In general, our suggestion to make the LiveQuery server scalable is to separate the Parse Server with the LiveQuery server and add more LiveQuery server instances based on your need. To help you do this, we use Redis to implement a Publisher and Subscriber. If you want to use that, the only thing you need to do is to provide the Redis server address when you initialize the Parse Server and LiveQuery server like this:
let api = new ParseServer({
  ...,
  liveQuery: {
    classNames: ['Test', 'TestAgain'],
    redisURL: 'redis://localhost:6379'
  }
});

...

let httpServer = require('http').createServer(app);
httpServer.listen(port);
var parseLiveQueryServer = ParseServer.createLiveQueryServer(httpServer,  {
  ...,
  redisURL: 'redis://localhost:6379'
});
The architecture of the whole LiveQuery system after you use Redis should be like this:
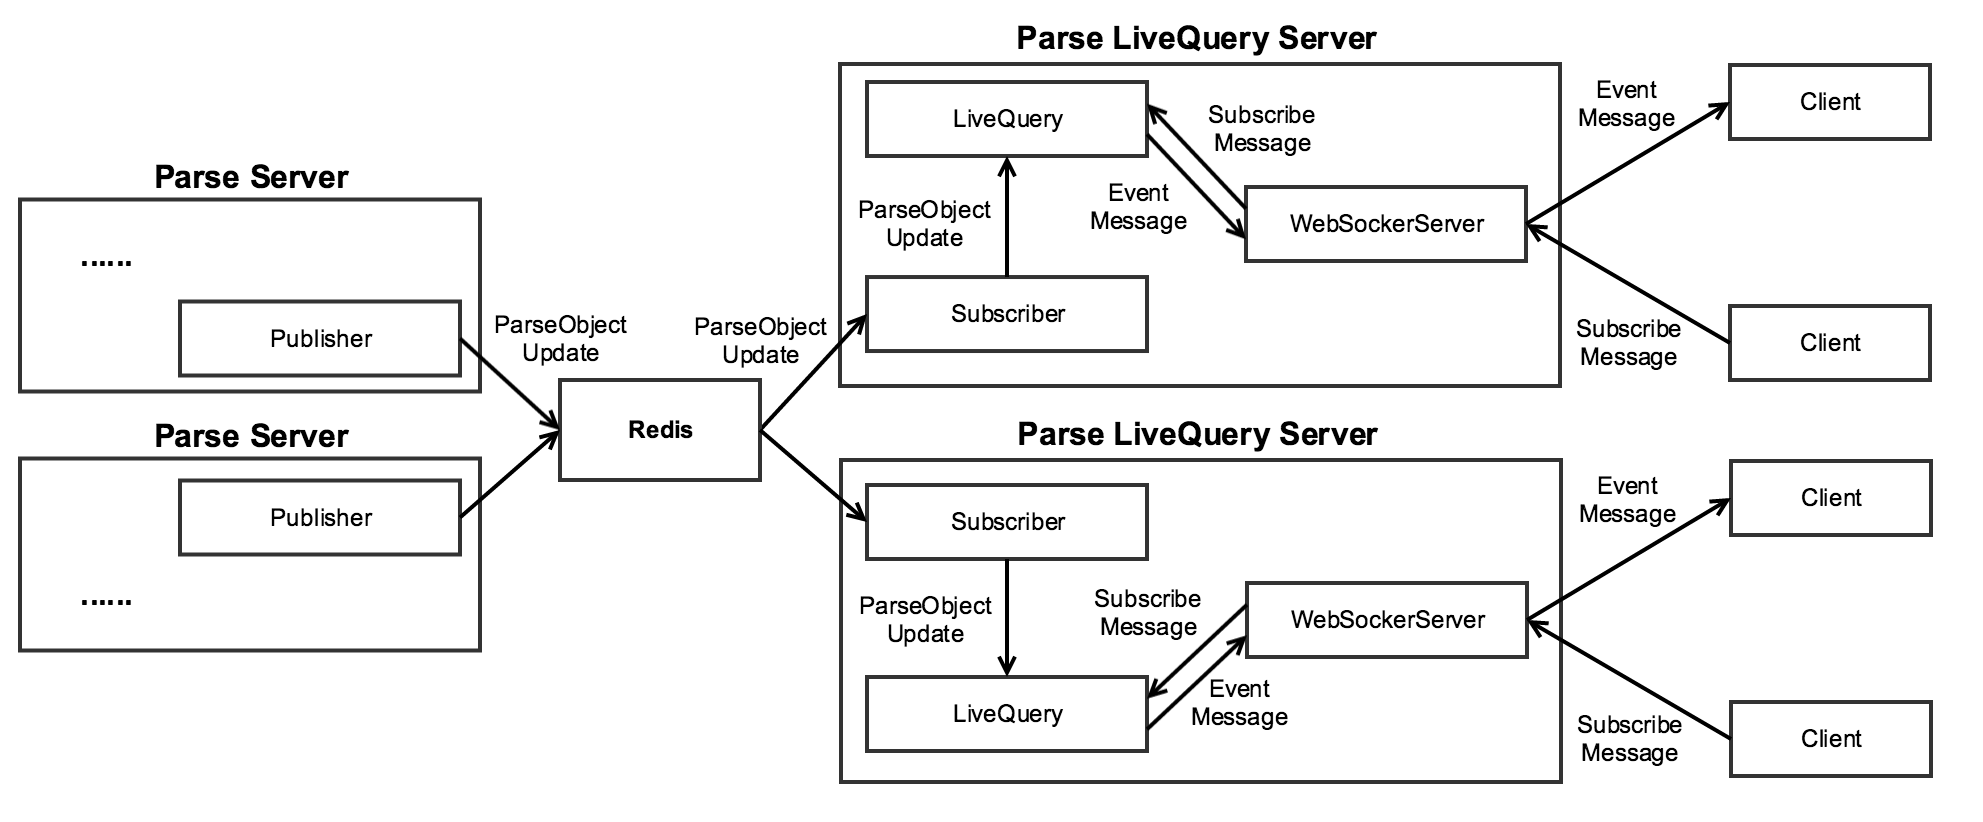
For example, if you use Heroku to deploy your Live Query server, after you setup the Redis with the LiveQuery server, you can simply add more dynos to make your app more scalable like this:

Security
The LiveQuery server provides two ways to secure your app. The first one is key matching. If you provide key pairs when you initialize the LiveQuery server, when clients try to connect to LiveQuery server, they have to provide the necessary key pairs. Otherwise, the connection will be refused.
The second one is ACL. For what is ACL, you can check the definition here. When clients try to connect and subscribe to the LiveQuery server, they can provide their sessionToken. If you give your Parse.Object proper ACL, when the LiveQuery server get the updates of the Parse.Object, it will try to match Parse.Object’s ACL with the sessionToken of clients or their subscriptions. The event will be only sent to clients whose sessionToken matches the Parse.Object’s ACL.
LiveQuery Clients
The JavaScript LiveQuery client is provided as part of the Parse JavaScript SDK as of version 1.8.0. A separate LiveQuery client library is available for iOS / OS X applications. An Android client is coming soon.
- Parse JavaScript SDK
- Parse LiveQuery iOS / OS X
- Parse LiveQuery Android - soon!
LiveQuery With NGINX
Please refer to the NGINX documentation in order to allow a proper handling of the LiveQuery server that relies on web sockets
OAuth and 3rd Party Authentication
Parse Server supports 3rd party authentication with
- Meetup
Configuration options for these 3rd-party modules is done with the oauth option passed to Parse Server:
{
  oauth: {
   twitter: {
     consumer_key: "", // REQUIRED
     consumer_secret: "" // REQUIRED
   },
   facebook: {
     appIds: "FACEBOOK APP ID"
   }
  }
}
Custom authentication
It is possible to leverage the OAuth support with any 3rd party authentication that you bring in.
{

  oauth: {
   my_custom_auth: {
     module: "PATH_TO_MODULE" // OR object,
     option1: "",
     option2: "",
   }
  }
}
On this module, you need to implement and export those two functions validateAuthData(authData, options) {} and validateAppId(appIds, authData) {}.
For more information about custom auth please see the examples:
Compatibility with parse.com
There are a few areas where Parse Server does not provide compatibility with the Parse hosted backend.
Analytics
Parse Analytics is not supported. We recommend sending analytics to another similar service like Mixpanel or Google Analytics.
Authentication
By default, only an application ID is needed to authenticate with Parse Server. The base configuration that comes with the one-click deploy options does not require authenticating with any other types of keys. Therefore, specifying client keys on Android or iOS is not needed.
Client Class Creation
Hosted Parse applications can turn off client class creation in their settings. Automatic creation of classes by the client is always allowed in Parse Server.
Cloud Code
You will likely need to make several changes to your Cloud Code to port it to Parse Server.
No current user
Each Cloud Code request is now handled by the same instance of Parse Server, therefore there is no longer a concept of a “current user” constrained to each Cloud Code request. If your code uses Parse.User.current(), you should use request.user instead. If your Cloud function relies on queries and other operations being performed within the scope of the user making the Cloud Code request, you will need to pass the user’s sessionToken as a parameter to the operation in question.
Consider an messaging app where every Message object is set up with an ACL that only provides read-access to a limited set of users, say the author of the message and the recipient. To get all the messages sent to the current user you may have a Cloud function similar to this one:
// Parse.com Cloud Code
Parse.Cloud.define('getMessagesForUser', function(request, response) {
  var user = Parse.User.current();

  var query = new Parse.Query('Messages');
  query.equalTo('recipient', user);
  query.find()
    .then(function(messages) {
      response.success(messages);
    });
});
If this function is ported over to Parse Server without any modifications, you will first notice that your function is failing to run because Parse.User.current() is not recognized. If you replace Parse.User.current() with request.user, the function will run successfully but you may still find that it is not returning any messages at all. That is because query.find() is no longer running within the scope of request.user and therefore it will only return publicly-readable objects.
To make queries and writes as a specific user within Cloud Code, you need to pass the user’s sessionToken as an option. The session token for the authenticated user making the request is available in request.user.getSessionToken().
The ported Cloud function would now look like this:
// Parse Server Cloud Code
Parse.Cloud.define('getMessagesForUser', function(request, response) {
  var user = request.user; // request.user replaces Parse.User.current()
  var token = user.getSessionToken(); // get session token from request.user

  var query = new Parse.Query('Messages');
  query.equalTo('recipient', user);
  query.find({ sessionToken: token }) // pass the session token to find()
    .then(function(messages) {
      response.success(messages);
    });
});
Master key must be passed explicitly
Parse.Cloud.useMasterKey() is not available in Parse Server Cloud Code. Instead, pass useMasterKey: true as an option to any operation that requires the use of the master key to bypass ACLs and/or CLPs.
Consider you want to write a Cloud function that returns the total count of messages sent by all of your users. Since the objects in our Message class are using ACLs to restrict read access, you will need to use the master key to get the total count:
Parse.Cloud.define('getTotalMessageCount', function(request, response) {

  // Parse.Cloud.useMasterKey() <-- no longer available!

  var query = new Parse.Query('Messages');
  query.count({ useMasterKey: true }) // count() will use the master key to bypass ACLs
    .then(function(count) {
      response.success(count);
    });
});
Minimum JavaScript SDK version
Parse Server also uses at least version 1.7.0 of the Parse SDK, which has some breaking changes from the previous versions. If your Parse.com Cloud Code uses a previous version of the SDK, you may need to update your cloud code. You can look up which version of the JavaScript SDK your Parse.com Cloud Code is using by running the following command inside your Cloud Code folder:
$ parse jssdk
Current JavaScript SDK version is 1.7.0
Network requests
As with Parse Cloud Code, you can use Parse.Cloud.httpRequest to make network requests on Parse Server. It’s worth noting that in Parse Server you can use any npm module, therefore you may also install the “request” module and use that directly instead.
Cloud Modules
Native Cloud Code modules are not available in Parse Server, so you will need to use a replacement:
-
App Links: Use the applinks-metatag module.
-
Buffer: This is included natively with Node. Remove any
require('buffer')calls. -
Mailgun: Use the official npm module: mailgun-js.
-
Mandrill: Use the official npm module, mandrill-api.
-
Moment: Use the official npm module, moment.
-
Parse Image: We recommend using another image manipulation library, like the imagemagick wrapper module. Alternatively, consider using a cloud-based image manipulation and management platform, such as Cloudinary.
-
SendGrid: Use the official npm module, sendgrid.
-
Stripe: Use the official npm module, stripe.
-
Twilio: Use the official npm module, twilio.
-
Underscore: Use the official npm module, underscore.
Dashboard
Parse has provided a separate Parse Dashboard project which can be used to manage all of your Parse Server applications.
Class Level Permissions
Class-level permissions are supported in Parse Server, but they have always been configured using the dashboard on Parse.com. It is possible to modify these permissions without the dashboard. You’ll see the format for class-level permissions in the SCHEMA collection when you migrate your database. There is also a setPermissions method on the Schema class, which you can see used in the unit-tests in Schema.spec.js.
Parse Config
Parse Config is available in Parse Server and can be configured from your Parse Dashboard.
Push Notification Console
You can now send push notifications using Parse Dashboard.
Files
Parse Files in hosted Parse applications were limited to 10 MB. The default storage layer in Parse Server, GridStore, can handle files up to 16 MB. To store larger files, we suggest using Amazon’s Simple Storage Service (S3).
In-App Purchases
iOS in-app purchase verification through Parse is not supported.
Jobs
There is no background job functionality in Parse Server. If you have scheduled jobs, port them over to a self-hosted solution using a wide variety of open source job queue projects. A popular one is kue. Alternatively, if your jobs are simple, you could use a cron job.
Push Notifications
Parse Server implements basic transactional pushes to iOS and Android devices using channels or queries. Check out the Push Guide for the details.
Client Push
Hosted Parse applications could disable a security setting in order to allow clients to send push notifications. Parse Server does not allow clients to send push notifications as the masterKey must be used. Use Cloud Code or the REST API to send push notifications.
Android: Exporting GCM Registration IDs
Parse supports sending pushes to Android devices via Google Cloud Messaging (GCM). By default, the GCM registration IDs (stored in the deviceToken field) for your app are associated with Parse’s GCM sender ID, which won’t work after Parse is retired. You may want to take these actions to have your app register with a different GCM sender ID, which will make the registration IDs in the deviceToken field exportable to other push providers:
- Enable GCM for your Android project in the Google Developer Console. Take note of your project number (it should be a large integer like
123427208255). This is also known as your GCM sender ID. - Add the
com.parse.push.gcm_sender_idmetadata attribute to your app manifest so that Parse registers for push with your GCM sender ID. For instance, if your GCM sender ID is123427208255, then you should add a metadata attribute namedcom.parse.push.gcm_sender_idwith the valueid:123427208255(note that the “id:” prefix is required). This attribute requires Android SDK 1.8.0 or higher. See our Android push guide for more details on this attribute. - Parse will now register for GCM with both its GCM sender ID and your GCM sender ID on app startup. You can use the resulting GCM registration IDs (stored in the
deviceTokenfield of ParseInstallation) with other GCM push providers.
Parse IoT Devices
Push notification support for the Parse IoT SDKs is provided through the Parse Push Notification Service (PPNS). PPNS is a push notification service for Android and IoT devices maintained by Parse. This service will be retired on January 28, 2017. This page documents the PPNS protocol for users that wish to create their own PPNS-compatible server for use with their Parse IoT devices.
Schema
Schema validation is built in. Retrieving the schema via API is available.
Session Features
Parse Server requires the use of revocable sessions. If your app is still using legacy sessions, follow this migration guide.
Single app aware
Parse Server only supports single app instances. There is ongoing work to make Parse Server multi-app aware. However, if you intend to run many different apps with different datastores, you currently would need to instantiate separate instances.
Social Login
Facebook, Twitter, and Anonymous logins are supported out of the box. Support for additional platforms may be configured via the oauth configuration option.
Webhooks
Cloud Code Webhooks are not supported.
Welcome Emails and Email Verification
This is not supported out of the box. But, you can use a beforeSave to send out emails using a provider like Mailgun and add logic for verification. Subscribe to this issue to be notified if email verification support is added to Parse Server.
Using MongoDB + RocksDB
MongoRocks: What and Why?
Quick Version
Parse has been using MongoDB on RocksDB (MongoRocks) for application data since April, 2015. If you are migrating your Parse app(s) to your own MongoDB infrastructure, we recommend using MongoRocks to take advantage of the increased performance, greater efficiency, and powerful backup capabilities offered by the RocksDB storage engine.
Long Version
In version 3.0, MongoDB introduced the storage engine API to allow users an alternative to the default memory mapped (MMAP) storage engine used by earlier versions of MongoDB. In 2015, Facebook developed a RocksDB implementation of the storage engine API, MongoRocks, which is used by Parse for all customer data. RocksDB is an embeddable persistent key-value store developed by Facebook. It uses a Log-structured Merge Tree (LSM) for storage and is designed for high write throughput and storage efficiency.
Improved Performance and Efficiency
When Parse switched from MMAP to MongoRocks, we discovered the following benefits in our benchmarking:
- 50x increase in write performance
- 90% reduction in storage size
- significantly reduced latency on concurrent workloads due to reduced lock contention
Simple and efficient hot backups
In addition to performance gains, a major advantage of MongoRocks (and RocksDB in general) is very efficient backups that do not require downtime. As detailed in this blog post, RocksDB backups can be taken on a live DB without interrupting service. RocksDB also supports incremental backups, reducing the I/O, network, and storage costs of doing backups and allowing backups to run more frequently. At Parse, we reduced DB infrastructure costs by more than 20% by using MongoRocks, the Strata backup tool, and Amazon S3 in place of MMAP and EBS Snapshots.
Are there any reasons not to use MongoRocks?
Generally speaking, MongoRocks was suitable for running all app workloads at Parse. However, there are some workloads for which LSM are not ideal, and for which better performance may be achieved with other storage engines like MMAP or WiredTiger, such as:
- Applications with high number of in-place updates or deletes. For example, a very busy work queue or heap.
- Applications with queries that scan many documents and fit entirely in memory.
It’s difficult to make precise statements about performance for any given workload without data. When in doubt, run your own benchmarks. You can use the flashback toolset to record and replay benchmarks based on live traffic.
Example: Provisioning on Ubuntu and AWS
There are hundreds of ways to build out your infrastructure. For illustration we use an AWS and Ubuntu configuration similar to that used by Parse. You will need a set of AWS access keys and the AWS CLI.
Choosing Hardware
At Parse, we use AWS i2.* (i/o optimized) class instances with ephemeral storage for running MongoRocks. Prior to this, when we used the MMAP storage engine, we used r3.* (memory optimized) instances with EBS PIOPS storage. Why the change?
- RocksDB is designed to take full advantage of SSD storage. We also experienced large bursts of I/O for some workloads, and provisioning enough IOPS with EBS to support this was expensive. The ephemeral SSDs provided by the i2 class were ideal in our case.
- MongoRocks uses significantly more CPU than MMAP due to compression. CPU was never a major factor in MMAP.
- Memory is less critical in MongoRocks. Memory is everything in MMAP.
- EBS snapshots were critical to our backup strategy with MMAP. With MongoRocks, we had incremental backups with strata, so snapshots were not needed.
If you’re not sure about your workload requirements, we recommend running on the i2 class instances. You can always change this later depending on your production experience.
Below is a general guide for instance sizing based on your existing Parse request traffic:
- < 100 requests/sec: i2.xlarge
- 100-500 requests/sec: i2.2xlarge
- 500+ requests/sec: i2.4xlarge
This guide will use i2.2xlarge as an example.
Provisioning
We recommend you run MongoDB in replica set mode, with at least three nodes for availablity. Each node should run in a separate Availability Zone.
There are dozens of ways to provision hosts in AWS. For reference, we use the AWS CLI below, but the inputs can be easily translated to your tool of choice.
$ SECURITY_GROUP=<my security group ID>
$ US_EAST_1A_SUBNET=<subnet id for us-east-1a>
$ US_EAST_1C_SUBNET=<subnet id for us-east-1c>
$ US_EAST_1D_SUBNET=<subnet id for us-east-1d>
$ aws ec2 run-instances —image-id ami-fce3c696 --instance-type i2.2xlarge --key-name chef3 --block-device-mappings '[{"DeviceName": "/dev/sdb", "VirtualName": "ephemeral0"},{"DeviceName": "/dev/sdc", "VirtualName": "ephemeral1"}]' --security-group-ids ${SECURITY_GROUP} --subnet-id ${US_EAST_1A_SUBNET} --associate-public-ip-address
$ aws ec2 run-instances —image-id ami-fce3c696 --instance-type i2.2xlarge --key-name chef3 --block-device-mappings '[{"DeviceName": "/dev/sdb", "VirtualName": "ephemeral0"},{"DeviceName": "/dev/sdc", "VirtualName": "ephemeral1"}]' --security-group-ids ${SECURITY_GROUP} --subnet-id ${US_EAST_1D_SUBNET} --associate-public-ip-address
$ aws ec2 run-instances —image-id ami-fce3c696 --instance-type i2.2xlarge --key-name chef3 --block-device-mappings '[{"DeviceName": "/dev/sdb", "VirtualName": "ephemeral0"},{"DeviceName": "/dev/sdc", "VirtualName": "ephemeral1"}]' --security-group-ids ${SECURITY_GROUP} --subnet-id ${US_EAST_1D_SUBNET} --associate-public-ip-address
Configuring Storage
The i2.2xlarge and larger instances have multiple ephemeral volumes that should be striped together to produce your data volume. On each host, use mdadm to create the raid volume:
$ sudo apt-get install mdadm
$ sudo mdadm —create /dev/md0 --level=stripe /dev/xvdb /dev/xvdc
$ sudo mkfs -t ext4 /dev/md0
$ sudo mkdir -p /var/lib/mongodb
$ sudo mount /dev/md0 /var/lib/mongodb
Installation
To use MongoRocks, you will need to use a special build of MongoDB that has the storage engine compiled in. At Parse, we run an internally built version, as a pre-packaged version of MongoRocks did not exist when we initially migrated. For new installations, we recommend that you use the Percona builds located here. These builds are 100% feature compatible with the official MongoDB releases, but have been compiled to include the RocksDB storage engine. We have tested the Percona builds with the Parse migration utility and the strata backup software, and verified that both work and are suitable for running Parse apps in production.
Ubuntu installation
$ curl -s -O https://www.percona.com/downloads/percona-server-mongodb/percona-server-mongodb-3.0.8-1.2/binary/debian/trusty/x86_64/percona-server-mongodb-3.0.8-1.2-r97f91ef-trusty-x86_64-bundle.tar
$ tar -xf percona-server-mongodb-3.0.8-1.2-r97f91ef-trusty-x86_64-bundle.tar
$ sudo dpkg -i percona-server-mongodb-*
Configuration
Configuring MongoDB to use the RocksDB storage engine is a matter of setting a few flags in the mongodb.conf file. For complete documentation of all MongoDB configuration options, visit the MongoDB reference page for Configuration File Options.
First, set the storage engine parameter to instruct MongoDB to use the RocksDB storage engine.
storage:
  dbPath: /var/lib/mongodb
  journal:
    enabled: true
  engine: rocksdb
Next, some additional parameters.
# RockDB tuning parameters
# Yield if it's been at least this many milliseconds since we last yielded.
setParameter = internalQueryExecYieldPeriodMS=1000
# Yield after this many "should yield?" checks.
setParameter = internalQueryExecYieldIterations=100000
The adjustments to the internalQueryExecYield* options reduce the frequency that MongoDB yields for writers. Since RocksDB has document level locking, frequent yielding is not necessary.
Startup
When starting MongoRocks on a host for the very first time, your storage directory (e.g. /var/lib/mongodb) should be empty. If you have existing data from other storage engines (i.e. MMAP or WiredTiger), you should back up and remove those data files, as the storage formats are not compatible.
Backups
Installing strata
Strata is written in go. It requires go 1.4 or later to compile. You can use apt or yum to install go, but these packages are frequently out of date on common distributions. To install a more recent version of go:
$ curl https://storage.googleapis.com/golang/go1.5.3.linux-amd64.tar.gz | sudo tar xzf - -C /usr/local
$ sudo mkdir /go
$ sudo chmod 0777 /go
You will need to add go to your PATH environment variable and set GOPATH. On ubuntu, this is as simple as:
$ echo -e 'export PATH="/usr/local/go/bin:${PATH}:" \nexport GOPATH=/go' | sudo tee /etc/profile.d/gopath.sh
After logging in again, you can test that go is installed by running
$ go version
go version go1.5.3 linux/amd64
Installing strata
With go installed, compiling and installing strata is simply a matter of using go install:
$ go get github.com/facebookgo/rocks-strata/strata/cmd/mongo/lreplica_s3storage_driver/strata
$ go install github.com/facebookgo/rocks-strata/strata/cmd/mongo/lreplica_s3storage_driver/strata
This installs the strata binary to $GOPATH/bin/strata
Configuring backups
At Parse, we deployed strata using a simple distributed cron on all backup nodes. You can find a sample cron and and schedule here in the rocks-strata repository.
At a high level, the three things you want to do regularly when running backups with strata are:
- Run
strata backupto create the actual backup. This stores the data files and backup metadata in S3, identified by a unique replica ID. Each host must have its own replica ID. For example, if your RS is named “mydata” and your host name is “db1”, you might use “mydata-db1” as your replica ID. - Run
strata deleteto prune metadata for backups older than a certain date. The retention period that you specify is dependent on your needs. - Run
strata gcto delete data files that are orphaned bystrata delete.
Displaying backups
You can view backup metadata at any time with strata show backups:
For example, to see all backups for node db1 in replica set mydb, you would run something like this:
$ strata --bucket=mybucket --bucket-prefix=mongo-rocks show backups --replica-id=mydb-db1

ID   data                      num files   size (GB)   incremental files   incremental size   duration
0    2015-09-02 21:11:20 UTC   4           0.000005    4                   0.000005           187.929573ms
More documentation on strata, including how to restore backups, can be found here.
Migrating Existing Data to MongoRocks
Moving your Parse app for the first time
If your data is still hosted on Parse, then your job is really easy. Just follow the steps in our migration guide to move your data to your new MongoRocks replica set. We highly recommend that you take steps to secure your MongoDB installation with authentication and encryption. For a list of best security practices, see the MongoDB Security Checklist.
Upgrading an existing replica set to MongoRocks
The data files used by MMAP, WiredTiger, and RocksDB are not compatible. In other words, you cannot start MongoRocks using existing MMAP or Wiredtiger data. To change storage formats, you must do one of the following:
- Do a logical export and import using mongodump and mongorestore.
- Perform an initial sync of data using replication
Option 2 is the easiest, as you can bring a new, empty node online and add it to the replica set without incurring downtime. This approach usually works fine until your data size is in the hundreds of gigabytes. To do so:
- Provision a new node configured for RocksDB, following the above steps.
- Add the node to your replica set using rs.add()
- Wait for initial sync. Note that your data sync must complete before the oplog window expires. Depending on the size of your data, you may need to resize your oplog
Running Parse Server for development
Normally, when you run a standalone Parse Server, the latest release that has been pushed to npm will be used. This is great if you are interested in just running Parse Server, but if you are developing a new feature or fixing a bug you will want to use the latest code on your development environment.
First, you will need to clone this repo if you haven’t done so yet.
git clone https://github.com/ParsePlatform/parse-server.git
You can then link the parse-server module to the cloned repo and run npm install:
npm link parse-server path/to/cloned/repo
npm install
You can now start Parse Server using npm start:
npm start -- --appId APPLICATION_ID --masterKey MASTER_KEY --serverURL http://localhost:1337/parse
Contributing
We really want Parse to be yours, to see it grow and thrive in the open source community. Please see the Contributing to Parse Server notes.