Stay informed
Subscribe to our newsletter if you'd like to stay informed about Shoutem Extensions and Shoutem UI Toolkit.
From Getting started tutorial you might remember a mention of settings pages. Settings pages are web pages that appear in Shoutem builder and you as developer can write them. If you check Extension reference document, you can see that settings pages are defined in pages root field of extension.json and can be referenced on 3 places:
settingsPages in the root of extension.json: array of pages for adjusting global extension settingssettingsPages in shortcuts field: array of pages for adjusting settings for shortcutssettingsPage in screens field: one page for adjusting layout settingsOn each of these places, adjacent property settings can come along which represent default settings these pages will be receive if there are no other settings. Value of property settings is in arbitrary format. Although same in format, each of these 3 places is used for different settings type. You can read more on settings types in reference.
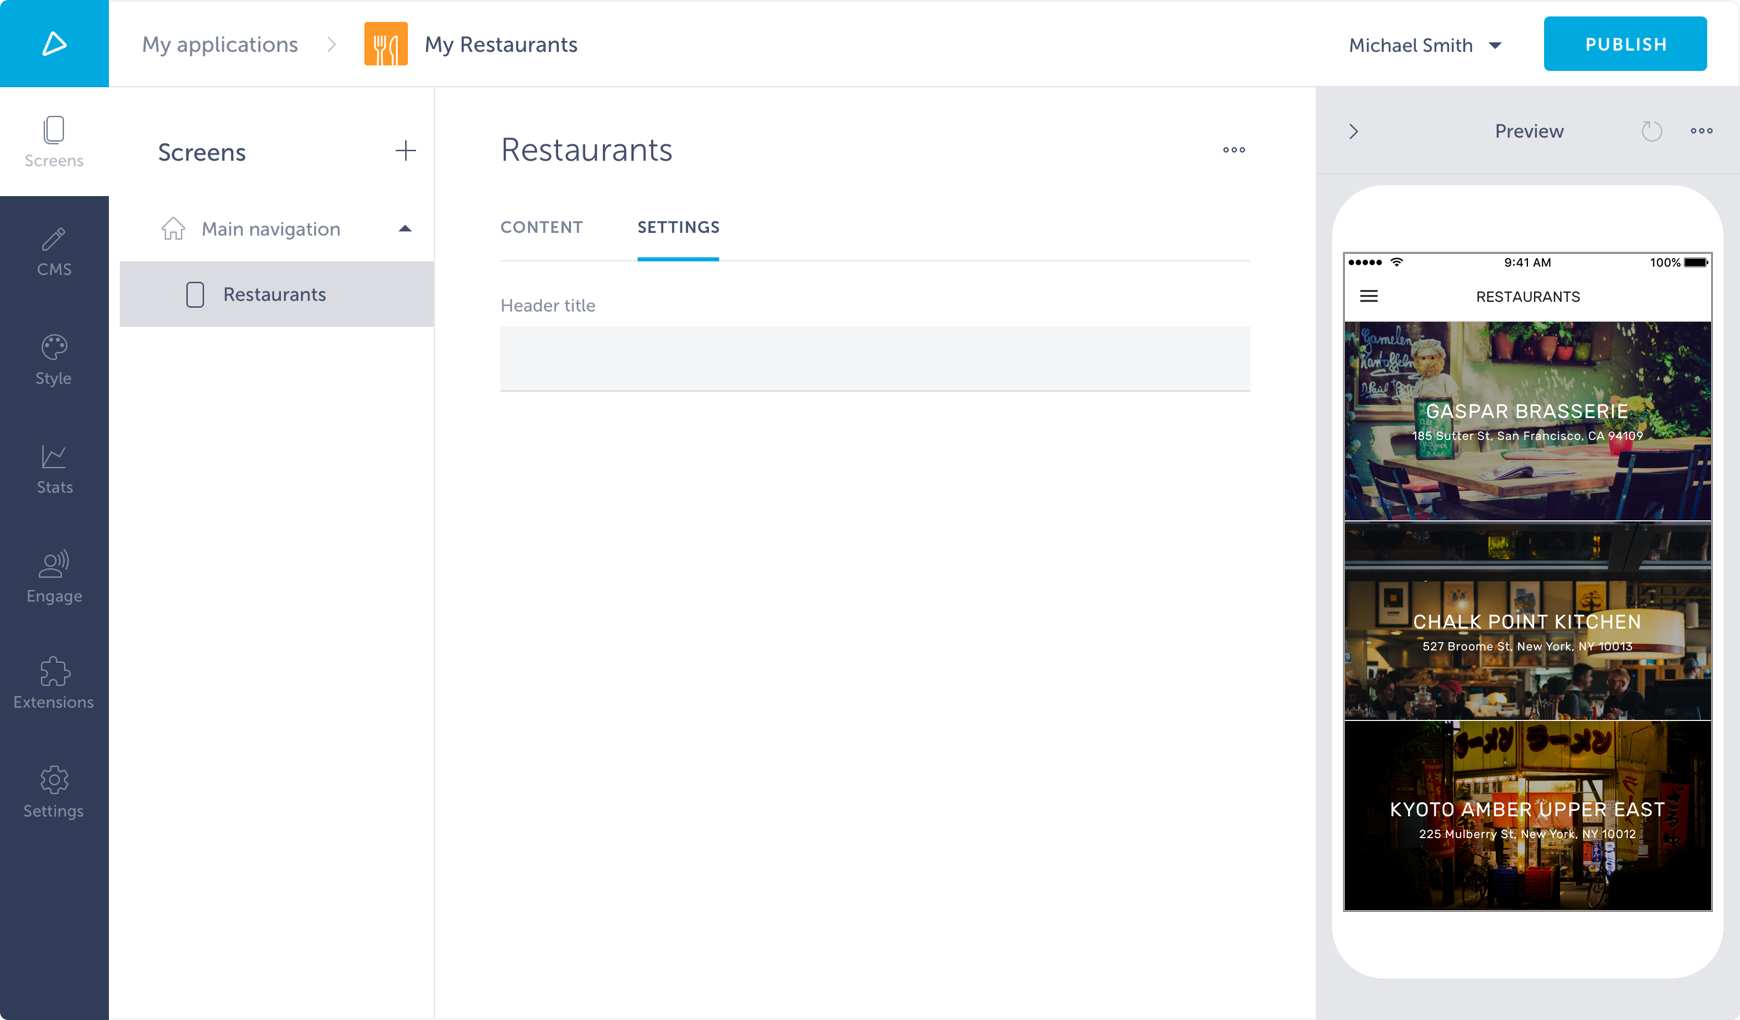
For example, we want to create an extension for restaurants, the same one from Getting started. However, we want to enable application owners (who will use your extension) to customize the header of the list showing restaurants. Until now, it was hardcoded to RESTAURANTS, but with settings pages we can enable the customization of that text.
Note
This tutorial continues on Getting started. If you don’t have an app which is result from Getting started chapter, find the
Restaurantsextension on Github, install it onto new app and fill with some restaurants. If, however, you have this step ready, but passed more tutorials, some code examples will have specifics from those tutorials.
Locate to folder where you keep extension code:
$ cd Restaurants
and create a settings page with RestaurantsPage name:
$ shoutem page add RestaurantsPage
File `server/pages/RestaurantsPage.js` was created!
Your extension.json looks as follows:
#file: extension.json
{
  "name": "restaurants",
  "version": "0.0.1",
  "title": "Restaurants",
  "description": "List of restaurants",
  "shortcuts": [{ ... }],
  "dataSchemas": [{ ... }],
  "screens": [{ ... }],
  "pages": [{
    "name": "RestaurantsPage",
  }]
}
When we initialized extension project, there were some folders, like server/bin and server/build that we didn’t explain in detail. This is the folder structure of server folder what you’re seeing right now:
server/
├ bin/
|  ├ server.js
|  └ webpack.config.js
├ node_modules/
├ schemas/
|  └ Restaurants.json
├ pages/
|  └ RestaurantsPage.js
├ index.js
└ package.json
Apart from schemas folder which is used for data schemas, other files and folders are here to make settings pages easy:
bin folder is containing configuration file (server.js) to allow you to test settings pages locally and a build script (webpack.config.js) which builds server folder and makes it ready to be pushed to Shoutem servernode_modules folder containing npm packages for building settings pagespages folder containing settings pagesindex.js file as starting pointpackage.json file containing usual package information and references to building scriptsThis setup lets you use modern JavaScript (ES6) along with JSX, which we already used in React Native. When making an app we didn’t need special build environment, because the building process of client extension parts was done when app itself was built. Now, however, everything that you submit will be directly shown in the builder, hence we need to prepare it first.
Open now server/pages/RestaurantsPage.js.
#file: server/pages/RestaurantsPage.js
import React from 'react';

export default class RestaurantsPage extends React.Component {
  render () {
    return (
      <div>
        Hello World!
      </div>
    );
  }
}
This code represents the default root settings page component. To see it in the builder, export it in index.js with the same name, as it has in extension.json and reference it on one of the 3 settings pages places. To enable owners to set restaurants’ list title per shortcut instance, reference settings page in shortcuts field. For more details on settings pages types, check the reference.
First, export the page:
#file: server/index.js
import RestaurantsPage from './pages/PageName.js';

export pages = {
  RestaurantsPage
}

export reducer = {};
… and then use it in extension.json.
#file: extension.json
{
  "name": "restaurants",
  "version": "0.0.2",
  "title": "Restaurants",
  "description": "List of restaurants",
  "shortcuts": [{
    "name": "openRestaurantsList",
    "title": "Restaurants",
    "description": "Allow users to browse through list of restaurants"
    "screen": "@.RestaurantsList",
    "settingsPages": [{
      "page": "shoutem.cms.CmsPage",
      "title": "Content",
      "parameters": {
        "schema": "@.Restaurants"
      }
    }, {
      "page": "@.RestaurantsPage",
      "title": "Settings"
    }],
    "settings": {
      "headerTitle": "RESTAURANTS"
    }
  }],
  "screens": [{ ... }],
  "dataSchemas": [{ ... }],
  "pages": [{
    "name": "RestaurantsPage"
  }]
}
Notice that we’ve set default setting headerTitle to RESTAURANTS. We’ve also increased version to 0.0.2 in case you’ve already published the extension. Push the new version.
$ shoutem push
Uploading `Restaurants` extension to Shoutem...
Success!
Check Screens tab under the Shoutem builder. Under Restaurants shortcut in app structure, on the right side, there are 2 settings pages with their navigation items: Content and Settings. Click on Settings to see your Hello World!

Let’s now add text input component that will enable owners to customize the header of the list. Use React Bootstrap to build UI, which was already installed on extension initialization. Shoutem Builder is styling React Bootstrap components, so using those components will make design of your pages match Shoutem design for maximal user experience.
#file: server/pages/RestaurantsPage.js
import React from 'react';
import {
  FormGroup,
  ControlLabel,
  FormControl,
  Button
} from 'react-bootstrap';

export default class RestaurantsPage extends React.Component {
  render () {
    return (
      <form>
        <FormGroup>
          <ControlLabel>Insert the title of header:</ControlLabel>
        </FormGroup>
        <FormControl
          type="text"
          placeholder="Header title"
        />
        <Button
          type="submit"
        >
          SUBMIT
        </Button>
      </form>
    );
  }
}
Push the extension:
$ shoutem push
Uploading `Restaurants` extension to Shoutem...
Success!
This is how the settings page looks now.
Input is added, but clicking the button still doesn’t set anything. We need to add the logic of setting the header and change it in the application. For communication with the application, settings pages use @shoutem/builder-sdk.
Settings pages, as the name says it, set some settings of the app. As we said on the beginning, there are 3 types of settings: extension settings, shortcut settings and screen settings. We agreed to use shortcut settings to set the title of list. For that, we’ll use setShortcutSettings action creator from @shoutem/builder-sdk package. That package was also already installed on the extension initialization.
Use redux library which provides a way for updating the application state. Every root settings page component gets props object. Root component of a shortcut settings page gets both extension and shortcut objects in their prop. In this case, we need get settings from props.shortcut.settings.
To set shortcut settings, dispatch setShortcutSettings action creator bounded in connect method.
#file: server/pages/RestaurantsPage.js
import React from 'react';
import {
  connect
} from 'react-redux';
import {
  FormGroup,
  ControlLabel,
  FormControl,
  Button
} from 'react-bootstrap';
import {
  setShortcutSettings
} from '@shoutem/builder-sdk'

class RestaurantsPage extends React.Component {
  constructor(props) {
    super(props);

    this.onButtonClick = this.onButtonClick.bind(this);
  }

  onButtonClick() {
    const { shortcut } = this.props;
    const newSettings = Object.assign({}, shortcut.settings);
    newSettings.headerTitle = this.refs.headerTitle.value;

    setShortcutSettings(newSettings);
  }

  render () {
    const { settings } = this.props.shortcut;

    return (
      <form>
        <FormGroup>
          <ControlLabel>Insert the title of header:</ControlLabel>
        </FormGroup>
        <FormControl
          type="text"
          ref="headerTitle"
          placeholder="Header title"
          value={settings.headerTitle}
        />
        <Button
          onClick={this.onButtonClick}
          type="submit"
        >
          SUBMIT
        </Button>
      </form>
    );
  }
}

export connect(undefined, {
  setShortcutSettings
})(RestaurantsPage);
Notice that we’ve used headerTitle as a value for FormControl, which will be set to RESTAURANTS on the initial settings page load as defined in default settings.
Only thing left to do is to update the client side. Every screen that is being opened by shortcut, will get 4 props:
children: screen components of nested shortcuts,
setNavBarProps: function for setting NavBar component,
extension: extension object and
shortcut: shortcut instance object.
Let’s use this shortcut settings in the RestaurantsList screen.
#file: app/screens/RestaurantsList.js
import React, {
  Component
} from 'react';
import {
  TouchableOpacity,
} from 'react-native';
import {
  Image,
  ListView,
  Text,
  Tile,
  Title,
  Subtitle,
  Overlay,
  Divider
} from '@shoutem/ui';

import {
  find,
  isBusy,
  shouldRefresh,
  getCollection
} from '@shoutem/redux-io';

import { connect } from 'react-redux';
import { navigateTo } from '@shoutem/core/navigation';
import { ext } from '../const';

class RestaurantsList extends Component {
  constructor(props) {
    super(props);

    this.renderRow = this.renderRow.bind(this);
  }

  componentDidMount() {
    const { find, restaurants } = this.props;
    if (shouldRefresh(restaurants)) {
      find(ext('Restaurants'), 'all', {
          include: 'image',
      });
    }
  }

  renderRow(restaurant) {
    const { navigateTo } = this.props;

    return (
      <TouchableOpacity onPress={() => navigateTo({
        screen: ext('RestaurantDetails'),
        props: { restaurant }
      })}>
        <Image styleName="large-banner" source=>
          <Tile>
            <Title>{restaurant.name}</Title>
            <Subtitle>{restaurant.address}</Subtitle>
          </Tile>
        </Image>
      </TouchableOpacity>
    );
  }

  render() {
    const { restaurants, setNavBarProps, shortcut } = this.props;

    // set the title in the Navigation bar
    setNavBarProps({
      title: shortcut.settings.headerTitle
    });

    return (
      <ListView
        data={restaurants}
        status={isBusy(restaurants)}
        renderRow={restaurant => this.renderRow(restaurant, navigateTo)}
      />
    );
  }
}

export default connect(
  (state) => ({
    restaurants: getCollection(state[ext()].allRestaurants, state)
  }),
  { navigateTo, find }
)(RestaurantsList);
Push the extension:
$ shoutem push
Uploading `Restaurants` extension to Shoutem...
Success!
… and we’re done!